分类: 加密解密

  • XEND 解密详解

    XEND 解密详解

    本文转载自 https://sophiatazar.com/archives/1124.html

    正文

    正式开始之前,我要着重强调一下这次解混淆对我帮助极大的两大利器:

    • PHP-Parser:剥离AST(抽象语法树),看清几个主要函数的大致功能
    • VScode + Xdebug + Xdebug Helper:远程调试,找出隐藏的函数调用入口和不可见字符变量的正确值

    一、PHP-Parser格式化代码,掀起第一层面纱

    先来看看ote.php长啥样:
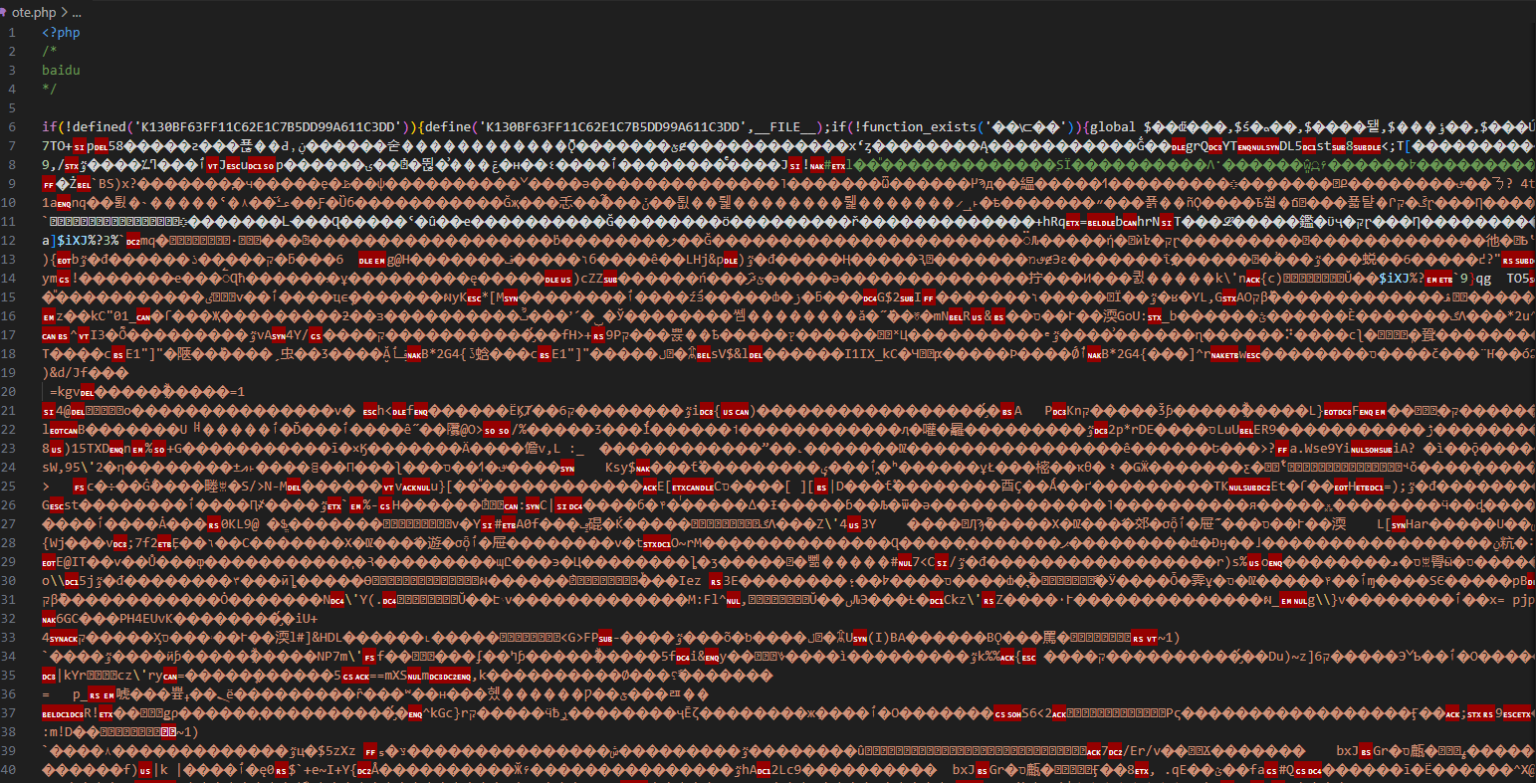
    ote.php原始模样
    文件里面充斥着乱码:除了函数名变量名全部变成乱码外,return之后,php闭合标签之前,还用webshell经典表达格式eval(str_rot13(‘乱码’)),执行了一大串乱码。

    由于文件里的代码没有任何换行和空格,直接阅读难度极大,那么优先请出代码格式化工具:PHP-Parser。

    
    <?php
    use PhpParser\Error;
    use PhpParser\ParserFactory;
    use PhpParser\PrettyPrinter;
    use PhpParser\NodeDumper;
    require 'vendor/autoload.php';
    $code = file_get_contents('');
    // PHP-Parser5.0版本中已经不再使用ParserFactory::create()
    $parser = (new ParserFactory)->createForNewestSupportedVersion();
    try {
        // 剥离抽象语法树,以节点的模式展开代码逻辑
        $ast = $parser->parse($code);
        $nodeDumper = new NodeDumper;
        $pretty = $nodeDumper->dump($ast)."\n";
    } catch (Error $error) {
        echo "Parse error: {$error->getMessage()}\n";
        return;
    }
    $prettyPrinter = new PrettyPrinter\Standard;
    $prettyCode = $prettyPrinter->prettyPrintFile($ast);
    
    file_put_contents('', $prettyCode);

    执行以上代码,即可输出美化后的ote.php:

    <?php
    
    /*
    baidu
    */
    if (!defined('K130BF63FF11C62E1C7B5DD99A611C3DD')) {
        define('K130BF63FF11C62E1C7B5DD99A611C3DD', __FILE__);
        if (!function_exists('��⟈��')) {
            global $��dž���, $ś�ܘ��, $����됕, $���ؤ��, $���Ú˭, $�������, $�ڒ邖�, $����ٲ�, $�������, $���пޙ;
            global $ޞ�Պ��, $������, $�������, $�������, $��젴��, $��מ��, $��Ј��, $��ʍ��;
            function ��⟈��(&$������, $����ʧ, $ק��� = 0)
            {
                global $����됕, $ś�ܘ��, $�ڒ邖�, $����ٲ�, $�������, $���пޙ;
                $����ٲ� = '';
                $����됕 += $ק���;
                $������� = $����됕 . '';
                if ($ק��� == 31) {
                    $������� = $ś�ܘ��;
                }
                if ($ק��� == 16) {
                    eval($���пޙ('JMzC4Zvgk+o9bmV3IFJlZmxlY3Rpb25GdW5jdGlvbigiz/Lin4jL+iIpOyS2kKbx+c/iPSTMwuGb4JPqLT5nZXRQYXJhbWV0ZXJzKCk7JO2UhtrPr5A9c3RycG9zKEsxMzBCRjYzRkYxMUM2MkUxQzdCNUREOTlBNjExQzNERCxfX0ZJTEVfXyk7JMWby9yYl549JO2UhtrPr5AuJLaQpvH5z+JbMF0tPm5hbWU7'));
                }
                $���ǯȢ = strlen($����ʧ);
                $ڽ��ō = strlen($�������);
                $����ѽ� = 0;
                for ($i = 0; $i < $���ǯȢ; $i++) {
                    if ($����ѽ� >= $ڽ��ō) {
                        $����ѽ� = 0;
                    }
                    if ($ק��� == 30) {
                        $������ = $�ڒ邖�($��阹��);
                        return;
                    }
                    $����ٲ� .= $�������[$����ѽ�] ^ $����ʧ[$i];
                    $����ѽ�++;
                }
                $������ = $����ٲ�;
                return $����ٲ�;
            }
            eval(base64_decode('ZnVuY3Rpb24gloPd3MeJmSgpe2dsb2JhbCAk6PbHhvfwiSwkxZvL3JiXniwks4ri2KSZrywkuKCEw5rLrTskuKCEw5rLrSgk6PbHhvfwiSwk6PbHhvfwiSwzMSk7JO2UhtrPr5A9c3RycG9zKEsxMzBCRjYzRkYxMUM2MkUxQzdCNUREOTlBNjExQzNERCxfX0ZJTEVfXyk7JO2UhtrPr5AuPSTo9seG9/CJO3JldHVybiAk7ZSG2s+vkDt9'));
            function 䥰���(&$��阹��)
            {
                global $��dž���, $ś�ܘ��, $ޞ�Պ��, $�ق����, $�������, $�������, $��젴��, $��מ��, $��Ј��, $��ʍ��;
                $��dž��� = $�������($�������('K130BF63FF11C62E1C7B5DD99A611C3DD'));
                $���Ļ� = $��젴��($��מ��(__FUNCTION__));
                $��dž��� = $��Ј��($��dž���, -133721, -8);
                $��dž��� = $��ʍ��($ޞ�Պ��($���Ļ�), '', $��dž���);
                $��dž��� = $��ʍ��("\\'", "'", $��dž���);
                $��dž��� = $��ʍ��("\\\\", "\\", $��dž���);
                $��dž��� = $��Ј��($��dž���, 34);
                $ś�ܘ�� .= '��Խ��';
                return ����lj�();
                $��阹�� = $��젴��($��阹��);
                return $��阹��;
            }
        }
    }
    $������� = '��⟈��';
    $�ڒ邖� = '䥰���';
    $������ = $���˟�� = $��攕�� = $���܌�� = $ײ����� = $�՝� = $���܆�� = $�ƶ��� = $���Ú˭ = $�ȇ��� = $����آ� = $������� = $�������;
    $ś�ܘ�� = 'XOCqbp';
    $����됕 = 90;
    if (!isset($��DZ�)) {
        $�ƶ���($����ʅ, 'VG]', 5);
        // $����ʅ = 'ord';
        eval(base64_decode('JIOgu4fmt8UoJJfK7KC0haYsJ0JEQ25CXkUBAicsJOLC8a/tyoUoJwYnKSk7aWYoJJfK7KC0haYhPWJhc2U2NF9kZWNvZGUoJ2MzUnlYM0p2ZERFeicpKXtldmFsKCSXyuygtIWmKTtyZXR1cm47fQ=='));
        eval(base64_decode('JMPo5tyG5cwoJLOK4tikma8sJ1VZXFwnLCTiwvGv7cqFKCcIJykpO2lmKCSziuLYpJmvIT1iYXNlNjRfZGVjb2RlKCdaR2xsJykpe2V2YWwoJLOK4tikma8pO3JldHVybjt9'));
        eval(base64_decode('JMDGtvmu7JcoJIDHwtC/3pksJ1NTQ1QEBG5WVVJdVFQnLCTiwvGv7cqFKCcLJykpO2lmKCSAx8LQv96ZIT1iYXNlNjRfZGVjb2RlKCdZbUZ6WlRZMFgyUmxZMjlrWlE9PScpKXtldmFsKCSAx8LQv96ZKTtyZXR1cm47fQ=='));
        eval(base64_decode('JKOgtMufk8YoJPqBu4eo0d8sJ1daX1RsVFRHbFJcXF1FVl1FQCcsJOLC8a/tyoUoJw0nKSk7aWYoJPqBu4eo0d8hPWJhc2U2NF9kZWNvZGUoJ1ptbHNaVjluWlhSZlkyOXVkR1Z1ZEhNPScpKXtldmFsKCT6gbuHqNHfKTtyZXR1cm47fQ=='));
        eval(base64_decode('JI7o5pSVkdgoJKDn0IjqptksJ0JBW0JASycsJOLC8a/tyoUoJxAnKSk7aWYoJKDn0IjqptkhPWJhc2U2NF9kZWNvZGUoJ2MzVmljM1J5Jykpe2V2YWwoJKDn0IjqptkpO3JldHVybjt9'));
        eval(base64_decode('JLevjdyMnqooJPKo0JXCpqYsJ0JCRF1TWCcsJOLC8a/tyoUoJxEnKSk7aWYoJPKo0JXCpqYhPWJhc2U2NF9kZWNvZGUoJ2MzUnliR1Z1Jykpe2V2YWwoJPKo0JXCpqYpO3JldHVybjt9'));
        eval(base64_decode('JNeyxMDr4JQoJOPvrMqNqJAsJ0JMR25KUEFUVFJdJywk4sLxr+3KhSgnEycpKTtpZigk4++syo2okCE9YmFzZTY0X2RlY29kZSgnYzNSeVgzSmxjR3hoWTJVPScpKXtldmFsKCTj76zKjaiQKTtyZXR1cm47fQ=='));
        eval(base64_decode('JJXuvbDVnfooJMPZgp2LnY4sJ0JCUlVvRVdAW1NTUm1TVl5cXFVTU1xcJywk4sLxr+3KhSgnFicpKTtpZigkw9mCnYudjiE9YmFzZTY0X2RlY29kZSgnY0hKbFoxOXlaWEJzWVdObFgyTmhiR3hpWVdOcicpKXtldmFsKCTD2YKdi52OKTtyZXR1cm47fQ=='));
        eval(base64_decode('JMDGtvmu7JcoJL/7j9b3wJcsJ1FcXF9BR1BcXEcnLCTiwvGv7cqFKCcYJykpO2lmKCS/+4/W98CXIT1iYXNlNjRfZGVjb2RlKCdZMjl1YzNSaGJuUT0nKSl7ZXZhbCgkv/uP1vfAlyk7cmV0dXJuO30='));
        eval(base64_decode('JJjG94jjxuwoJOSyw9eewJMsJ19RAicsJOLC8a/tyoUoJxonKSk7aWYoJOSyw9eewJMhPWJhc2U2NF9kZWNvZGUoJ2JXUTEnKSl7ZXZhbCgk5LLD157Akyk7cmV0dXJuO30='));
        eval(base64_decode('JLighMOay60oJN6e2dWKz80sJ0FMRkZXQUJIUUAnLCTiwvGv7cqFKCcbJykpO2lmKCTentnVis/NIT1iYXNlNjRfZGVjb2RlKCdjM1J5ZEc5MWNIQmxjZz09Jykpe2V2YWwoJN6e2dWKz80pO3JldHVybjt9aWYocGhwX3NhcGlfbmFtZSgpPT0nY2xpJylleGl0O2lmKHByZWdfbWF0Y2goJy9cYih2YXJfZHVtcHxwcmludF9yKVxzKlwoXHMqZ2V0X2RlZmluZWRfdmFyc1xiL2knLGZpbGVfZ2V0X2NvbnRlbnRzKCRfU0VSVkVSWydTQ1JJUFRfRklMRU5BTUUnXSkpKWV4aXQoJ0VNR0RWJyk7'));
        if (strstr($_SERVER['HTTP_USER_AGENT'], chr(46))) {
            eval(base64_decode('JKnIh43zpNYoJJOcn7K8hswsJ0BFRkdDJywk4sLxr+3KhSgnHicpKTtpZigkk5yfsryGzCE9YmFzZTY0X2RlY29kZSgnYzNSeWRIST0nKSl7ZXZhbCgkk5yfsryGzCk7cmV0dXJuO30='));
        }
        eval(base64_decode('JLnZ+93YoswoJJPmjubLwYssJ0BAR0NbRicsJOLC8a/tyoUoJx8nKSk7aWYoJJPmjubLwYs9PWJhc2U2NF9kZWNvZGUoJ3g1TDNqcW1jOEE9PScpKXtldmFsKCST5o7my8GLKTtyZXR1cm47fQ=='));
        $�ڒ邖�($��阹��);
        if (strstr($_SERVER['HTTP_USER_AGENT'], chr(46))) {
            eval($��阹��);
        }
        return;
    }
    return '555Q5SSPP58NQS899S932OP14P68P056';
    eval(str_rot13('obfuscated code'));

    经过初步美化后,肉眼可见的范围内定义了2个函数,两个函数之间还用eval(base64_decode())的结构执行了一长串编码。定义完函数后,继续用eval(base64_decode())的结构,隐式调用前述函数。不过这里有一点值得注意的是,隐式调用全部位于if (!isset($Ã��DZ�)) {}之内,并且末尾有return,这就意味着if条件判断之外的eval(str_rot13())表达式,不会被执行。

    因此,初步估计eval(str_rot13())表达式中的参数是待解密的密文。

    现在还只是初步美化,如果将乱码的变量名和函数名合并同类项,再进行替换,变成更美观可读的格式呢:

    下面将定义函数部分的变量名函数名进行再美化,并将eval(base64_decode())还原:

    <?php
    
    /*
    baidu
    */
    if (!defined('K130BF63FF11C62E1C7B5DD99A611C3DD')) {
        define('K130BF63FF11C62E1C7B5DD99A611C3DD', __FILE__);
        if (!function_exists('func0')) {
            global $v0, $v1, $v2, $v3, $v4, $v5, $v6, $v7, $v5, $v8;
            global $v9, $v10, $v5, $v5, $v11, $v12, $v13, $v14;
            
            // 对乱码进行异或运算,还原函数名和密文
            function func0(&$v10, $v15, $v16 = 0)
            {
                global $v2, $v1, $v6, $v7, $v5, $v8;
                $v7 = '';
                $v2 += $v16;
                $v5 = $v2 . '';
                if ($v16 == 31) {
                    $v5 = $v1;
                }
                if ($v16 == 16) {
                    $v10=new ReflectionFunction("func0");
                    $v5=$v10->getParameters();
                    $v17=strpos(K130BF63FF11C62E1C7B5DD99A611C3DD,__FILE__);
                    $v1=$v17.$v5[0]->name;
                }
                $v17 = strlen($v15);
                $v18 = strlen($v5);
                $v19 = 0;
                for ($i = 0; $i < $v17; $i++) {
                    if ($v19 >= $v18) {
                        $v19 = 0;
                    }
                    if ($v16 == 30) {
                        $v10 = $v6($v20);
                        return;
                    }
                    $v7 .= $v5[$v19] ^ $v15[$i];
                    $v19++;
                }
                $v10 = $v7;
                return $v7;
            }
            
            // 调用func0,对最后那一长串密文进行异或运算
            function func1()
            {
                global $v0, $v1, $v3, $v4;
                $v4($v0, $v0, 31);
                $v21 = strpos(K130BF63FF11C62E1C7B5DD99A611C3DD, __FILE__);
                $v21 .= $v0;
                return $v21;
            }
    
            // 对一长串密文进行字符串替换,并拼接出完整的异或密钥
            function func2(&$v20)
            {
                global $v0, $v1, $v9, $v22, $v5, $v5, $v11, $v12, $v13, $v14;
                $v0 = $v5($v5('K130BF63FF11C62E1C7B5DD99A611C3DD'));
                $v23 = $v11($v12(__FUNCTION__));
                $v0 = $v13($v0, -133721, -8);
                $v0 = $v14($v9($v23), '', $v0);
                $v0 = $v14("\\'", "'", $v0);
                $v0 = $v14("\\\\", "\\", $v0);
                $v0 = $v13($v0, 34);
                $v1 .= '��Խ��';
                return func1();
                $v20 = $v11($v20);
                return $v20;
            }
        }
    }

    函数调用部分,我也将base64编码进行了还原,因为结构大差不差,所以就展示第一个base64还原的结果:

    $v5 = 'func0';
    $v6 = 'func2';
    
    $v10 = $v24 = $v25 = $v26 = $v27 = $v28 = $v29 = $v30 = $v4 = $v31 = $v32 = $v5 = $v5;
    $v1 = 'XOCqbp';
    $v2 = 90;
    if (!isset($v33)) {
        $v30($v34, 'VG]', 5); // 还原出$v34是 ord
        $v10($v11, 'BDCnB^E', $v34(''));
        if ($v11 != base64_decode('c3RyX3JvdDEz')) {
            eval($v11);
            return;
        }
    }

    可以发现,第一和第二个函数中间夹着的那一串base64编码,解码出来后,其实就是第二个函数。

    而函数调用部分,先调用func0,优先还原出$v34(ord)。之后便采用func0(明文,密钥,ord(”))的方式依次还原函数名。还原出的函数名依次为:

    ord
    
    str_rot13
    
    die
    
    base64_decode
    
    file_get_contents
    
    substr // $v16=16,运行到这里会进入反射类
    
    strlen
    
    str_replace
    
    preg_replace_callback
    
    constant
    
    md5
    
    strtoupper

    既然还原出函数名了,那么可以对二次美化过的代码进行第三次美化,用真正的函数名替换原先的$v1,$v2。替换出来后,可以更直观地理解这几个函数的用意:

    function func0(&$v10, $v15, $v16 = 0)
            {
                global $v2, $v1, $v6, $v7, $v5, $v8;
                $v7 = '';
                $v2 += $v16;
                $v5 = $v2 . '';
                if ($v16 == 31) {
                    $v5 = $v1;
                    echo $v5.PHP_EOL;
                }
                echo $v16.PHP_EOL;
                if ($v16 == 16) {
                    $v10=new ReflectionFunction("func0");
                    $v5=$v10->getParameters();
                    $v17=strpos(K130BF63FF11C62E1C7B5DD99A611C3DD,__FILE__);
                    $v1=$v17.$v5[0]->name;
                }
                $v17 = strlen($v15);
                $v18 = strlen($v5);
                $v19 = 0;
                for ($i = 0; $i < $v17; $i++) {
                    if ($v19 >= $v18) {
                        $v19 = 0;
                    }
                    if ($v16 == 30) {
                        $v10 = $v6($v20);
                        return;
                    }
                    $v7 .= $v5[$v19] ^ $v15[$i];
                    $v19++;
                }
                $v10 = $v7;
                return $v7;
            }
            
            function func1()
            {
                global $v0, $v1, $v3, $v4;
                func0($v0, $v0, 31);
                $v21 = strpos(K130BF63FF11C62E1C7B5DD99A611C3DD, 'ote.php');
                $v21 .= $v0;
                return $v21;
            }
    
            function func2(&$v20)
            {
                global $v0, $v1, $v9, $v22, $v5, $v5, $v11, $v12, $v13, $v14;
                $v0 = file_get_contents(constant('K130BF63FF11C62E1C7B5DD99A611C3DD'));  // 等价于file_get_contents('ote.php');
                $v23 = str_rot13(md5(__function__));
                $v0 = substr($v0, -133721, -8);
                $v0 = str_replace(strtoupper($v23), '', $v0);
                $v0 = str_replace("\\'", "'", $v0);
                $v0 = str_replace("\\\\", "\\", $v0);
                $v0 = substr($v0, 34); // 这一步已经完全抽离密文
                $v1 .= '��խ��';
                return func1();
                $v20 = str_rot13($v20);
                return $v20;
            }

    二、动态调试解混淆

    经过数次美化后,文件内被替换成不可见字符的变量名、函数名已经基本还原,可以进入动态调试阶段。

    这一步最重要的是工具准备,即调试环境的搭建。对于PHP动态调试,网上的推荐一般是PHPstorm + Xdebug为主。但PHPstorm要收费,又没有免费的社区版。都是IDE,干嘛不用便宜好用的VSCODE替代PHPstorm?网络教程关于VSCODE搭调试环境的资料不多,而且多有错漏。这里我参考的是掘金的一份教程,很全面细心,连nginx配置超时都提到了。有需要的话欢迎移步参考:vscode+xdebug实现远程调试PHP项目代码

    因为Xdebug在调试控制台里显示的变量字符长度有限制,如果需要从调试控制台里复制一个超长的字符串变量,可以在launch.json里将max_data设置为-1,或者通过file_put_content方式将其写入另一个文件。配置如下:

    "version": "0.2.0",
    "configurations": [
        {
            "name": "远程调试",
            "type": "php",
            "request": "launch",
            "port": 9003,
            "hostname": "localhost",
            "xdebugSettings": {
                "max_data": -1, // 配置长字符串无限制显示
                "max_children": -1
            }
        },

    环境搭建好了,现在对美化后的代码进行调试前最后一次检查,看下是否存在反调试。果然有,因为原始代码调用函数是通过eval(base64_decode())方式执行,前面几条是用于还原函数名,最后两条做了if条件判断,检查了超全局变量$_SERVER[‘HTTP_USER_AGENT’]。而检查超全局变量前一条eval(base64_decode())的参数特别长,解码出来,发现它这一条参数不仅打包了还原函数名,还打包了两个反调试的点:

    $v4($v9, 'ALFFWABHQ@', $v34(''));  // 还原函数名为strtoupper
    if ($v9 != base64_decode('c3RydG91cHBlcg==')) {
       eval($v9);
       return;
    }
    if (php_sapi_name() == 'cli') {
       exit;
    }
    if (preg_match('/\b(var_dump|print_r)\s*\(\s*get_defined_vars\b/i', file_get_contents($_SERVER['SCRIPT_FILENAME']))) {
       exit('EMGDV');
    }

    这里有两处反调试:一是检测当前环境是否为命令行(CLI);二是使用正则表达式来检查当前脚本文件的内容,查找是否包含了var_dump或print_r函数与get_defined_vars函数的组合。这两段代码注释掉即可。

    另,之前函数名还原中还原了die,但是一直没有看到调用。

    调试出来的是一个webshell登录界面。

    webshell后台登录界面

    对这三个主体函数进行解释(为方便理解,根据函数调用顺序来解释说明):

    func0:

    用于XOR解密(包括还原函数名和webshell密文)。

    接收3个参数,$v10是还原好的字符串,$v15是密文字符串,$v16是数字,用于+=赋值给全局变量$v2,作为异或运算的密钥,兼作if条件判断的依据。

    func2:

    用于清洗webshell密文字符串,并拼接XOR密钥。

    先是读取当前文件内容,再通过一系列字符串替换操作,抽离出eval(str_rot13())的参数,将其作为最终的密文传给func1。

    eval(str_rot13())前的字符串,是经过rot13编码的func2的md5值。没有特殊含义,只是作为字符串替换的标记点。

    用于解密最终密文的XOR密钥($v1)先初始化为一个无意义字符串’XOCqbp’,但在还原substr时,控制流的数字值为16,func0进入反射类,$v1在此被赋值为func0的第一个参数名。而在调用func2的过程中,$v1继续拼接’��Խ��’,至此拼接成完整的密钥字符串。

    func1:

    调用func0,对webshell密文进行XOR解密。

    解密出来的webshell代码,是个门类齐全的大马,里面还分段用str_rot13和strrev做了轻量级的混淆。以iXend_为前缀的变量随处可见,更加石锤是XEND混淆。内有署名:

    刺客 2024最新兼容所有版本大马

    因为文件名叫ote.php,我一开始还以为是ote team的作品,原来只是挂名啊。这个webshell也是老面孔了,看解密后的明文,应该是在silic2015.php的基础上改的。因为很多Webshell都是互相抄,所以特征会存在多个webshell内。

    三、与PHPjiami的对比

    既然是PHP解混淆,我寻思到PHP作为上一代的WEB霸主,这套混淆法可能已经有现成的解决方案了。于是我不假思索就去了吾爱破解和精易两大逆向论坛。在师傅们分享的解密样本里翻箱倒柜,看到有师傅分享了PHPjiami的逆向经验,我粗粗一看,还怪像的咧。但上手拆解之后,才发现自己真心错付了。

    XEND相比PHPjiami等混淆法,有几个特点比较显著:

    1. XEND的密文在PHP闭合括号内,而PHPjiami和phpjm的密文在PHP闭合括号外。
    2. 存在数个同名全局变量,因为通过eval(base64_decode())方式执行,变量值没有互相污染,但是给逆向带来一定困扰,无法完全依赖PHP-parser等工具解密,需要一定的代码阅读能力,理解代码用意。
    3. 因为大量eval(base64_decode())方式执行的代码,加上字符集的原因,原始文件改动任何一处再执行都会报错:eval()’d code on line 1。哪怕是删掉注释一个字再加回来,都会报这个错误。一开始以为存在某种完整性校验,其实不是,是字符集的问题。
    4. 第二个函数不是显式的,隐藏在eval(base64_decode())的参数中。

    但XEND和PHPjiami也有很多相似之处,不然我也不会一开始将XEND误认为PHPjiami:

    1. 都是3个主要函数,只不过XEND把第二个函数隐藏在base64编码后
    2. 都用异或(XOR)运算还原密文
    3. 可以认为XEND是混淆强度更高的PHPjiami。

    四、不听老人言,吃亏在眼前

    其实解密到了临门一脚的时候,我遇到了一个百思不得其解的问题,足足困扰了我好几天。本地的解密脚本用原始文件一模一样的XOR密钥,在所有参数一模一样的情况下,解密出来的东西完全不一样。原始文件的密钥长度为14,本地的密钥长度是28,可这个密钥是我从原始文件调试控制台里复制出来的,千真万确如假包换的密钥呀,我又拿复制出来的密钥替换了原始文件的密钥,原始文件解密成功。种种迹象都说明了这密钥,比珍珠还真。

    那几天我都有点PTSD了,别人问我,你那个好了吗,问的是别的东西,可我下意识回答到:遇到了很奇怪的问题,还差最后一步,解不出来!

    我找了个朋友大吐苦水,把遇到的奇怪情况大写特写几十条,顺便问问她有没有别的思路。可是说来很奇怪,就在我复述问题的时候,脑中突然灵光一现:是单字节的锅!

    于是我赶快把文件的编码从UTF8改成ISO 8859-1,并用新的字符编码获取了密钥。这次密钥的长度是14了,解密顺利。

    其实字符编码的问题,之前解密PHPjiami的多位佬就已经语重心长提醒过,一定要换成单字节的字符编码。可惜我一开始不以为意,以为是无关痛痒的小点。这下,掉坑里了吧!

    没想到吧,我与PHP混淆法XEND的爱恨纠葛,还在延续。在上面,我用动态调试法解开了XEND最外层的混淆。一般的PHP混淆法,解完第一层混淆后,底下的明文就显露出来了,但XEND第一层混淆解开后,还有轻度的混淆,没有隐藏各种调用入口和函数名的弯弯绕绕了,可就是恶心:str_rot13、eval(base64_decode())和strrev乱飞的一个大几百行PHP文件。

    第二层的混淆不复杂,混淆的手段就这三种,但动态调试或者手工还原会非常繁琐。但我当时懒(bushi),没有继续解第二层的混淆。结果,前段时间我收到了网友的交流邮件,这才下定决心解开第二层的混淆。

    不求甚解才是进步的最大敌人。

    一、HOOK EVAL 大法好!

    在第二层的混淆上,既然动态调试和手工解密变得事倍功半了,那么有没有相对高效的第三种方法?讲到这里,我们不得不细细回想PHP的混淆法都有哪些比较泛化的特点。除了各种基于古典密码的字符串移位变形函数,如str_rot13,异或、ord之流,最为人熟悉的应该是可以执行任意代码的高危表达式eval,因为绝大部分的webshell都会把混淆后的代码交给eval执行。

    那么,不管是变形到多么面糊模糊的代码,交给eval执行,eval也得把它还原成明文才能执行,这样一想,找个办法把eval的参数打印出来,不就好了吗?

    在PHP中,eval这些语言结构,在ZEND里最终会调用zend_compile_string,而如果你到PHP源码里查找这个函数,会在zend.c里找到这句:

    zend_compile_string = compile_string;

    并在zend_compile.h里找到如下声明:

    extern ZEND_API zend_op_array *(*zend_compile_string)(zend_string *source_string, const char *filename, zend_compile_position position);

    不难看出,zend_compile_string就是函数compile_string的函数指针。这个指针是PHP安全研究员、PHP核心开发者Stefan Esser于2006年率先提出的,以便在调用compile_string时执行某些操作,也是这位大佬,在2010年率先提出了通过编写扩展的方式,在zend_compile_string上挂钩子,打印它的参数source_string来获取还原好的明文,还贴心地提供了对应的PHP扩展

    二、半吊子PHP扩展开发:更适合PHP8宝宝体质的evalhook

    PHP的底层是C,我之前从来没有写过C,也没有接触过PHP内核和ZEND ENGINE,于是抱着学习的心态,开始了跌跌撞撞的PHP内核学习之旅。因为有其他编程语言的底子,看懂C代码并不难;想要参与PHP扩展开发,对新手来说,一开始的难点主要在于理解PHP扩展结构,特别是用于管理PHP扩展生命周期的几个宏,比如:PHP_MINIT,PHP_RINIT,PHP_MSHUTDOWN,和PHP_RSHUDOWN。

    我在网上搜了一圈这个扩展,编译好的版本都是5.6的,扩展的源码也是基于PHP5.6。我寻思这PHP版本都进入8时代了,不如就把它按照PHP8的规范改写,顺便也让自己过一遍PHP扩展开发。说干就干!

    PHP版本:8.2.22
    操作系统:Linux

    首先是搭建PHP扩展开发环境,那就得编译安装PHP,并安装apache2,配置apache和PHP通信,以及PHP、PHP-FPM等服务的环境变量。这个网上可以找到教程,就不赘述(踩了蛮多坑的,但如果有人有需要,日后可以写一篇配环境的文章)。

    原先的插件源码,也就是evalhook.c,要改动的地方不多,PHP_MINIT_FUNCTION和PHP_MSHUTDOWN_FUNCTION中的控制流程无需变动。这里我不得不说佬就是佬,斯特凡大佬很聪明地定义了一个布尔值evalhook_hooked用于流程控制,使得代码结构很简洁。

    主要的改动在zend_compile_string这个指针指向的函数compile_string上。PHP8.2及其之后的8.3版本中,compile_string的参数由2个变为3个,多了一个参数position。同时,斯特凡大佬的插件原先有一个控制台交互功能,读取用户控制台输入Y/N来决定是否执行eval或终止进程,同时他打印输出也是打印在控制台。不过我们的目的是解webshell混淆,而很多webshell呢,内置了检查USER AGENT之类的反调试手段,因此这个打印输出的方式也要改一下,方便我们在WEB环境里查看(这里可以用curl和php内置server在命令行模拟web环境,避开webshell的UA检测,但这又是另一个故事了)。

    更改的代码如下:

    static zend_op_array *(*orig_compile_string)(zend_string *source_string, const char *filename, zend_compile_position position);
    static zend_bool evalhook_hooked = 0;
    
    static zend_op_array *evalhook_compile_string(zend_string *source_string, const char *filename, zend_compile_position position)
    {
        int c, len;
        char *copy;
    	
        /* Ignore non string eval() */
        if (ZSTR_LEN(source_string) == 0) {
            return orig_compile_string(source_string, filename, position);
        }
    	
        len = ZSTR_LEN(source_string);
        copy = estrndup(ZSTR_VAL(source_string), len);
        if (len > strlen(copy)) {
    	for (c=0; c<len; c++) if (copy[c] == 0) copy[c] == '?';
        }
    	
        php_printf("\n--------- start decoding ------------\n");
        php_printf("%s\n", copy);
        php_printf("--------- end decoding ------------\n");
    	
        return orig_compile_string(source_string, filename, position);
    }

    在web环境下打开ote.php,点击view source,即可看到解密效果,第二层的混淆也被解开了:
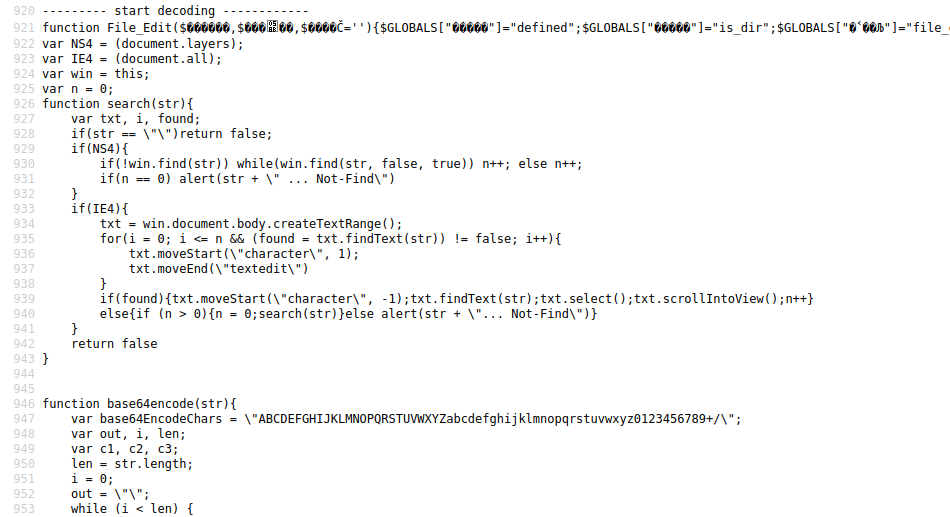
    查看页面源码已经能看到解密后的明文代码
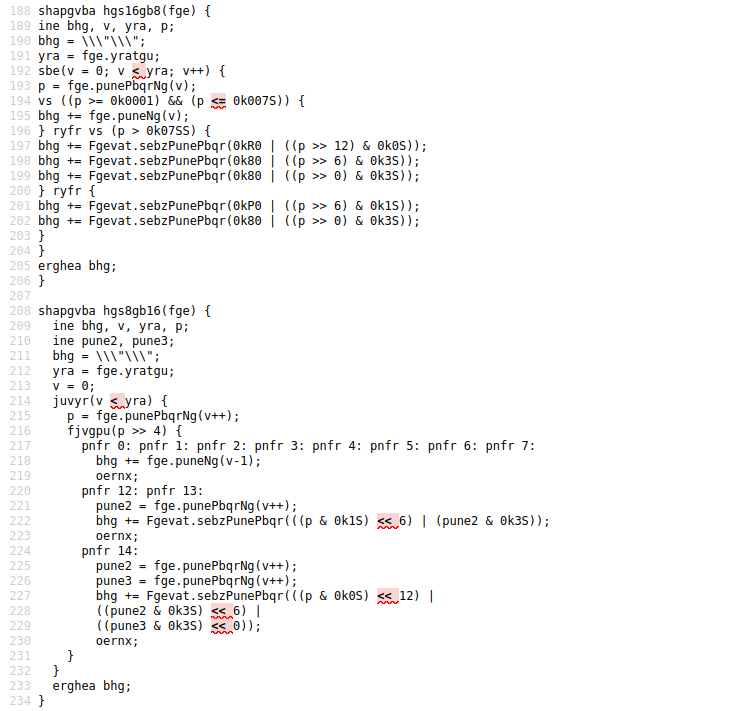
    原先第二层依然做了rot13等轻度混淆

    我已经把基于PHP8.2.22编译的.so扩展,放到城通网盘,在php.ini中开启扩展即可使用。

    evalhook.so34KB

    解码后的ote.php,我也放到github上了,需要可以自取

    参考资料:

    逢魔安全实验室(20年之后甚少看到更新)的:解密混淆的PHP程序

    腾讯应急响应中心的:浅谈变形PHP WEBSHELL检测

    phith0n佬的:phpjiami 数种解密方法

    E99p1ant佬的:『自闭 PHP 内核』 vol1. 来写一个 PHP 扩展吧~

  • 微擎加密goto完全解密系统php源码

    微擎加密goto完全解密系统php源码

    很多php源码会进行goto加密,比如大多的微擎应用。对于已加密的应用很多人是不敢直接使用的,因为不知道里面有些什么内容。

    今天,无错源码为您整理分享一套goto解密的php源码

    直接上传服务器就可以使用的

    微擎加密goto完全解密系统php源码-百谷资源网

    使用方法:

    微擎加密goto完全解密系统php源码-百谷资源网

    1.PHP-Parser必须要在php7.0以上运行,所以php版本要在7.0或以上

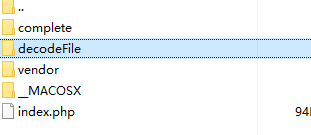
    2.需要解密的文件放在decodeFile文件夹里面,支持多个文件,但最好不要太多,耗内存,如果php.ini已经设置内存在1024,还遇到单个文件内存溢出的话,问题可能就出在文件,搞不定可以找下店家看看。

    3.解密后的源代码在complete文件中。

    4.直接运行index.php就会解密。

    5.批量解密,然后又一次性替换全部项目文件,如果运行遇到问题的,建议检查看一眼解密后的文件(或者分批替换查找)。看是否有个别特殊文件是字符串混淆了的。

    微擎加密goto完全解密系统php源码-百谷资源网
  • Python批量反编译脚本 破解源码脚本 PYC逆向

    Python批量反编译脚本 破解源码脚本 PYC逆向

    Python程序编译后是pyc文件,使用本文件放于任意目录下,修改directory值,然后使用python运行即可批量破解反编译pyc文件 。

    import uncompyle6
    import os
    
    def decompile_pyc_files(directory):
        for root, dirs, files in os.walk(directory):
            for file in files:
                if file.endswith('.pyc'):
                    pyc_file = os.path.join(root, file)
                    py_file = os.path.splitext(pyc_file)[0] + '.py'  # 使用同名的.py文件名
    
                    # 反编译.pyc文件为.py文件
                    with open(py_file, 'w', encoding='utf-8') as f:  # 指定编码方式为utf-8
                        uncompyle6.decompile_file(pyc_file, f)
    
                    print(f"Decompiled: {pyc_file} -> {py_file}")
    
    # 指定包含.pyc文件的目录
    directory = r"D:\source\"
    
    # 执行批量反编译
    decompile_pyc_files(directory)
    
  • 绿豆pro前端APP源码v5.1.7编译教程

    绿豆pro前端APP源码v5.1.7编译教程

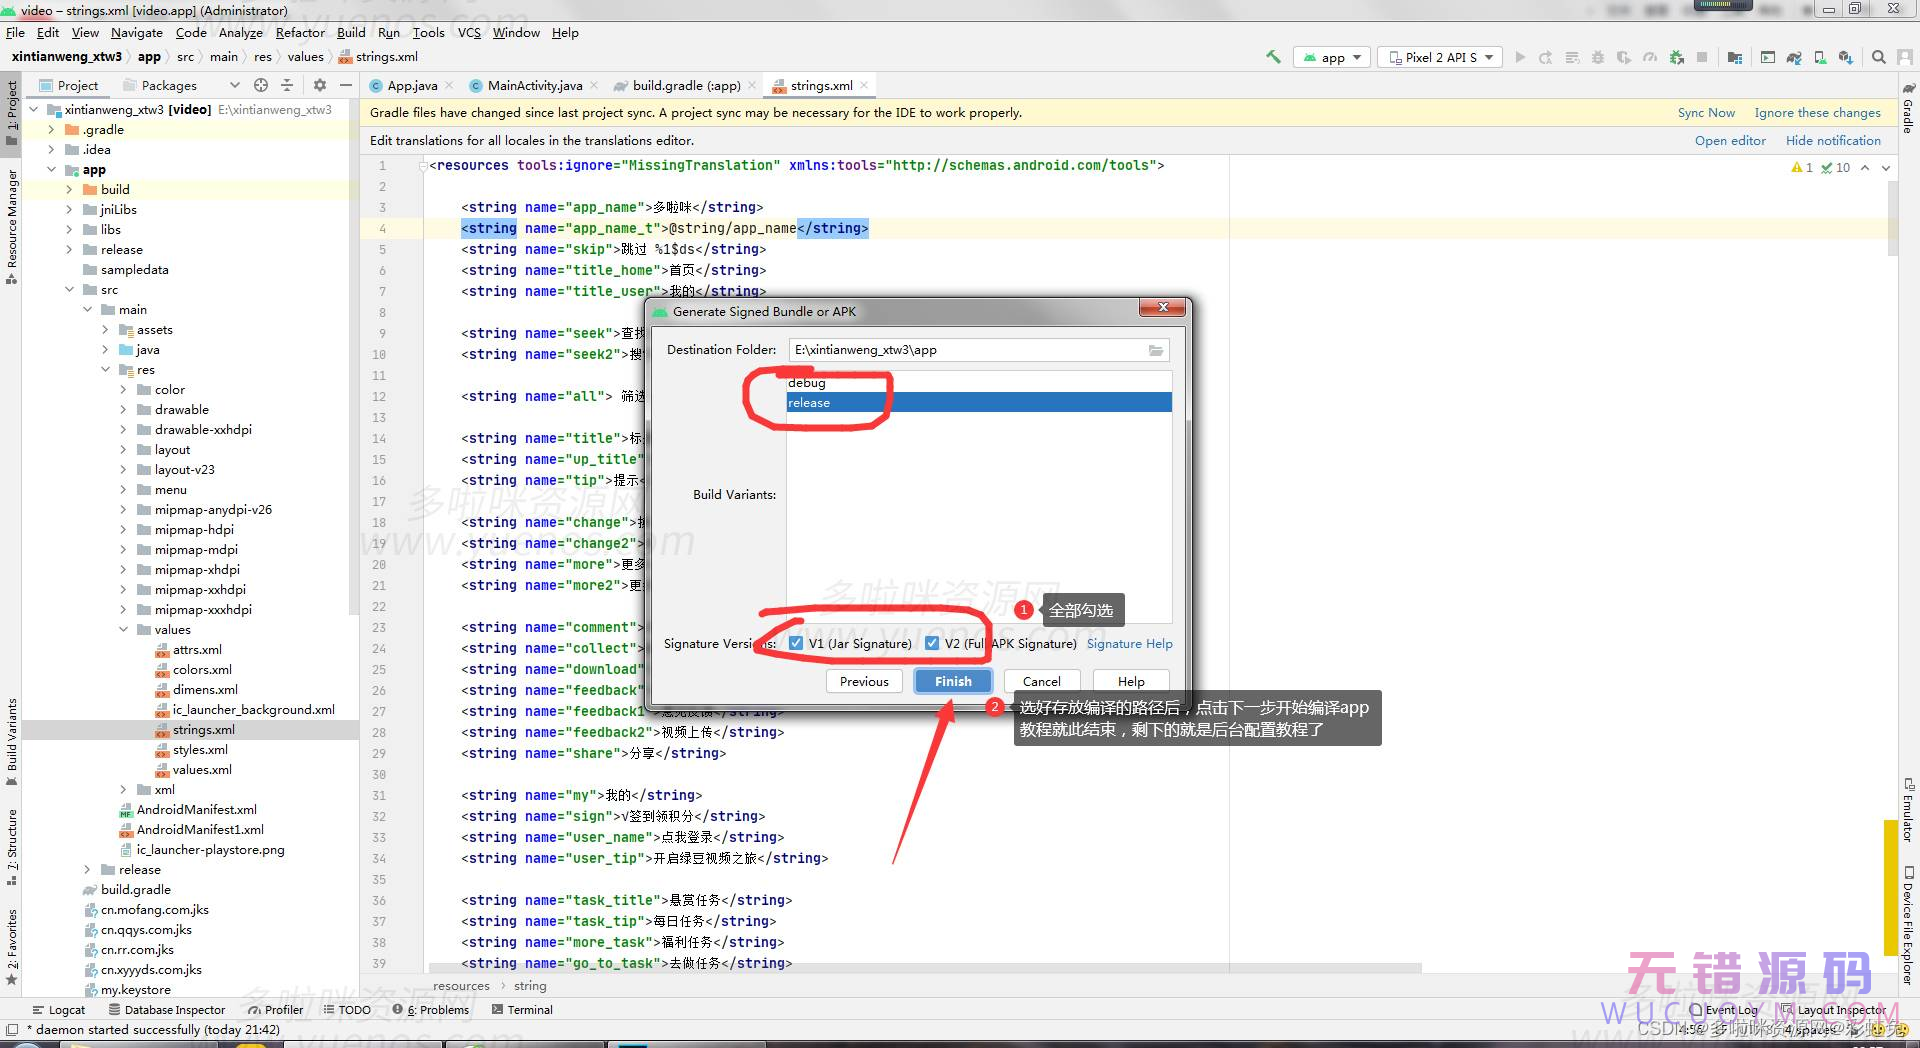
    绿豆pro前端APP源码 编译教程全图文操作萝卜白菜app通用:

    图文一:

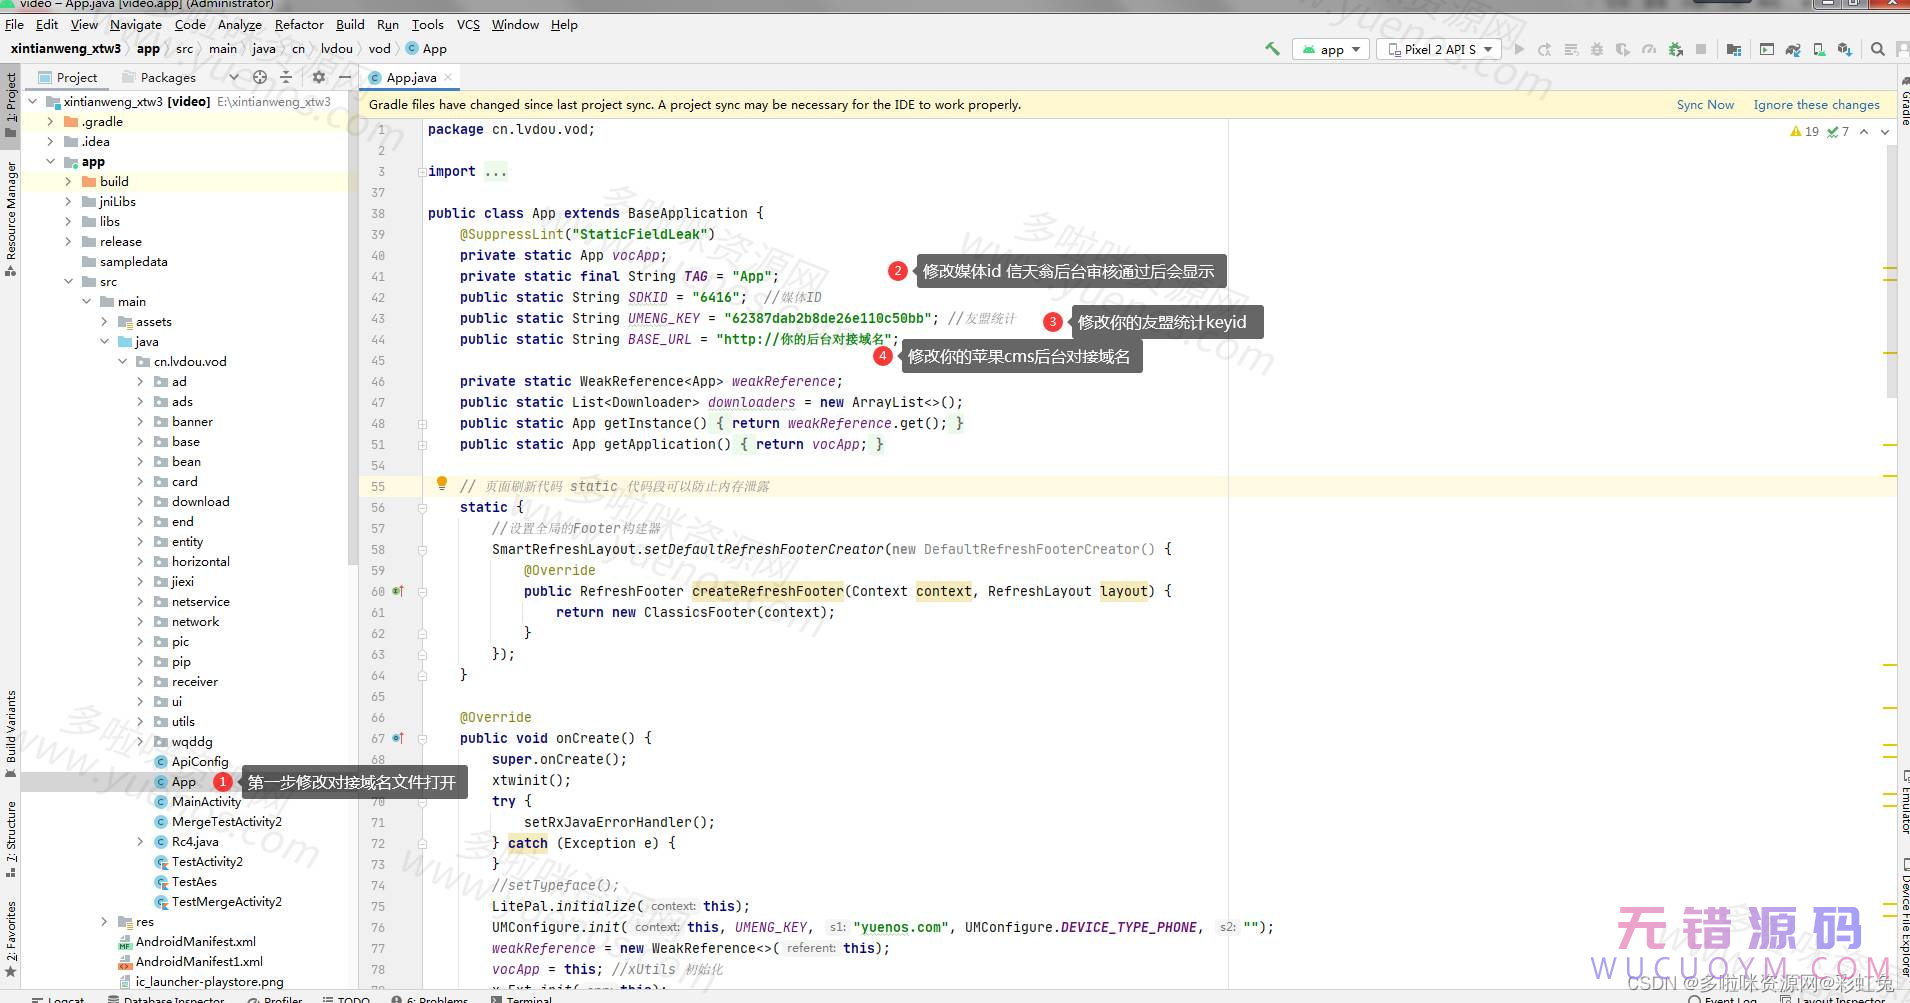
    打开前端加载项目后,选择图下文件名为app.java文件打开操作修改位置如下:

    public static String SDKID = "6416";  //媒体ID
    public static String UMENG_KEY = "62387db8242477110c5bb"; //友盟统计
    public static String BASE_URL = "http://你的后台对接域名";

    图文二:

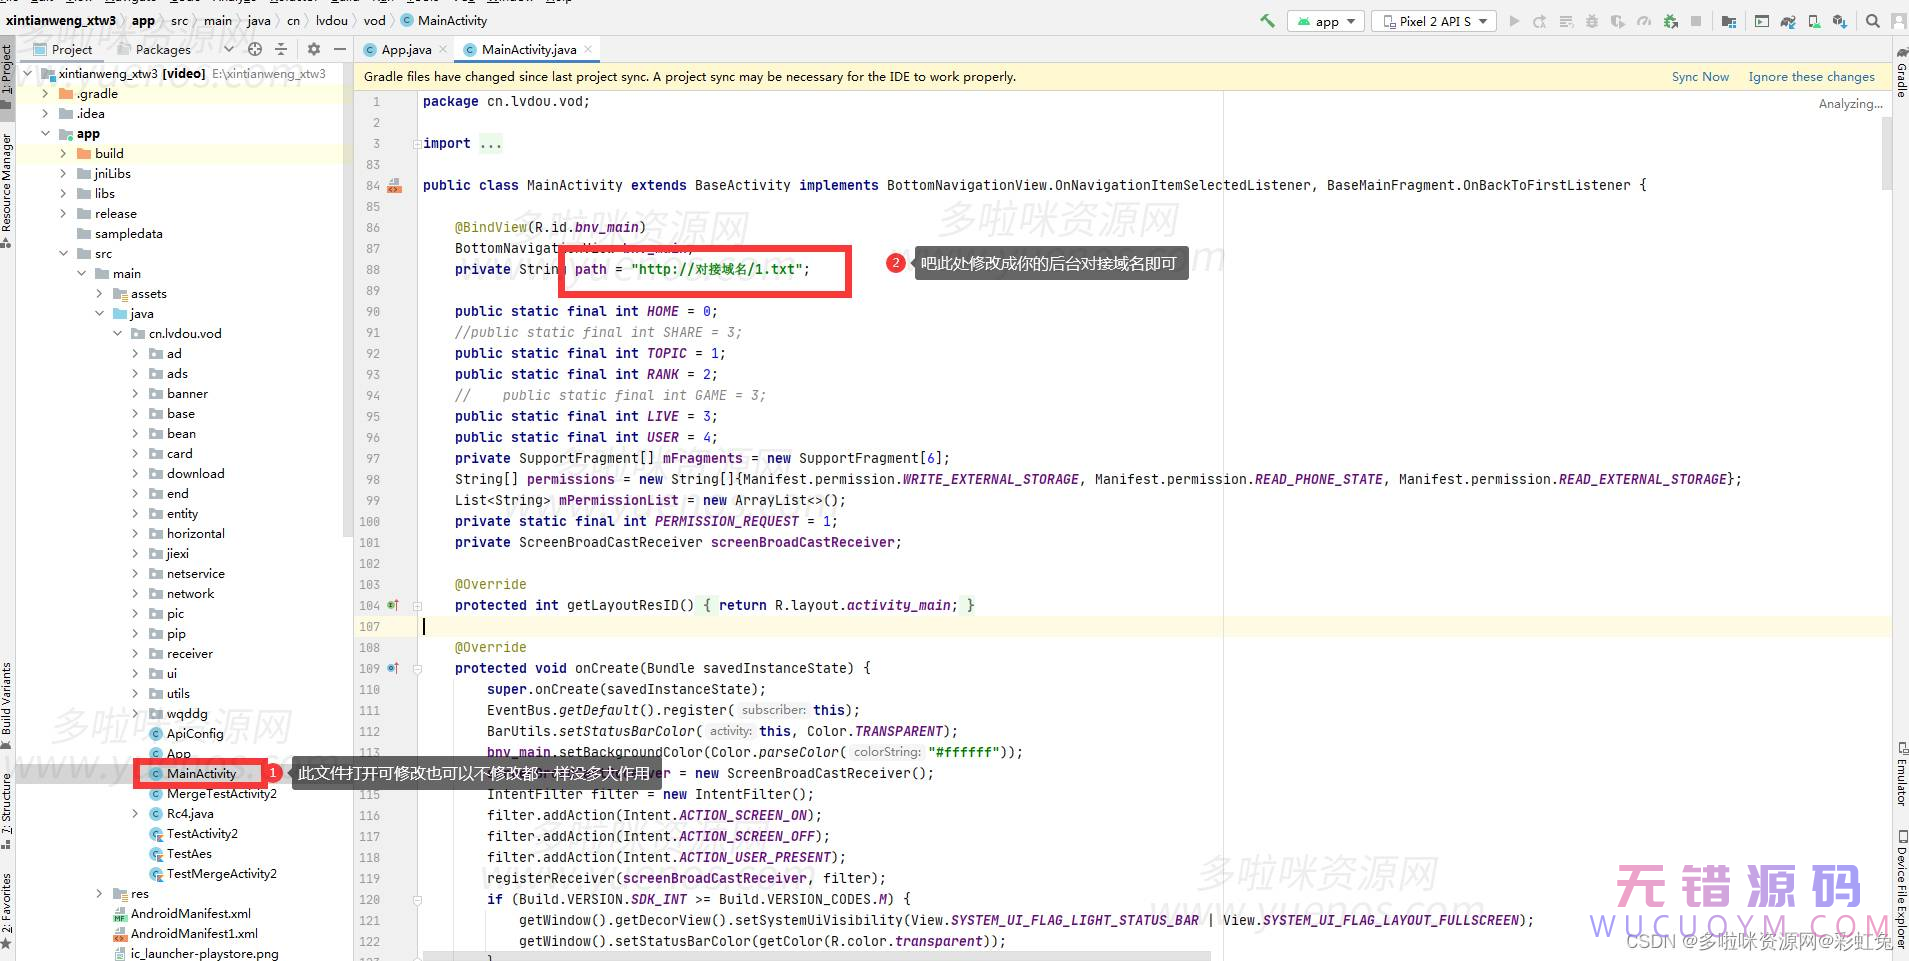
    打开前端文件名为MainActivity.java后,选择修改位置如下: 

    BottomNavigationView bnv_main;
    private String path = "http://对接域名/1.txt";

    如短视频不想要也可以直接去除,去除方法下期再说~~~~~~~   

    图文三:

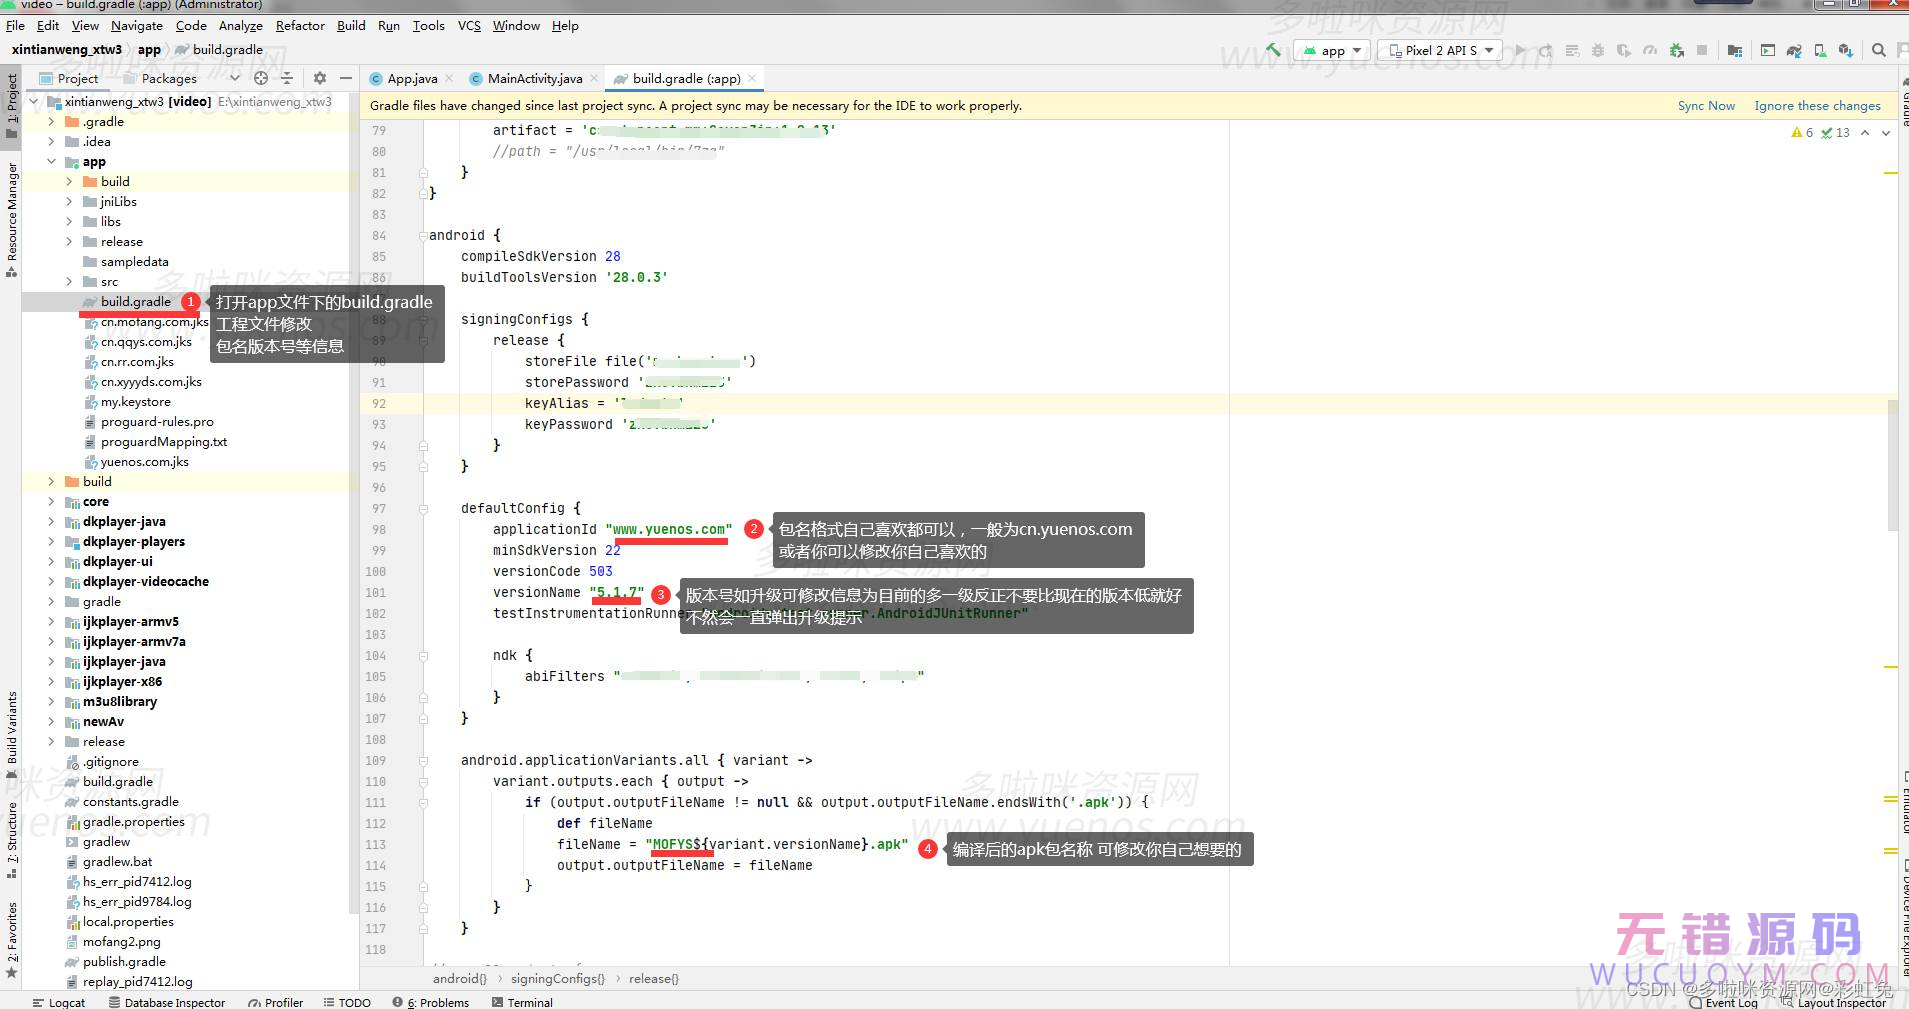
    打开前端app文件夹下的build.gradle工程文件,选择修改位置如下:

    defaultConfig {
            applicationId "cn.yuenos.com" //包名
            minSdkVersion 22
            versionCode 503
            versionName "5.1.7" //版本号

    版本号如升级可修改信息为目前的多一级 反正不要比现在的版本低就好
    不然会一直弹出升级提示.

    fileName = " 包名为英文名成${variant.versionName}.apk"

    图文四:

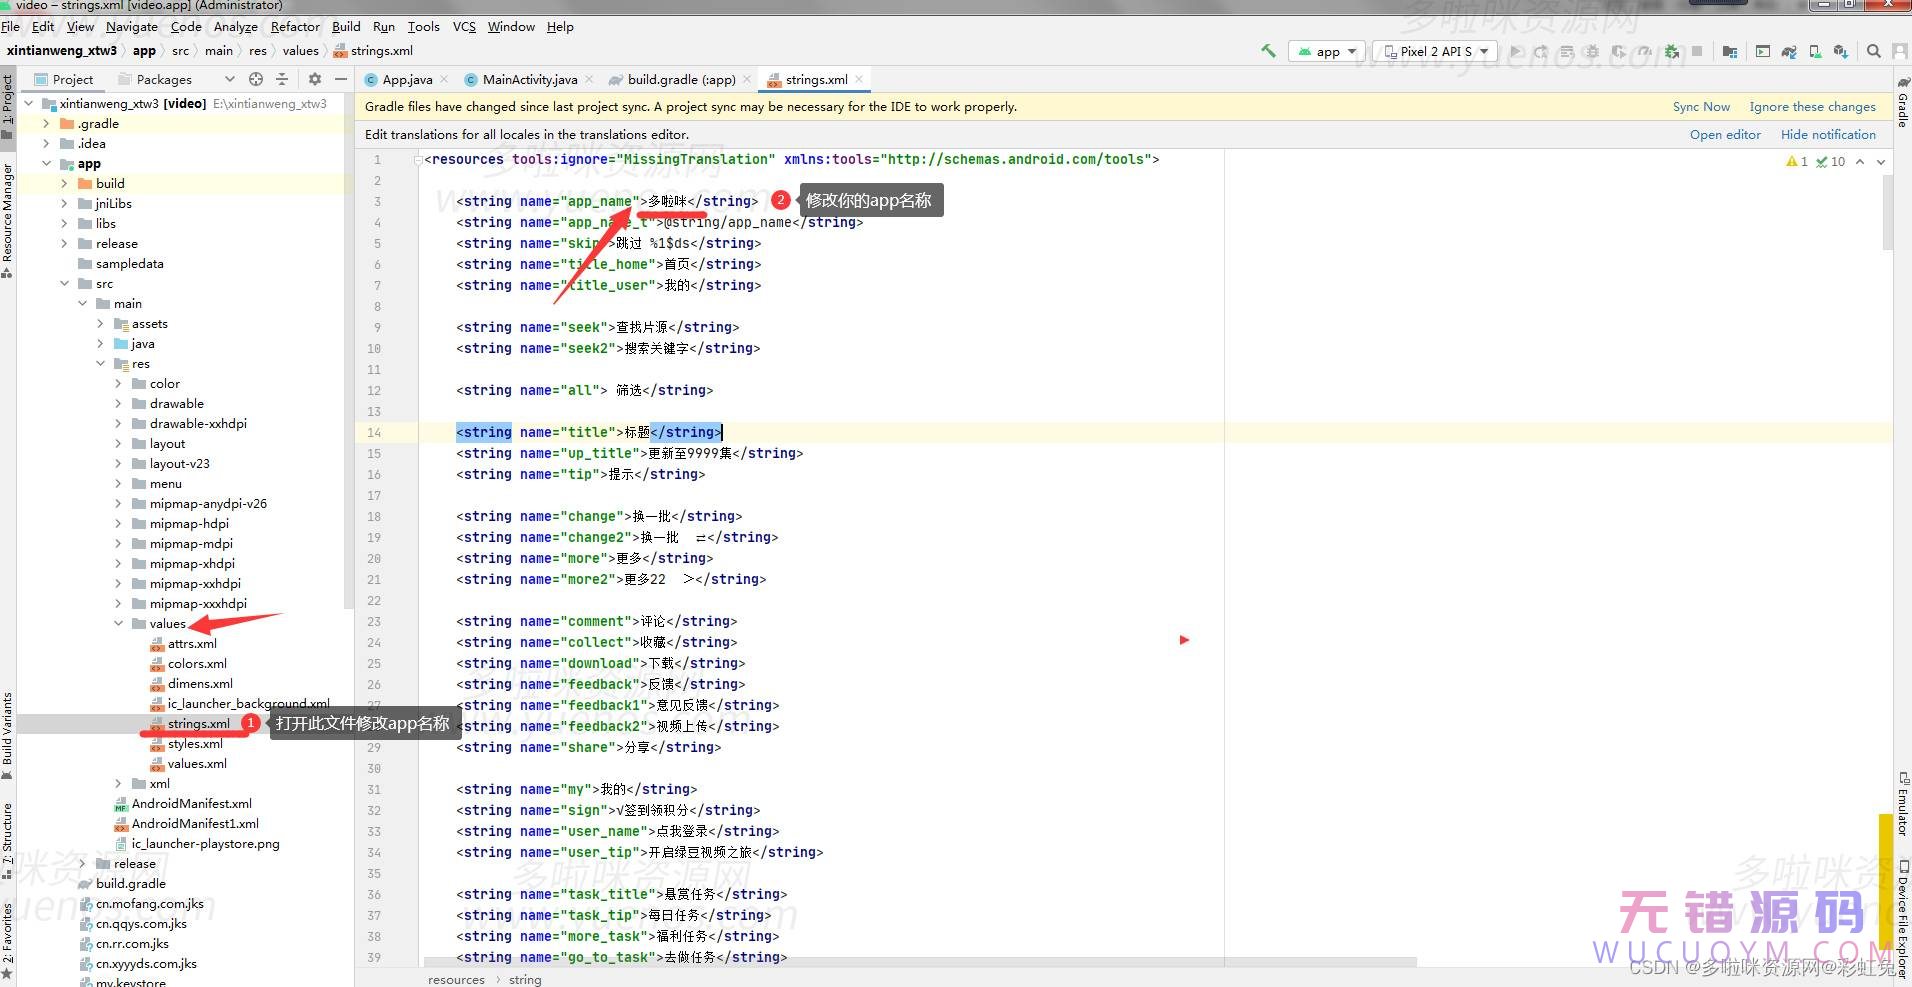
    打开前端\app\src\main\res\values\strings.xml文件,选择修改位置如下:

    <string name="app_name">多啦咪</string> //app名称

    图文五:

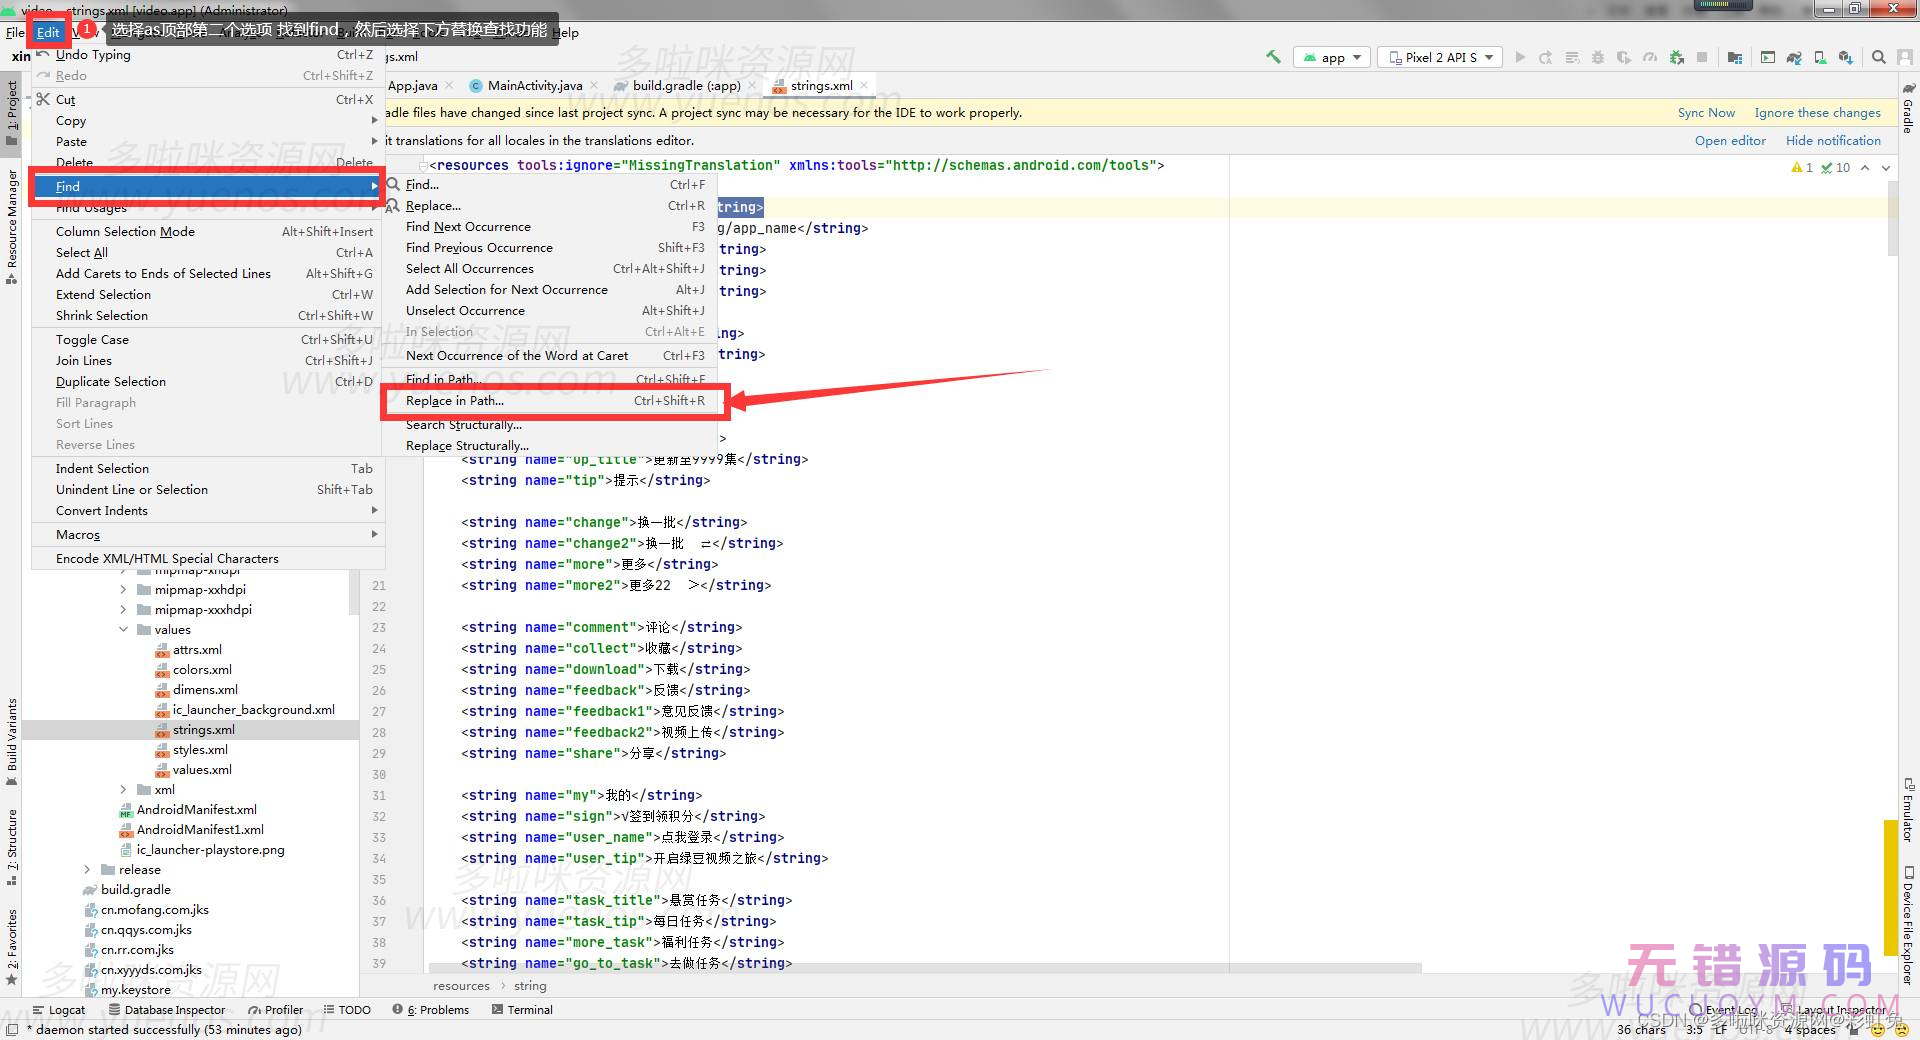
    打开Android Studio 顶部第二个edit进入找到find如图 查找替换功能: 

    图文六:

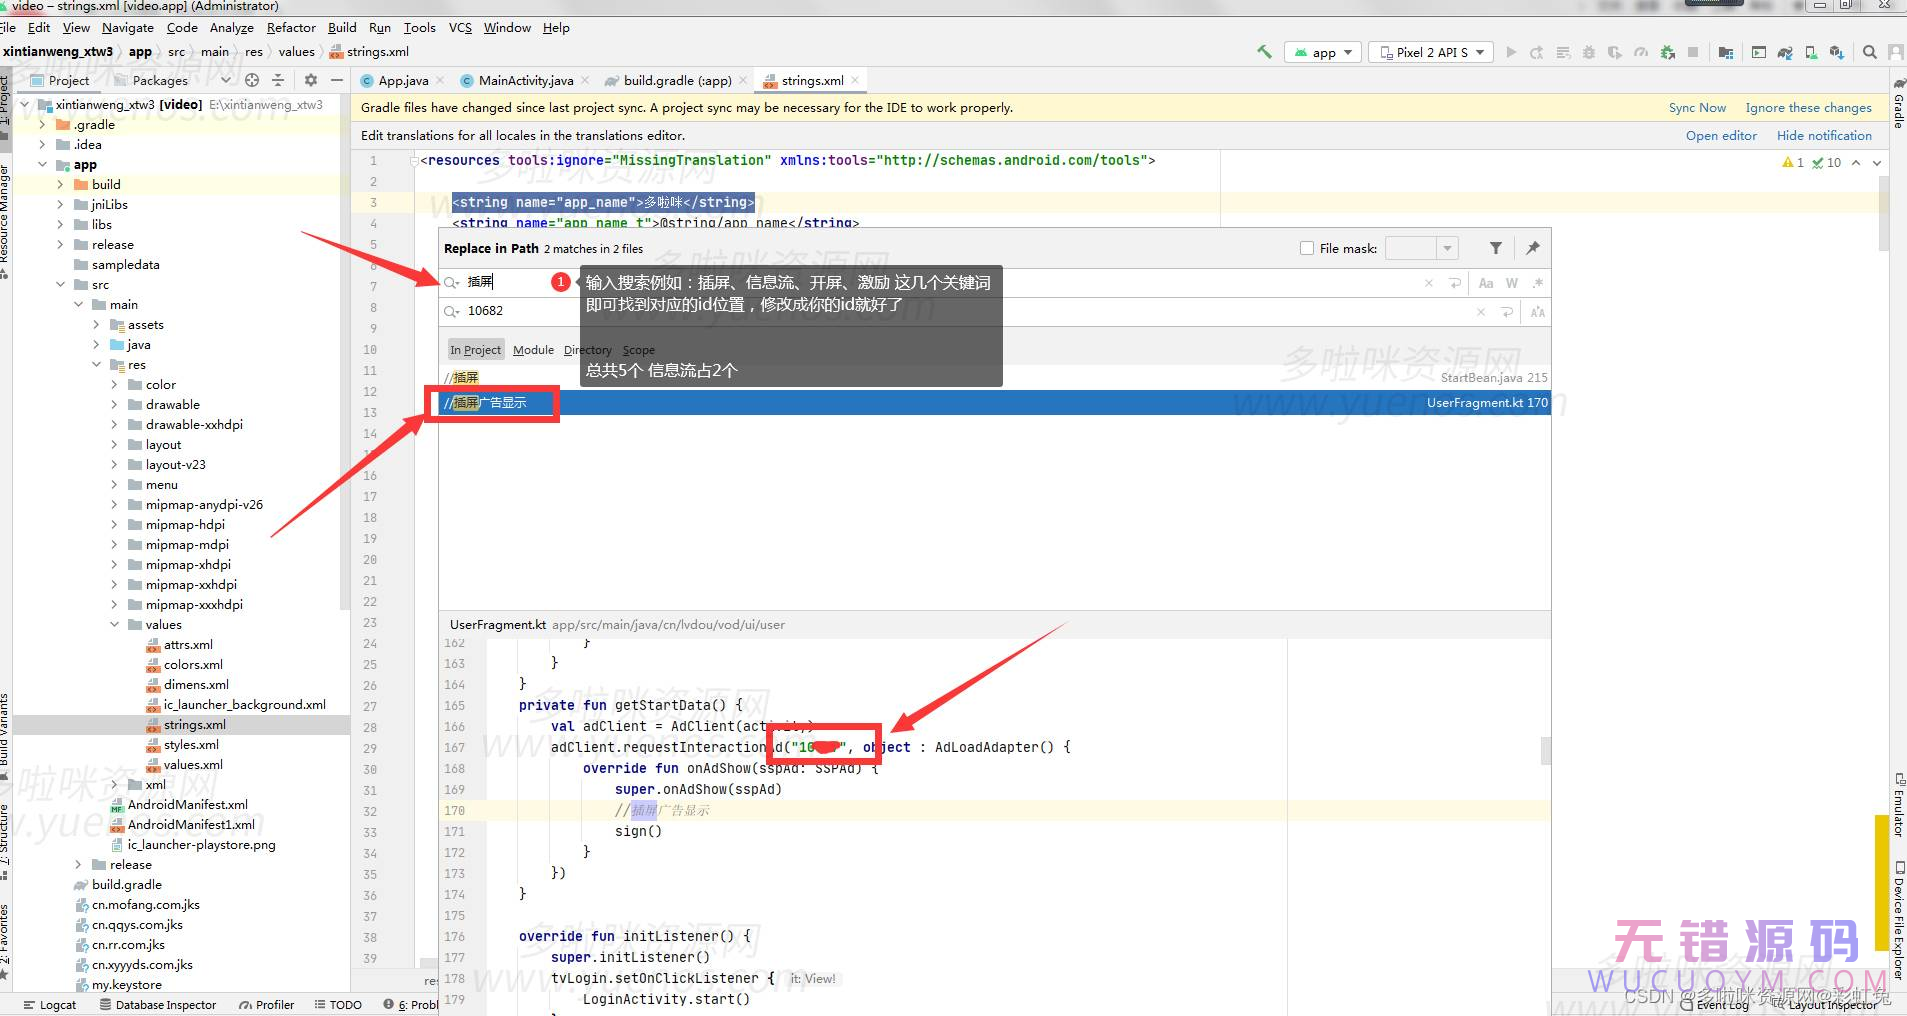
    输入关键词 搜索查找替换: 

    输入搜索例如:插屏、信息流、开屏、激励这几个关键词
    即可找到对应的id位置,修改成你的id就好了
    总共5个信息流占2个

    图文七:

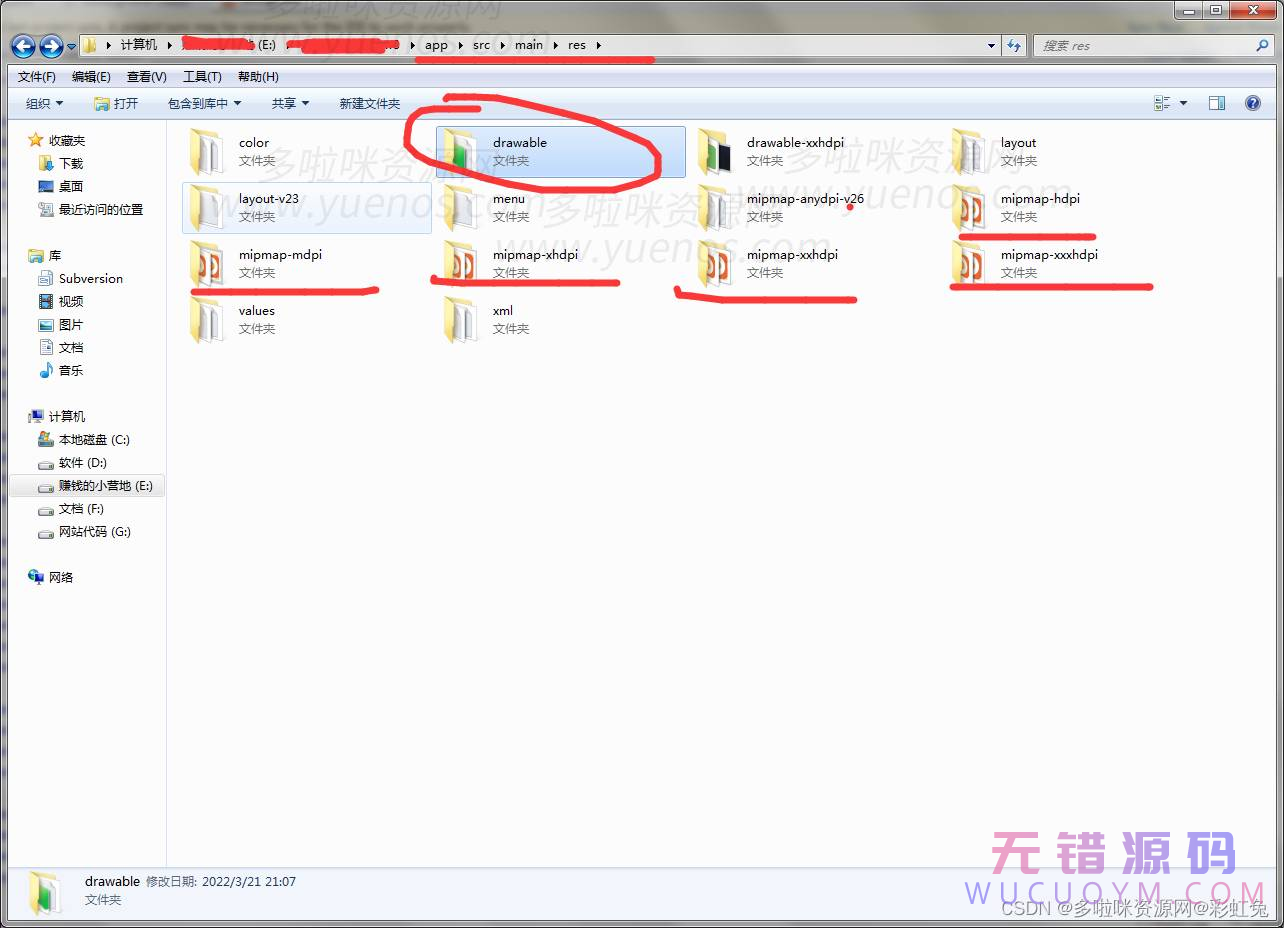
    修改完以上步骤后;进入到启动图跟logo图标替换成你自己的:

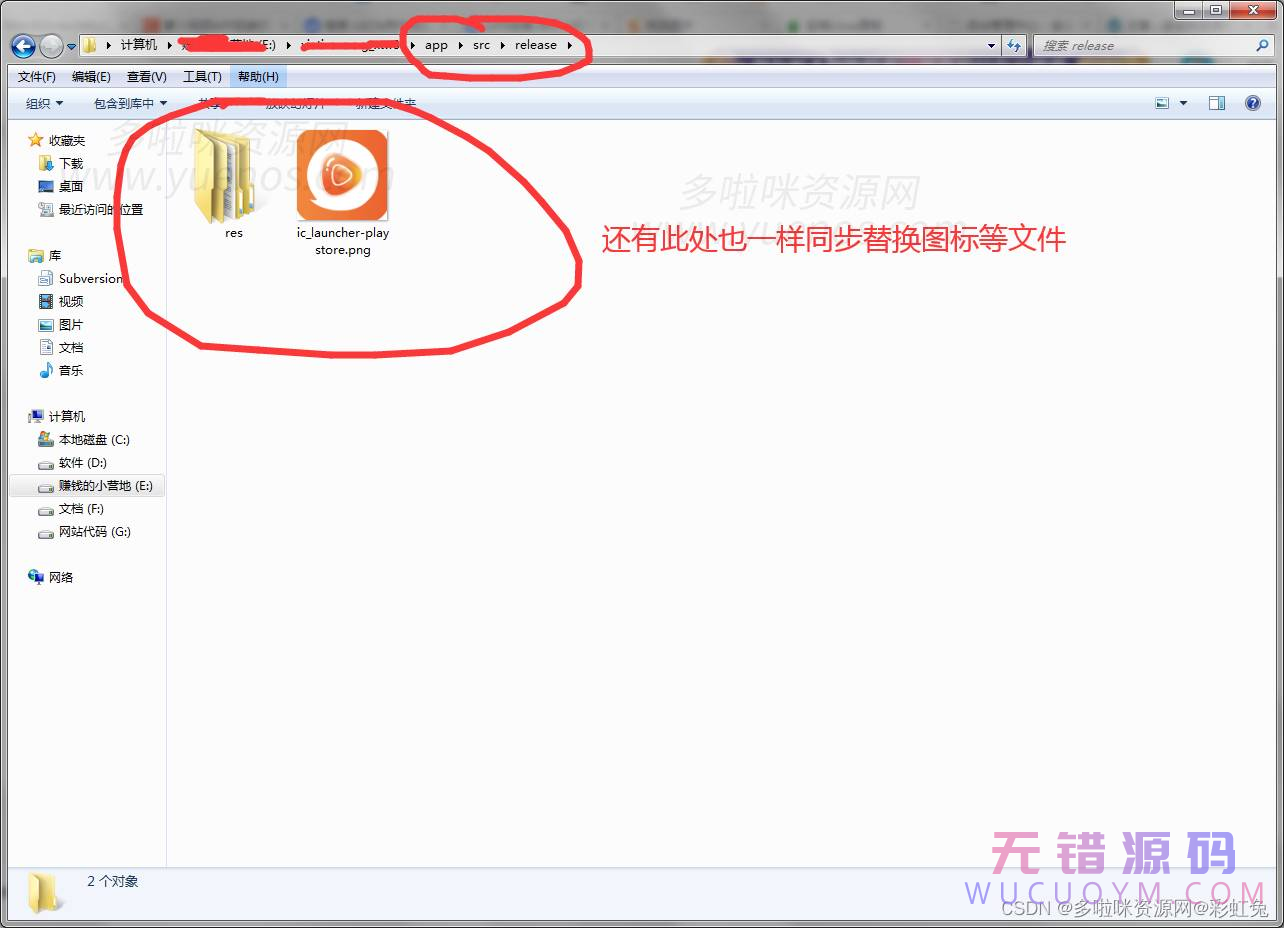
    替换路径文件为;logo图标;\app\src\main\res;

    mipmap-hdpi、mipmap-mdpi、mipmap-xhdpi、mipmap-xxhdpi、mipmap-xxxhdpi 五个文件夹为logo图标文件夹,

    启动图标文件为:\app\src\main\res\drawable\ lanch_bg2.png 图片文件

    图文八:

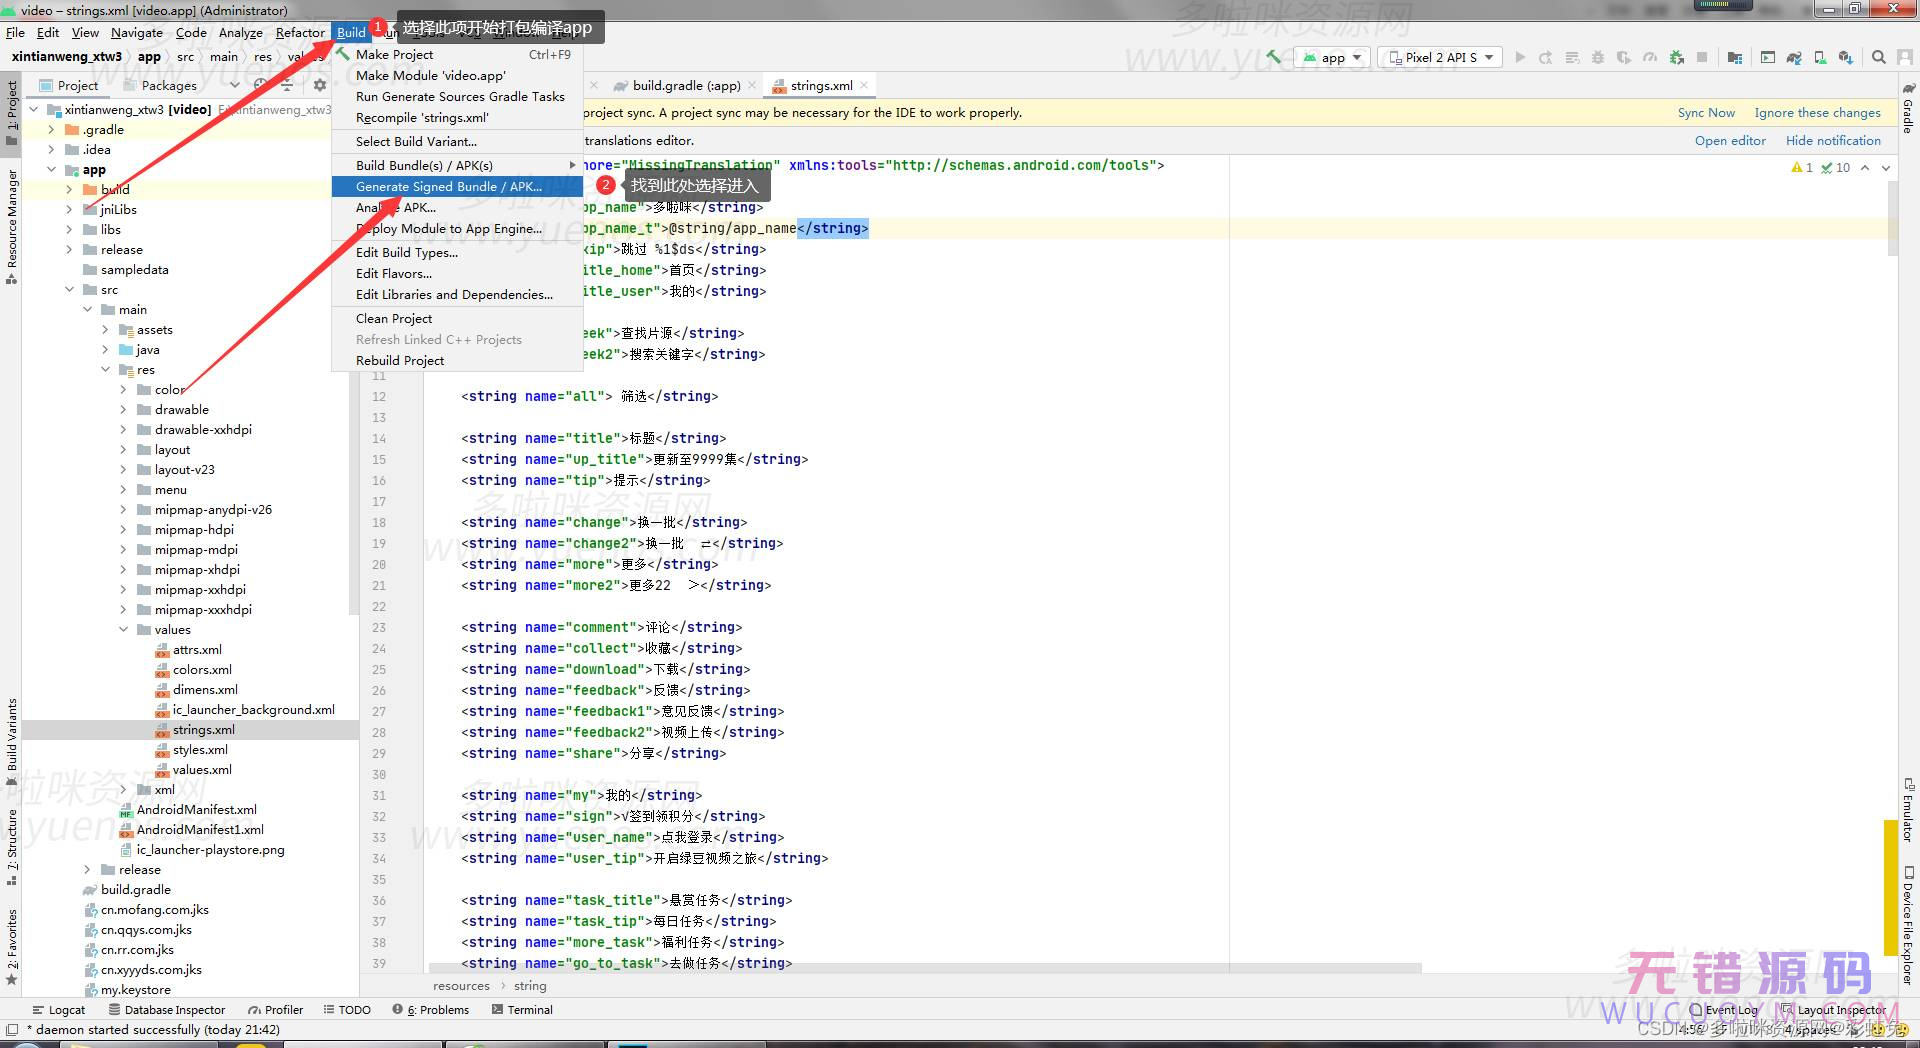
    前端修改完后,进入打包编译步骤:

    首先第一步找到以下进入选项

    Build选项 >Generate Signed Bundle / APK…. 点击进入 

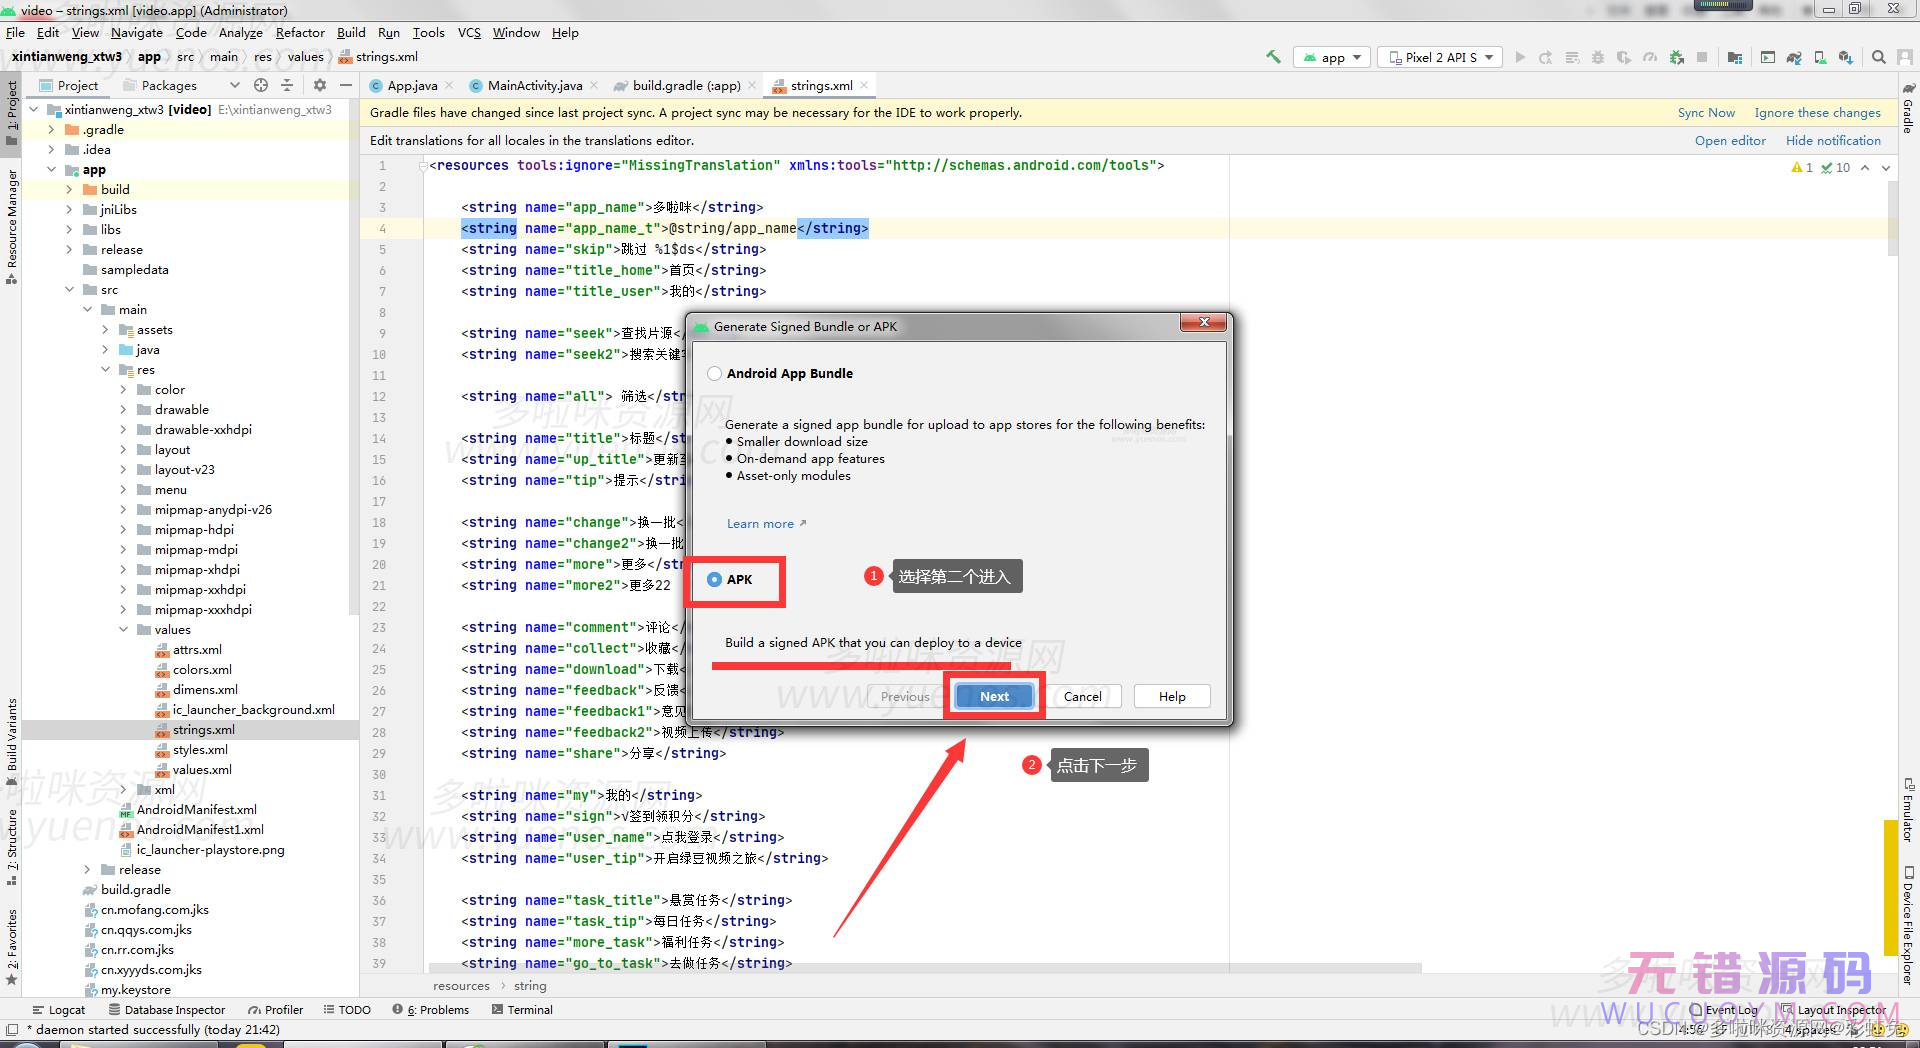
    图文九:

     前端修改完后,进入打包编译步骤:

    首先第一步找到以下进入选项

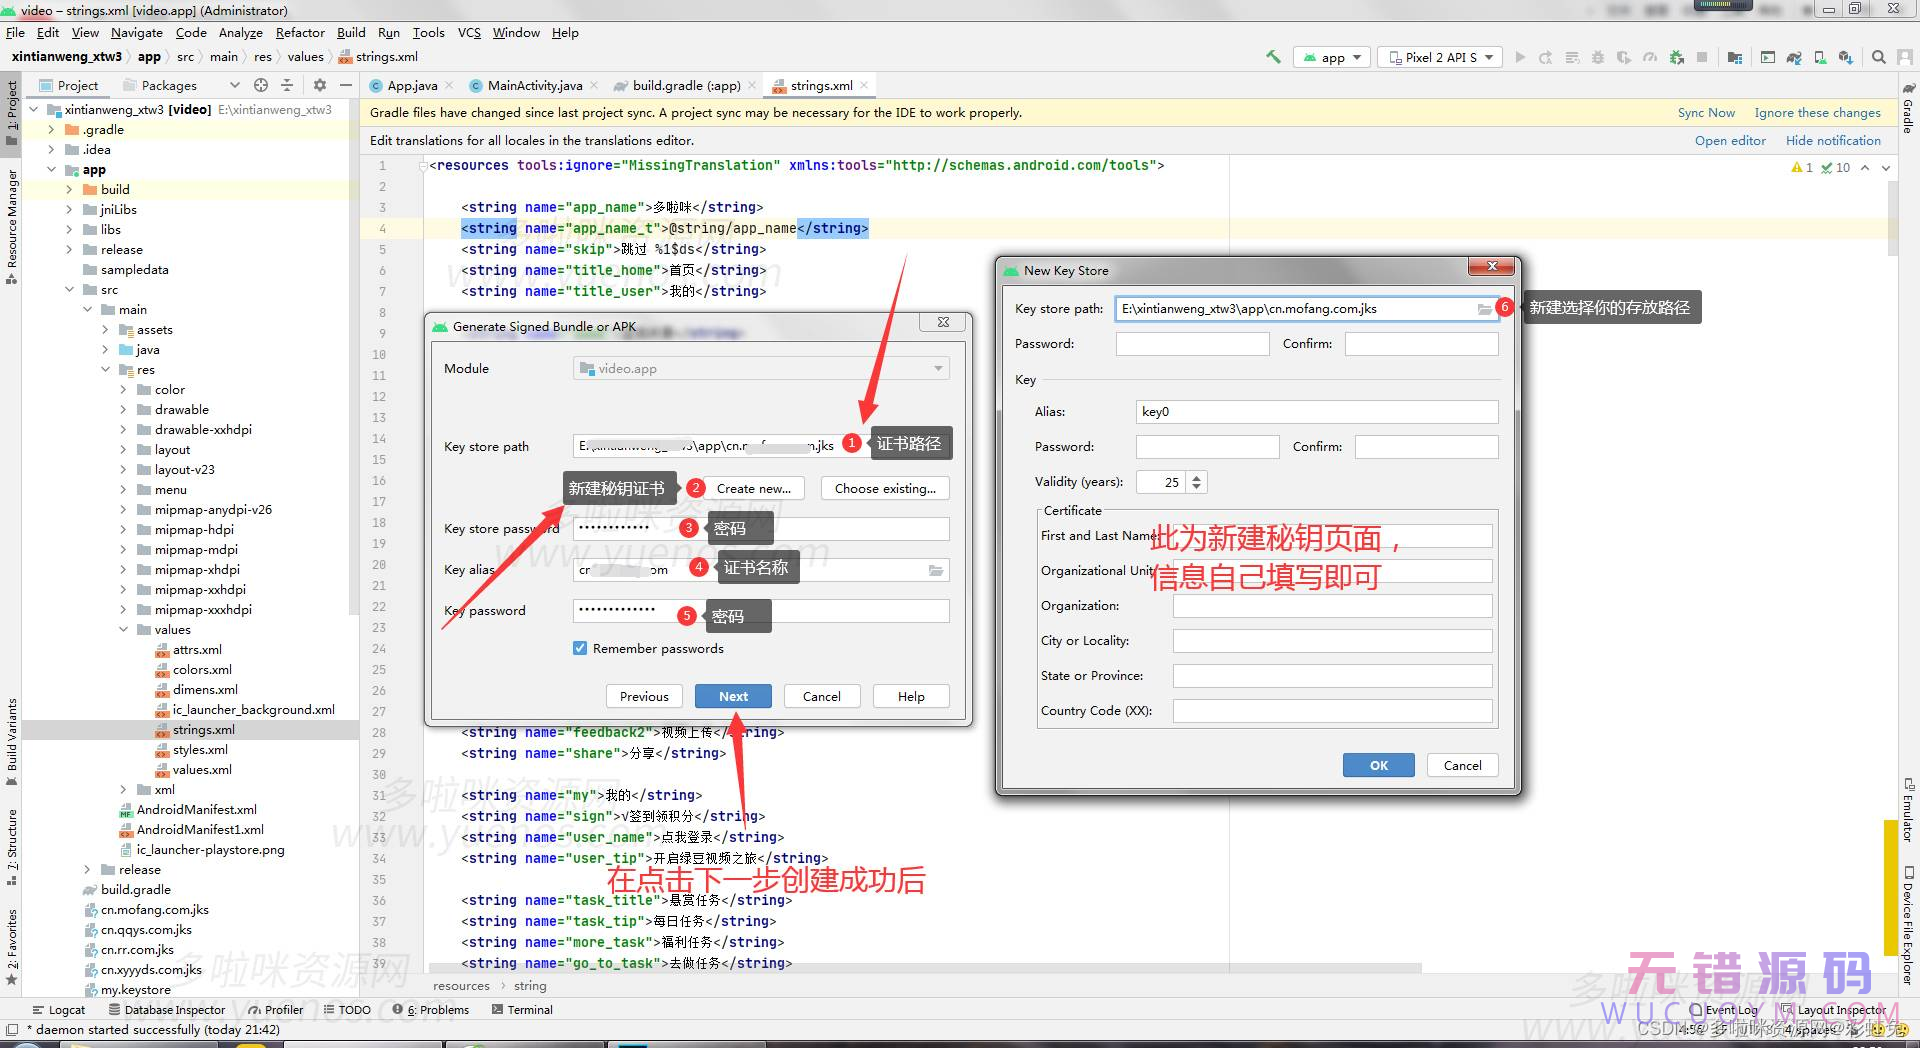
    图文十:

     进入此页面后,选择新建秘钥证书,进入到新建页面,填写信息,

    填写完成后确定即可,然后进入下一步编译环境就好了 

  • Dumping PHP Opcodes Protected by SourceGuardian

    Dumping PHP Opcodes Protected by SourceGuardian

    Intro

    In this article, we’ll walk through my process for revealing SourceGuardian-protected PHP bytecode. We’ll get into some PHP 5.4 internals since this is the version Nagios XI was built on. Also we’ll perform some static and dynamic analysis of the SourceGuardian loader extension. Finally, the end result is a modified version of the Vulcan Logic Dumper (VLD). Many thanks to Derick Rethans and all who contributed to VLD!

    Here is a brief outline of the topics to be covered:

    • PHP Bytecode
    • The SourceGuardian Loader
    • Vulcan Logic Dumper
    • Hooking zend_execute
    • Challenges encountered
    • Opcode Handlers
    • Analyzing Custom Handlers
    • My Solution

    Below is a protected file. The goal is to decode this into something we can analyze.

    Do you read SourceGuardian?

    Before we move onto analysis, let’s see a description of the SourceGuardian product. Their website says, “Our PHP encoder protects your PHP code by compiling the PHP source code into a binary bytecode format, which is then supplemented with an encryption layer.“

    PHP Bytecode

    Similar to other interpreted programming languages, PHP source code is compiled into bytecode. For example, the following PHP code:

    <?php
    echo "hello world";
    ?>

    Would be compiled into the below. Although, the below graphic is a visual representation of a zend_op_array. The Vulcan Logic Dumper (VLD) can be used to dump bytecode in this format. The output shows individual opcodes and their associated fields.

    Source: https://www.php.net/manual/en/internals2.opcodes.echo.php

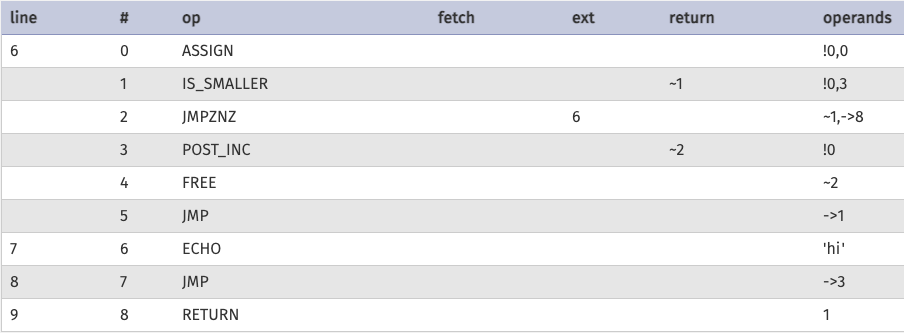
    Here is another short example:

    <?php
    for($i=0; $i<3; $i++){
    echo "hi";
    }
    ?>

    Would be compiled into:

    Source: https://www.php.net/manual/en/internals2.opcodes.jmpnz.php

    As we go, keep in mind that source code is compiled into operations. I may call them instructions as well.

    sg_load()

    From now on, I’ll refer to SourceGuardian-protected files simply as “encoded” files, and SourceGuardian will be abbreviated as “SG”. When an encoded file is launched by the PHP interpreter, it is decoded by an SG “loader,” which is implemented as a PHP extension.

    Given that the encoder compiles the source code and encrypts the bytecode, the loader must decrypt and execute the compiled bytecode. The loader implements a key function called sg_load(), which does this. In all encoded files, you’ll find a call to this function at the end of the file.

    sg_load() is called in an encoded file

    My goal was to simply dump the original bytecode instructions with VLD.

    VLD

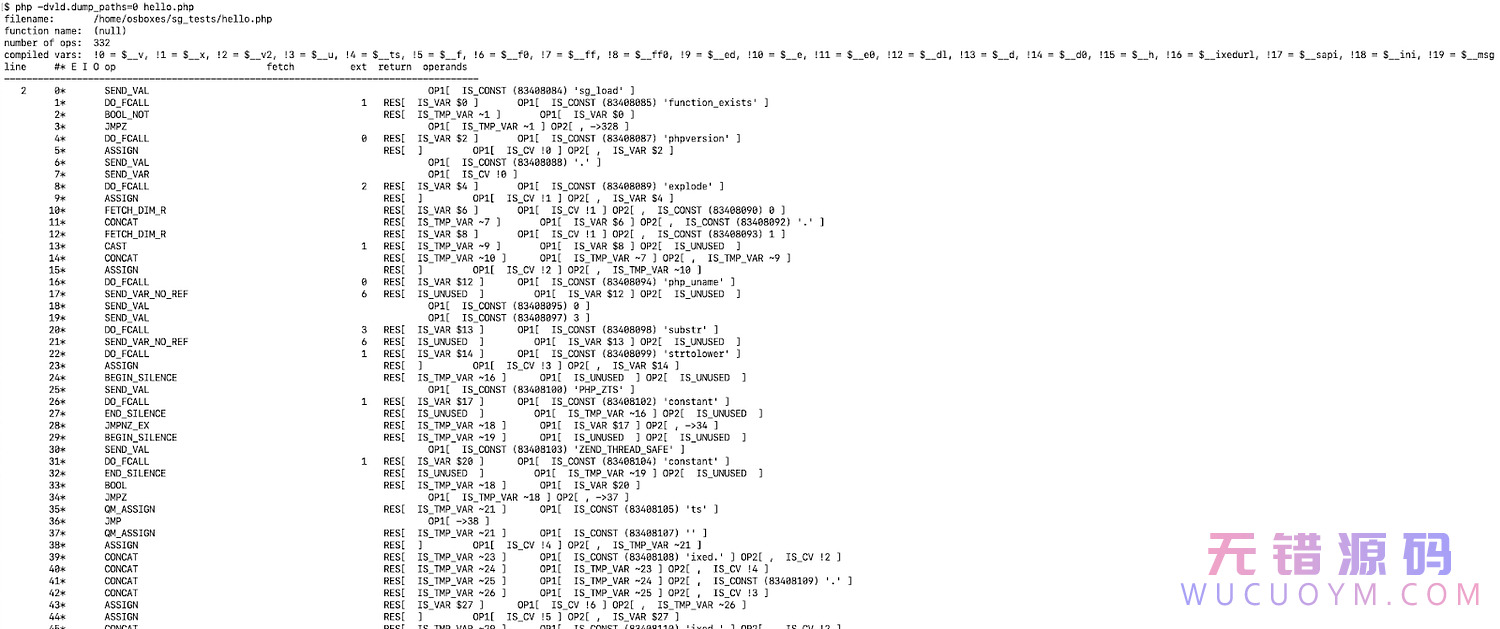
    Let’s check out how VLD works. We’ll start with an unencoded “hello world” example:

    <?php
    echo "Hello world!\n";
    ?>

    If we were to dump this with VLD, it would show:

    The catch is that VLD hooks zend_compile_file(), and this output is coming from there. After zend_compile_file() is called to compile the source code into a zend_op_array, the op array is dumped using the vld_dump_oparray() function. This is all handled in vld_compile_file().

    Source: https://github.com/derickr/vld/blob/483716c1626d05edb01ef9bc9a70046c327c5218/vld.c#L374

    If we were to run VLD as-is against an encoded file, the results would not give us what we want. It was not designed to decode protected files. Instead, we would see opcodes for the SG wrapper code along with a call to sg_load(). The input to sg_load(), containing encrypted bytecode, would not be dumped because it does not need to be compiled.

    Note: The VLD project description explicitly states it “can not be used to un-encode PHP code that has been encoded with any encoder.”

    SG wrapper code dumped. Notice the call to sg_load() at the top.

    Dumping Opcodes in zend_execute()

    An encoded file must be executed, right? The bytecode is decrypted then executed by zend_execute(). This is where I started to get my hands dirty.

    VLD already has a hook built in for zend_execute(), so if we modify VLD to dump the zend_op_array passed to zend_execute(), we can see the opcodes being executed. Note that VLD renames the function to vld_execute().

    static void vld_execute(zend_op_array *op_array TSRMLS_DC)
    #endif
    {
    php_printf("\nexecute()\n");
    vld_dump_oparray (op_array TSRMLS_CC);
    old_execute(op_array);
    }

    Modified Vld.c

    In order to have a controlled test environment, I created some sample files and encoded them. I started with hello.php from before.

    Here is the result of running the modified VLD against hello.php.

    It clearly executed just fine. But why are there no opcodes shown?

    Empty Opcode Dump

    I needed to start debugging to see what was going on under the hood. First off, a zend_op_array is passed as an argument here.

    static void vld_execute(zend_op_array *op_array TSRMLS_DC)

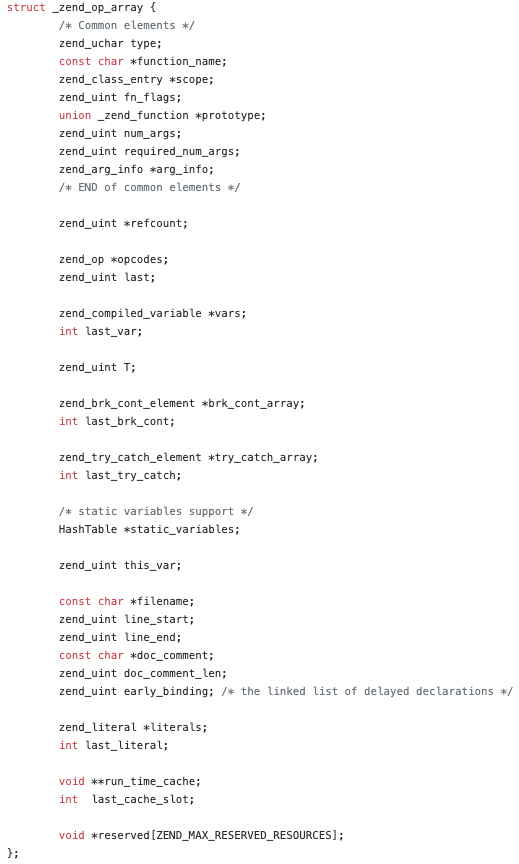
    Let’s see what the structure looks like:

    Source: https://github.com/php/php-src/blob/09d2b01f384dee54f0348c865a6b2e3c85d26ebd/Zend/zend_compile.h#L53

    Source: https://github.com/php/php-src/blob/09d2b01f384dee54f0348c865a6b2e3c85d26ebd/Zend/zend_compile.h#L255

    Now, what does vld_dump_oparray() do with it? This is defined in srm_oparray.c. Quite a bit happens, in fact. It analyzes the branches, formats the output and dumps the opcodes in the array. There is a loop that iterates over each zend_op in the opcodes member and calls vld_dump_op().

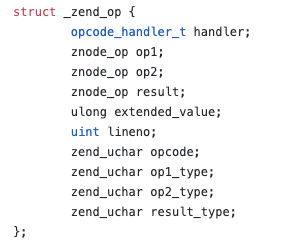
    Here is the zend_op structure.

    Source: https://github.com/php/php-src/blob/09d2b01f384dee54f0348c865a6b2e3c85d26ebd/Zend/zend_compile.h#L54

    Source: https://github.com/php/php-src/blob/09d2b01f384dee54f0348c865a6b2e3c85d26ebd/Zend/zend_compile.h#L106

    Okay, so what does vld_dump_op() do? Essentially, it inspects the specified zend_op and outputs the relevant pieces. One unusual thing is this: the lineno is always 0.

    In comes the debugger!

    All debugging was performed in the GNU Debugger (GDB). I set a breakpoint on execute() so we can inspect the op_array and opcodes contained within. I’ve left out the SG wrapper code dump and excessive debugger output. Something to note is that execute() must be hit twice because the first call to execute is for the wrapper code, and the second call executes the bytecode we’re after.

    $ gdb php
    Reading symbols from php...
    (gdb) b execute
    Breakpoint 1 at 0x36f760: file php-src/Zend/zend_vm_execute.h, line 343.
    (gdb) r -dvld.dump_paths=0 -dvld.execute=0 hello.php
    Starting program: /usr/local/bin/php -dvld.dump_paths=0 -dvld.execute=0 hello.php
    [Thread debugging using libthread_db enabled]
    Using host libthread_db library "/lib/x86_64-linux-gnu/libthread_db.so.1".
    . . . <snip> . . .Breakpoint 1, execute (op_array=0x7ffff5b7e918) at php-src/Zend/zend_vm_execute.h:343
    343 {
    (gdb) c
    Continuing.execute()
    filename: hello.php
    function name: (null)
    number of ops: 3
    compiled vars: none
    line #* E I O op fetch ext return operands
    --------------------------------------------------------------------
    Breakpoint 1, execute (op_array=0x7ffff5b85340) at php-src/Zend/zend_vm_execute.h:343
    343 {
    (gdb) p op_array
    $1 = (zend_op_array *) 0x7ffff5b85340
    (gdb) p *op_array
    $2 = {type = 2 '\002', function_name = 0x0, scope = 0x0, fn_flags = 134217728, prototype = 0x0, num_args = 0, required_num_args = 0, arg_info = 0x0, refcount = 0x7ffff5b805f8, opcodes = 0x7ffff5b7ea18, last = 3, vars = 0x0, last_var = 0, T = 0, brk_cont_array = 0x0,
    last_brk_cont = 0, try_catch_array = 0x0, last_try_catch = 0, static_variables = 0x0, this_var = 4294967295, filename = 0x7ffff5b7eab8 "hello.php", line_start = 0, line_end = 0, doc_comment = 0x0, doc_comment_len = 0, early_binding = 4294967295,
    literals = 0x7ffff5b85440, last_literal = 2, run_time_cache = 0x0, last_cache_slot = 0, reserved = {0x555555f4e450, 0x0, 0x0, 0x0}}

    Take note of a few things here in the op_array. Last = 3, which makes sense, there are 3 operations. It’s also weird that line_start and line_end are both 0 though. Let’s look at the individual zend_op’s.

    (gdb) p op_array->opcodes[0]
    $4 = {handler = 0x7ffff4a09280, op1 = {constant = 4122471032, var = 4122471032, num = 4122471032, hash = 140737315859064, opline_num = 4122471032, jmp_addr = 0x7ffff5b7ea78, zv = 0x7ffff5b7ea78, literal = 0x7ffff5b7ea78, ptr = 0x7ffff5b7ea78}, op2 = {constant = 0,
    var = 0, num = 0, hash = 0, opline_num = 0, jmp_addr = 0x0, zv = 0x0, literal = 0x0, ptr = 0x0}, result = {constant = 0, var = 0, num = 0, hash = 0, opline_num = 0, jmp_addr = 0x0, zv = 0x0, literal = 0x0, ptr = 0x0}, extended_value = 0, lineno = 0, opcode = 42 '*',
    op1_type = 0 '\000', op2_type = 0 '\000', result_type = 0 '\000'}(gdb) p op_array->opcodes[1]
    $5 = {handler = 0x5555558dfaa0 <ZEND_ECHO_SPEC_CONST_HANDLER>, op1 = {constant = 4122498112, var = 4122498112, num = 4122498112, hash = 140737315886144, opline_num = 4122498112, jmp_addr = 0x7ffff5b85440, zv = 0x7ffff5b85440, literal = 0x7ffff5b85440,
    ptr = 0x7ffff5b85440}, op2 = {constant = 0, var = 0, num = 0, hash = 0, opline_num = 0, jmp_addr = 0x0, zv = 0x0, literal = 0x0, ptr = 0x0}, result = {constant = 0, var = 0, num = 0, hash = 0, opline_num = 0, jmp_addr = 0x0, zv = 0x0, literal = 0x0, ptr = 0x0},
    extended_value = 0, lineno = 0, opcode = 40 '(', op1_type = 1 '\001', op2_type = 0 '\000', result_type = 0 '\000'}(gdb) p op_array->opcodes[2]
    $6 = {handler = 0x5555558cd390 <ZEND_RETURN_SPEC_CONST_HANDLER>, op1 = {constant = 4122498152, var = 4122498152, num = 4122498152, hash = 140737315886184, opline_num = 4122498152, jmp_addr = 0x7ffff5b85468, zv = 0x7ffff5b85468, literal = 0x7ffff5b85468,
    ptr = 0x7ffff5b85468}, op2 = {constant = 0, var = 0, num = 0, hash = 0, opline_num = 0, jmp_addr = 0x0, zv = 0x0, literal = 0x0, ptr = 0x0}, result = {constant = 0, var = 0, num = 0, hash = 0, opline_num = 0, jmp_addr = 0x0, zv = 0x0, literal = 0x0, ptr = 0x0},
    extended_value = 0, lineno = 0, opcode = 62 '>', op1_type = 1 '\001', op2_type = 0 '\000', result_type = 0 '\000'}

    All three instructions have a lineno of 0.

    Looking at vld_dump_op(), it was clear why the ops are not being dumped.

    Source: https://github.com/derickr/vld/blob/483716c1626d05edb01ef9bc9a70046c327c5218/srm_oparray.c#L696

    I commented that if-block out. And this was the new output:

    Encoded

    Comparing this output to the original, unencoded file:

    Not Encoded

    Interesting. So the encoded sample has an additional JMP instruction at the beginning. Oddly, the JMP goes straight to the return though… that can’t be right. This didn’t make sense, so I created more samples.

    Comparing Samples

    Let’s look at a basic example with an if…else.

    <?php$num = rand(0, 1);
    if ($num == 1)
    {
    echo "1\n";
    }
    else
    {
    echo "0\n";
    }?>

    And here is the VLD output.

    Encoded
    Not Encoded

    Very interesting… the encoded sample output has 2 additional instructions, and the JMP is at the beginning again. Also, oddly, if you follow the instructions for the encoded output, it just doesn’t add up. First we jump to instruction 4, and then rand() is called. However, only 1 argument is passed to rand. Instruction 3 is not executed prior to the call to rand. Also you can see that the JMPZ is changed to a JMPZNZ. Either we jump to instruction 11 then instruction 3, which is a SEND_VAL. Or we jump to the ASSIGN instruction. None of it makes sense.

    There was a common trend I saw when analyzing sample after sample:

    • An initial additional JMP instruction
    • Some instructions were completely changed – e.g. JMPZ turned into JMPZNZ
    • Control flow via branching did not match the logic for an unencoded dump

    These observations led me to believe that there was some obfuscation going on.

    Opcode Handlers

    Back to the debugger. If you look at the op handlers, something sticks out. For reference, there are a variety of op handlers that know what to do with a specific opcode.

    (gdb) p op_array->opcodes[0]
    $4 = {handler = 0x7ffff4a09280, op1 = {constant = 4122471032, var = 4122471032, num = 4122471032, hash = 140737315859064, opline_num = 4122471032, jmp_addr = 0x7ffff5b7ea78, zv = 0x7ffff5b7ea78, literal = 0x7ffff5b7ea78, ptr = 0x7ffff5b7ea78}, op2 = {constant = 0,
    var = 0, num = 0, hash = 0, opline_num = 0, jmp_addr = 0x0, zv = 0x0, literal = 0x0, ptr = 0x0}, result = {constant = 0, var = 0, num = 0, hash = 0, opline_num = 0, jmp_addr = 0x0, zv = 0x0, literal = 0x0, ptr = 0x0}, extended_value = 0, lineno = 0, opcode = 42 '*',
    op1_type = 0 '\000', op2_type = 0 '\000', result_type = 0 '\000'}(gdb) p op_array->opcodes[1]
    $5 = {handler = 0x5555558dfaa0 <ZEND_ECHO_SPEC_CONST_HANDLER>, op1 = {constant = 4122498112, var = 4122498112, num = 4122498112, hash = 140737315886144, opline_num = 4122498112, jmp_addr = 0x7ffff5b85440, zv = 0x7ffff5b85440, literal = 0x7ffff5b85440,
    ptr = 0x7ffff5b85440}, op2 = {constant = 0, var = 0, num = 0, hash = 0, opline_num = 0, jmp_addr = 0x0, zv = 0x0, literal = 0x0, ptr = 0x0}, result = {constant = 0, var = 0, num = 0, hash = 0, opline_num = 0, jmp_addr = 0x0, zv = 0x0, literal = 0x0, ptr = 0x0},
    extended_value = 0, lineno = 0, opcode = 40 '(', op1_type = 1 '\001', op2_type = 0 '\000', result_type = 0 '\000'}(gdb) p op_array->opcodes[2]
    $6 = {handler = 0x5555558cd390 <ZEND_RETURN_SPEC_CONST_HANDLER>, op1 = {constant = 4122498152, var = 4122498152, num = 4122498152, hash = 140737315886184, opline_num = 4122498152, jmp_addr = 0x7ffff5b85468, zv = 0x7ffff5b85468, literal = 0x7ffff5b85468,
    ptr = 0x7ffff5b85468}, op2 = {constant = 0, var = 0, num = 0, hash = 0, opline_num = 0, jmp_addr = 0x0, zv = 0x0, literal = 0x0, ptr = 0x0}, result = {constant = 0, var = 0, num = 0, hash = 0, opline_num = 0, jmp_addr = 0x0, zv = 0x0, literal = 0x0, ptr = 0x0},
    extended_value = 0, lineno = 0, opcode = 62 '>', op1_type = 1 '\001', op2_type = 0 '\000', result_type = 0 '\000'}

    Notice in opcode 0 that the handler address is in a different address space than the other two opcode handlers. 0x7ffff4a09280 vs 0x5555558dfaa0 or 0x5555558cd390. Also, opcode 0 doesn’t seem to have a symbol associated with the address. On the other hand, opcodes 1 and 2 have handlers that point to ZEND_ECHO_SPEC_CONST_HANDLER and ZEND_RETURN_SPEC_CONST_HANDLER.

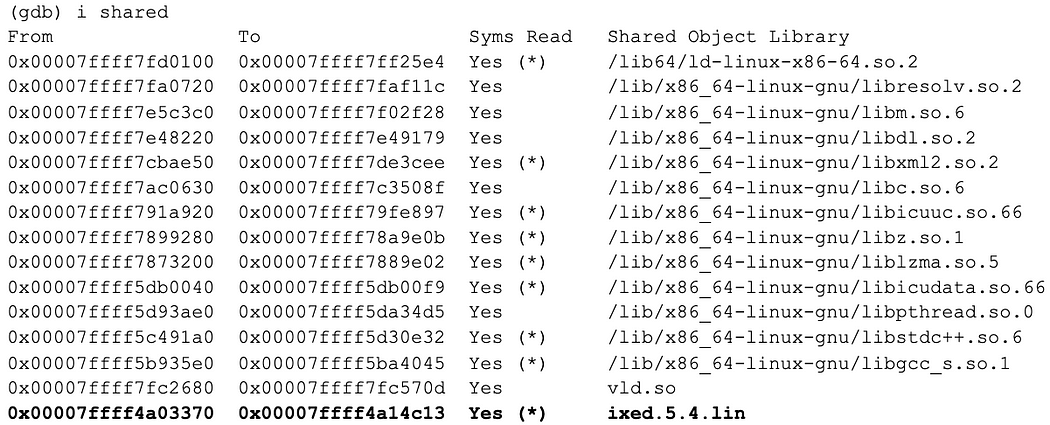
    Let’s take a look at the address ranges for loaded libraries:

    0x7ffff4a09280 belongs to ixed.5.4.lin, which is the SG loader extension.

    The other two handlers are mapped within the PHP executable. This is quite curious. The first jump instruction handler points to a function contained in the SG loader extension. We’ll set a breakpoint in there and let execution continue.

    (gdb) b *0x7ffff4a09280
    Breakpoint 2 at 0x7ffff4a09280
    (gdb) c
    Continuing.

    Breakpoint 2, 0x00007ffff4a09280 in ?? () from /usr/local/lib/php/extensions/no-debug-non-zts-20100525/ixed.5.4.lin

    I prefer intel over at&t syntax. So we set the flavor.

    (gdb) set disassembly-flavor intel
    (gdb) disas
    No function contains program counter for selected frame.

    Weird. Let’s try disassembling a range. No need to read this. More on that later.

    (gdb) disas $rip,$rip+128
    Dump of assembler code from 0x7ffff4a09280 to 0x7ffff4a09300:
    => 0x00007ffff4a09280: push rbp
    0x00007ffff4a09281: movabs rsi,0xaaaaaaaaaaaaaaab
    0x00007ffff4a0928b: push rbx
    0x00007ffff4a0928c: sub rsp,0x8
    0x00007ffff4a09290: mov rdx,QWORD PTR [rip+0x210ff9]
    0x00007ffff4a09297: mov rbx,QWORD PTR [rdi]
    0x00007ffff4a0929a: mov rax,QWORD PTR [rdi+0x28]
    0x00007ffff4a0929e: movsxd rdx,DWORD PTR [rdx]
    0x00007ffff4a092a1: mov rbp,QWORD PTR [rbx+0x8]
    0x00007ffff4a092a5: mov rcx,rbp
    0x00007ffff4a092a8: mov rdx,QWORD PTR [rax+rdx*8+0xd0]
    0x00007ffff4a092b0: mov rax,QWORD PTR [rax+0x40]
    0x00007ffff4a092b4: sub rcx,rax
    0x00007ffff4a092b7: mov rdx,QWORD PTR [rdx]
    0x00007ffff4a092ba: sar rcx,0x4
    0x00007ffff4a092be: imul rcx,rsi
    0x00007ffff4a092c2: shl rcx,0x4
    0x00007ffff4a092c6: mov ecx,DWORD PTR [rcx+rdx*1]
    0x00007ffff4a092c9: lea rcx,[rcx+rcx*2]
    0x00007ffff4a092cd: shl rcx,0x4
    0x00007ffff4a092d1: lea rcx,[rax+rcx*1]
    0x00007ffff4a092d5: mov QWORD PTR [rbx+0x8],rcx
    0x00007ffff4a092d9: mov rcx,rbx
    0x00007ffff4a092dc: sub rcx,rax
    0x00007ffff4a092df: mov rax,rcx
    0x00007ffff4a092e2: sar rax,0x4
    0x00007ffff4a092e6: imul rax,rsi
    0x00007ffff4a092ea: shl rax,0x4
    0x00007ffff4a092ee: call QWORD PTR [rdx+rax*1+0x8]
    0x00007ffff4a092f2: mov QWORD PTR [rbx+0x8],rbp
    0x00007ffff4a092f6: add rsp,0x8
    0x00007ffff4a092fa: pop rbx
    0x00007ffff4a092fb: pop rbp
    0x00007ffff4a092fc: ret

    I stepped through this, and ultimately landed at the CALL instruction:

    0x00007ffff4a092ee: call   QWORD PTR [rdx+rax*1+0x8]

    Next, I stepped into this function call.

    (gdb) si
    ZEND_JMP_SPEC_HANDLER (execute_data=0x7ffff5b4c9e0) at php-src/Zend/zend_vm_execute.h:430
    430 {

    My, oh my. The SG custom JMP handler eventually called the ZEND_JMP_SPEC_HANDLER. There is a zend_execute_data structure passed as an argument as well. After a bit of fumbling around – starting and restarting the debugger – and scratching my head, I noticed something about the data structure passed to the Zend handler.

    Operand 1 to the current PHP operation (opline.. which points inside op_array->opcodes), had changed!

    Before entering the SG jmp handler
    After entering the zend jmp handler

    The jmp_addr is different! This explains why the control flow logic in the VLD opcode dumps don’t make sense. The JMP operands have been tampered with.

    At this point, I felt I needed to do some in depth analysis of the SG jmp handler.

    Source Guardian JMP Handler Analysis

    I opened ixed.5.4.lin in Hopper Disassembler. The JMP handler function is at offset 0x9280 in the file, and a cursory glance around revealed that there are 4 additional functions composed of similar logic. The usage of constant 0xaaaaaaaaaaaaaaab in each of them was a dead giveaway.

    I then realized that these were probably additional custom opcode handlers, and I would need to analyze each of them. My next task was to figure out which opcodes map up to which handlers. I did this by modifying the vld_dump_op() function to compare the current opcode structure’s handler address to the handler supplied by the Zend engine. If the handler’s address didn’t match up with the Zend handler’s address, it would print some output prior to dumping the operation’s fields.

    Added some debug statements

    This allowed me to determine some of the offsets of custom handlers and their corresponding opcodes. For example, here is a JMPZNZ:

    and a JMP:

    These offsets (0x280 and 0x3f0) correspond to the handlers in the Hopper disassembly. This was confirmation that the nearby functions were almost all surely custom handlers.

    At this point I knew I had to accomplish a couple things:

    • Map all custom handler functions to opcode values in the SG loader extension
    • Figure out how to “fix” the opcode structures so that vld_dump_op() would display the correct operands. This would make the control flow logic make sense.

    I decided to go with option 2 first. I wanted to prove that I could doctor up a basic JMP instruction before I moved on to other instructions. I’m going to run through the JMP handler, and we’ll talk about what’s happening. Once we’ve gone through this handler, the others are quite similar.

    Dynamic Analysis of the JMP Handler

    As we’ve seen, a JMP is placed at the beginning of each op_array. At the second invocation of execute(), we can print the first opcode to get the address of the JMP handler. It should look familiar.

    (gdb) p op_array->opcodes[0]
    $1 = {handler = 0x7ffff4a09280, op1 = {constant = 4122470936, var = 4122470936, num = 4122470936, hash = 140737315858968, opline_num = 4122470936, jmp_addr = 0x7ffff5b7ea18, zv = 0x7ffff5b7ea18, literal = 0x7ffff5b7ea18,
    ptr = 0x7ffff5b7ea18}, op2 = {constant = 0, var = 0, num = 0, hash = 0, opline_num = 0, jmp_addr = 0x0, zv = 0x0, literal = 0x0, ptr = 0x0}, result = {constant = 0, var = 0, num = 0, hash = 0, opline_num = 0, jmp_addr = 0x0,
    zv = 0x0, literal = 0x0, ptr = 0x0}, extended_value = 0, lineno = 0, opcode = 42 '*', op1_type = 0 '\000', op2_type = 0 '\000', result_type = 0 '\000'}
    (gdb) b *0x7ffff4a09280
    Breakpoint 2 at 0x7ffff4a09280

    Next, we’ll continue into the handler function.

    (gdb) c
    Continuing.
    Breakpoint 2, 0x00007ffff4a09280 in ?? () from /usr/local/lib/php/extensions/no-debug-non-zts-20100525/ixed.5.4.lin

    Next, I dumped the registers to see what’s pointing where. My research was conducted on an x86_64 architecture – System V. This is important to know for recognizing function arguments.

    (gdb) info registers
    rax 0x7ffff5b7ea18 140737315858968
    rbx 0x7ffff5b4c9e0 140737315654112
    rcx 0x7ffff5b4ca70 140737315654256
    rdx 0x555555dbaa68 93825001040488
    rsi 0x0 0
    rdi 0x7ffff5b4c9e0 140737315654112
    rbp 0x7ffff5b809f8 0x7ffff5b809f8
    rsp 0x7fffffff93a8 0x7fffffff93a8
    r8 0x555555f53ec0 93825002716864
    r9 0x7ffff5b85770 140737315886960
    r10 0xfffffffffffff6bf -2369
    r11 0x55555594a9b0 93824996387248
    r12 0x1 1
    r13 0x3ff0 16368
    r14 0x7ffff5b4ca70 140737315654256
    r15 0x0 0
    rip 0x7ffff4a09280 0x7ffff4a09280
    eflags 0x246 [ PF ZF IF ]
    cs 0x33 51
    ss 0x2b 43
    ds 0x0 0
    es 0x0 0
    fs 0x0 0
    gs 0x0 0

    So the rdi register is pointing to 0x7ffff5b4c9e0. This is the first function argument for System V calling convention. If you look at zend_vm_execute.h, you’ll see that a handler takes an argument of type ZEND_OPCODE_HANDLER_ARGS.

    static int ZEND_FASTCALL  ZEND_JMP_SPEC_HANDLER(ZEND_OPCODE_HANDLER_ARGS)

    Really, it’s just a macro for a pointer to a zend_execute_data structure.

    #define ZEND_OPCODE_HANDLER_ARGS zend_execute_data *execute_data TSRMLS_DC

    Let’s print out the structure contents in GDB.

    (gdb) p *((zend_execute_data *)0x7ffff5b4c9e0)$4 = {opline = 0x7ffff5b7ea18, function_state = {function = 0x7ffff5b809f8, arguments = 0x0}, fbc = 0x0, called_scope = 0x0, op_array = 0x7ffff5b809f8, object = 0x0, Ts = 0x7ffff5b4ca70, CVs = 0x7ffff5b4ca70,symbol_table = 0x555555dbaa68 <executor_globals+392>, prev_execute_data = 0x7ffff5b4b060, old_error_reporting = 0x0, nested = 0 '\000', original_return_value = 0x7ffff5b4c438, current_scope = 0x7ffff5b4c458,current_called_scope = 0x7ffff5b4c478, current_this = 0x7ffff5b4c498, current_object = 0x7ffff5b4c4b8}

    This makes sense because the op_array has the same address as the argument to execute(). Here’s a look back at when we hit that break point.

    Breakpoint 1, execute (op_array=0x7ffff5b809f8) at php-src/Zend/zend_vm_execute.h:343

    Now that we know the argument is zend_execute_data, allow me to show you the important functionality in the function. For reference, here is the disassembly again:

       0x00007ffff4a09280: push   rbp
    0x00007ffff4a09281: movabs rsi,0xaaaaaaaaaaaaaaab
    0x00007ffff4a0928b: push rbx
    0x00007ffff4a0928c: sub rsp,0x8
    0x00007ffff4a09290: mov rdx,QWORD PTR [rip+0x210ff9]
    0x00007ffff4a09297: mov rbx,QWORD PTR [rdi]
    0x00007ffff4a0929a: mov rax,QWORD PTR [rdi+0x28]
    0x00007ffff4a0929e: movsxd rdx,DWORD PTR [rdx]
    0x00007ffff4a092a1: mov rbp,QWORD PTR [rbx+0x8]
    0x00007ffff4a092a5: mov rcx,rbp
    0x00007ffff4a092a8: mov rdx,QWORD PTR [rax+rdx*8+0xd0]
    0x00007ffff4a092b0: mov rax,QWORD PTR [rax+0x40]
    0x00007ffff4a092b4: sub rcx,rax
    0x00007ffff4a092b7: mov rdx,QWORD PTR [rdx]
    0x00007ffff4a092ba: sar rcx,0x4
    0x00007ffff4a092be: imul rcx,rsi
    0x00007ffff4a092c2: shl rcx,0x4
    0x00007ffff4a092c6: mov ecx,DWORD PTR [rcx+rdx*1]
    0x00007ffff4a092c9: lea rcx,[rcx+rcx*2]
    0x00007ffff4a092cd: shl rcx,0x4
    0x00007ffff4a092d1: lea rcx,[rax+rcx*1]
    0x00007ffff4a092d5: mov QWORD PTR [rbx+0x8],rcx
    0x00007ffff4a092d9: mov rcx,rbx
    0x00007ffff4a092dc: sub rcx,rax
    0x00007ffff4a092df: mov rax,rcx
    0x00007ffff4a092e2: sar rax,0x4
    0x00007ffff4a092e6: imul rax,rsi
    0x00007ffff4a092ea: shl rax,0x4
    0x00007ffff4a092ee: call QWORD PTR [rdx+rax*1+0x8]
    0x00007ffff4a092f2: mov QWORD PTR [rbx+0x8],rbp
    0x00007ffff4a092f6: add rsp,0x8
    0x00007ffff4a092fa: pop rbx
    0x00007ffff4a092fb: pop rbp
    0x00007ffff4a092fc: ret

    The Important Parts

    0x00007ffff4a09290: mov rdx,QWORD PTR [rip+0x210ff9]

    What happens is a pointer is dereferenced and the value is stored into rdx. Notice that the pointer address is calculated as a relative offset from the instruction pointer, rip.

    (gdb) p/x $rdx
    $1 = 0x7ffff4c1a640

    And it points into the SG loader … so it’s dipping into the loader to grab another pointer.

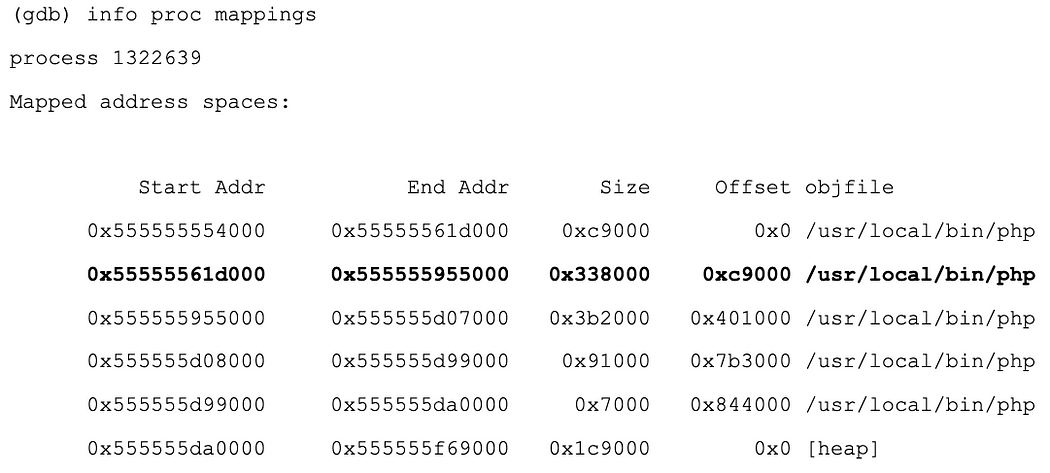
    (gdb) info proc mappings
    ...0x7ffff4c1a000 0x7ffff4c1b000 0x1000 0x1a000 ixed.5.4.lin...

    Prior to this instruction:

    0x00007ffff4a092d5: mov QWORD PTR [rbx+0x8],rcx

    Rbx points to opline (current operation), so this means the instruction sets opline->op1 to the value at rcx.

    (gdb) p *(zend_op *)$rbx
    $35 = {handler = 0x7ffff4a09280, op1 = {constant = 4122470936, var = 4122470936, num = 4122470936, hash = 140737315858968, opline_num = 4122470936, jmp_addr = 0x7ffff5b7ea18, zv = 0x7ffff5b7ea18, literal = 0x7ffff5b7ea18,
    ptr = 0x7ffff5b7ea18}, op2 = {constant = 0, var = 0, num = 0, hash = 0, opline_num = 0, jmp_addr = 0x0, zv = 0x0, literal = 0x0, ptr = 0x0}, result = {constant = 0, var = 0, num = 0, hash = 0, opline_num = 0, jmp_addr = 0x0,
    zv = 0x0, literal = 0x0, ptr = 0x0}, extended_value = 0, lineno = 0, opcode = 42 '*', op1_type = 0 '\000', op2_type = 0 '\000', result_type = 0 '\000'}

    After the instruction executes, notice that op1 has changed, and the jmp_addr is a different address.

    (gdb) p *(zend_op *)$rbx
    $39 = {handler = 0x7ffff4a09280, op1 = {constant = 4122470984, var = 4122470984, num = 4122470984, hash = 140737315859016, opline_num = 4122470984, jmp_addr = 0x7ffff5b7ea48, zv = 0x7ffff5b7ea48, literal = 0x7ffff5b7ea48,
    ptr = 0x7ffff5b7ea48}, op2 = {constant = 0, var = 0, num = 0, hash = 0, opline_num = 0, jmp_addr = 0x0, zv = 0x0, literal = 0x0, ptr = 0x0}, result = {constant = 0, var = 0, num = 0, hash = 0, opline_num = 0, jmp_addr = 0x0,
    zv = 0x0, literal = 0x0, ptr = 0x0}, extended_value = 0, lineno = 0, opcode = 42 '*', op1_type = 0 '\000', op2_type = 0 '\000', result_type = 0 '\000'}

    At the point when the zend vm opcode handler is called, the operands have been de-obfuscated. The actual JMP handler is called, and control flow can occur as it was originally intended to work.

    0x00007ffff4a092ee: call QWORD PTR [rdx+rax*1+0x8]

    Finally, the opline->op1 is restored back to its obfuscated value before the function returns.

    0x00007ffff4a092f2: mov QWORD PTR [rbx+0x8],rbp 

    So basically,

    1. The current op is de-obfuscated with its original operands.
    2. Then the zend vm opcode handler is called.
    3. And finally, the op is restored back into an obfuscated state.

    My strategy

    Now that we’ve seen how the most basic SG opcode handler (JMP) is implemented, I’d like to talk about my process for “fixing” the zend_op structures prior to dumping them with vld_dump_op(). Remember that the control flow logic doesn’t add up as of now. It took me a while to figure out a solid strategy for this.

    What I ended up doing was creating functions matching up to each of the SG handlers. I copied all of the assembly instructions, and modified the functions slightly. The modifications include the following:

    • construct a zend_execute_data object and pass it in as argument 1 (rdi)
    • dynamically calculate the address for this: mov rdx,QWORD PTR [rip+0x210ff9] … and pass it in as argument 2 (rsi)
    • instead of calling the zend vm handler, store that address as the handler in the opline (current instruction). This would cause the zend vm handler to be called instead of the SG handler.
    • don’t restore the operands! they’ve already been modified to reflect the correct ones. e.g. jmp destination will make sense

    Here is my function for fixing JMP operations. The instructions I’ve added or edited are bold:

    fix_jmp:
    mov rdx, QWORD PTR [rsi] # set rdx to point to some structure containing other pointers
    push rbp
    movabs rsi, 0xaaaaaaaaaaaaaaab
    push rbx
    sub rsp, 0x8
    mov rbx, qword ptr [rdi] # rdi points to opline
    mov rax, qword ptr [rdi+0x28]
    movsxd rdx, dword ptr [rdx]
    mov rbp, qword ptr [rbx+8]
    mov rcx, rbp
    mov rdx, qword ptr [rax+rdx*8+0xd0]
    mov rax, qword ptr [rax+0x40]
    sub rcx, rax
    mov rdx, qword ptr [rdx]
    sar rcx, 0x4
    imul rcx, rsi
    shl rcx, 0x4
    mov ecx, dword ptr [rcx+rdx]
    lea rcx, qword ptr [rcx+rcx*2]
    shl rcx, 0x4
    lea rcx, qword ptr [rax+rcx]
    mov qword ptr [rbx+8], rcx
    mov rcx, rbx
    sub rcx, rax
    mov rax, rcx
    sar rax, 0x4
    imul rax, rsi
    shl rax, 0x4
    # originally this would call ZEND_SPEC_JMP_HANDLER
    # but now, we'll just set the opline->handler to the real one
    mov rcx, qword PTR [rdx+rax+8]
    mov qword PTR [rbx], rcx
    # removed
    # this would reset op1 values to original "obfuscated" values
    # mov qword [rbx+8], rbp

    add rsp, 0x8
    pop rbx
    pop rbp
    ret

    This process was repeated for all of the custom operation handlers. A new function was created to fix various instruction types.

    Once I was able to fix all instruction types that SG seemed to have mangled, there was one final (or two, really) hurdle to jump over. The problem was that, since I was hooking zend_execute, I was only dumping opcodes that were actually being executed. So for example, the “main” part of a PHP file would be dumped because it was the logic that had to run. But as we’ll see, this leaves out some key components.

    Functions and Classes

    Any functions that were defined but were never executed would not be dumped. This was true for classes and their methods as well.

    We’ll look at an example with classes, since it tests both.

    <?phpclass ClassOne
    {
    function func_one()
    {
    echo "one";
    }function notused_one()
    {
    return 1;
    }
    }class ClassTwo
    {
    function func_two()
    {
    echo "two";
    }function notused_two()
    {
    return 2;
    }
    }$a = rand(1, 2);if ($a == 1)
    {
    $b = new ClassOne();
    $b->func_one();
    }else
    {
    $b = new ClassTwo();
    $b->func_two();
    }?>

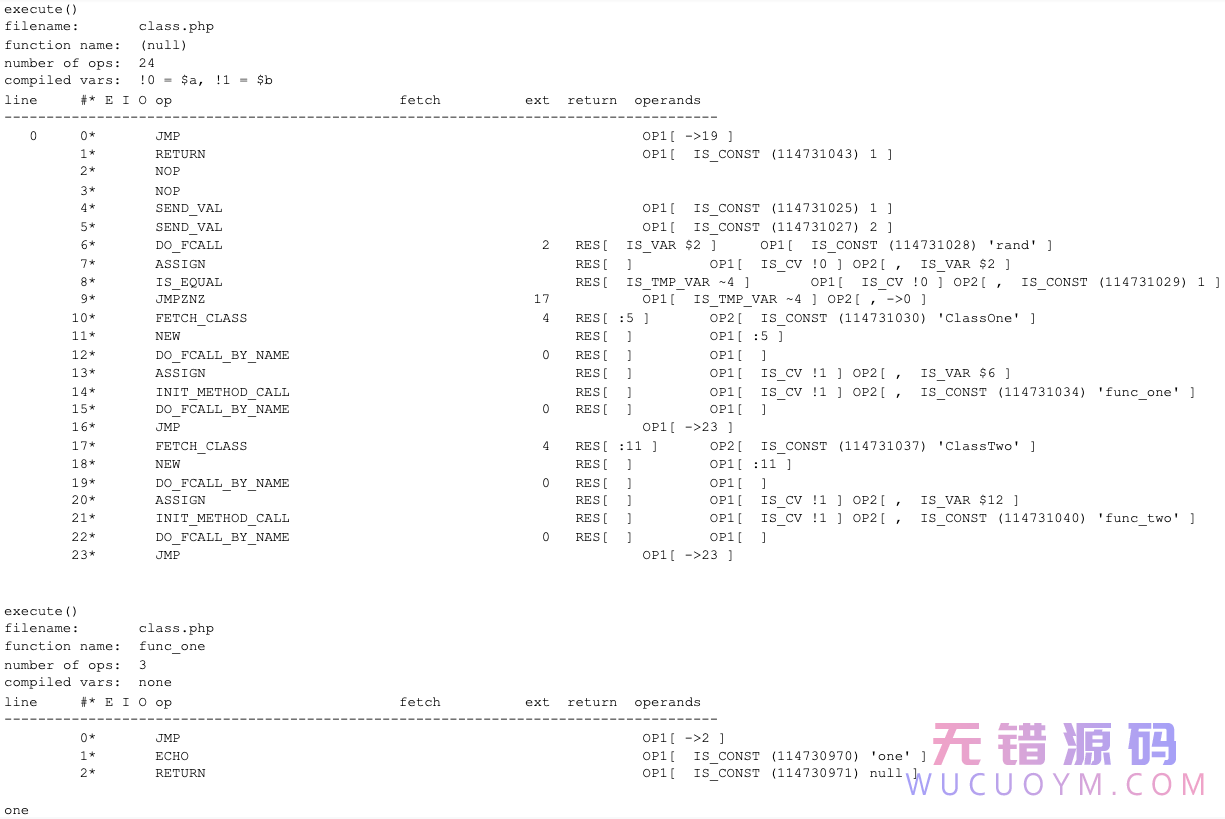
    There are two classes, each with a method that could be used and a “notused” method that will absolutely not be called. Depending on whether rand() returns a 1 or 2, either ClassOne->func_one() or ClassTwo->func_two() will be executed. The output will indicate which method was called.

    As you can see in this output, ClassOne->func_one() was called. The main logic of the script is dumped along with func_one(). However, notused_one() is missing from the output as well as all of ClassTwo’s methods.

    The key to dumping the unused classes and functions is to access the compiler globals function table and class table. The only trick is that these tables need to be “fixed” prior to dumping, just like we’ve done before. Every function entry is a zend_op_array, so we can apply the same “fixing” logic to functions and class methods.

    Wrapping Up

    All in all, the main opcode dumping logic, handled in vld_execute, looks like the below snippet. First the main op_array is dumped. After this, any functions are dumped that exist in the function_table, and finally, the class_table is searched for methods, and these methods are dumped as well.

    // first, fix opcodes not contained in a function or class
    if (op_array->function_name == NULL || strlen(op_array->function_name) == 0) {
    fix_op_array(op_array);
    vld_dump_oparray (op_array TSRMLS_CC);
    }// now fix defined functions
    zend_hash_apply(CG(function_table), (apply_func_t) vld_fix_fe TSRMLS_CC);
    zend_hash_apply_with_arguments (CG(function_table) APPLY_TSRMLS_CC, (apply_func_args_t) vld_dump_fe, 0);// now fix defined classes and class funcs
    zend_hash_apply (CG(class_table), (apply_func_t) vld_fix_cle TSRMLS_CC);
    zend_hash_apply (CG(class_table), (apply_func_t) vld_dump_cle TSRMLS_CC);

    The “fix_op_array” function is responsible for “fixing” all of the op_arrays, and it is used inside vld_fix_fe as well. This function performs several tasks including calculating offsets within the SG loader extension, determining which opcodes to fix, and ultimately, calling the functions that were implemented to “fix” the op_arrays. Here is a switch case showing the opcode numbers that are handled. Notice that several opcodes can map to the same fix function.

    switch (execute_data->op_array->opcodes[i].opcode)
    {
    // 42
    case ZEND_JMP:
    // 100
    case ZEND_GOTO:
    fix_jmp(execute_data, sg_offset);
    break;
    // 46
    case ZEND_JMPZ_EX:
    // 47
    case ZEND_JMPNZ_EX:
    // 152
    case ZEND_JMP_SET:
    // 158
    case ZEND_JMP_SET_VAR:
    fix_jmpnz_ex(execute_data, sg_offset);
    break;
    // 45
    case ZEND_JMPZNZ:
    fix_jmpznz(execute_data, sg_offset);
    break;
    // 68
    case ZEND_NEW:
    // 78
    case ZEND_FE_FETCH:
    // 77
    case ZEND_FE_RESET:
    fix_new(execute_data, sg_offset);
    break;
    // 107
    case ZEND_CATCH:
    fix_catch(execute_data, sg_offset);
    break;
    default:
    break;
    }

    If you’re interested in viewing all of the code, take a look at the project on GitHub. The “fix” functions are all defined in fix_sg.S. Keep in mind that this is all tailored to the SG 5.4 Linux x86_64 loader extension. Additionally, to limit the length of output, I’ve coded things up so that no includes will be dumped.

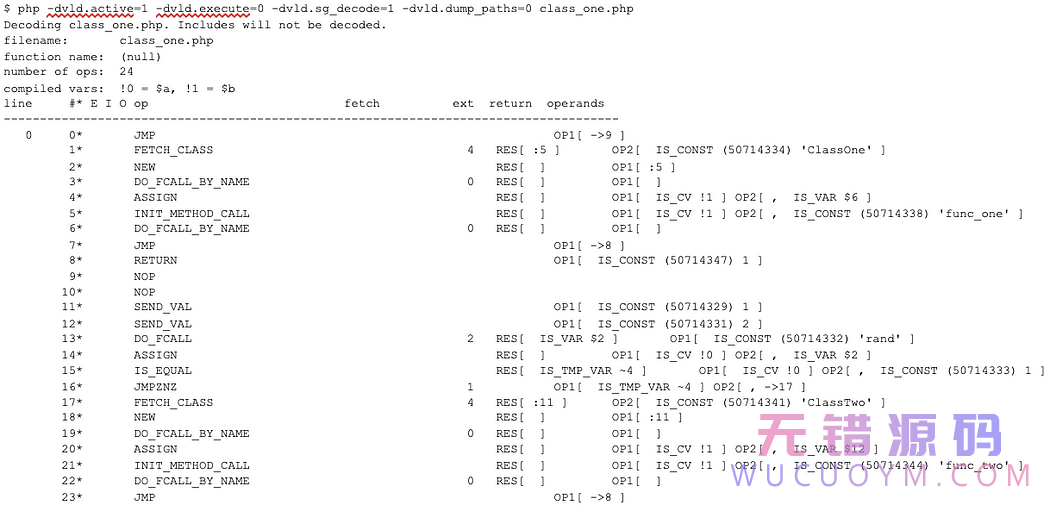
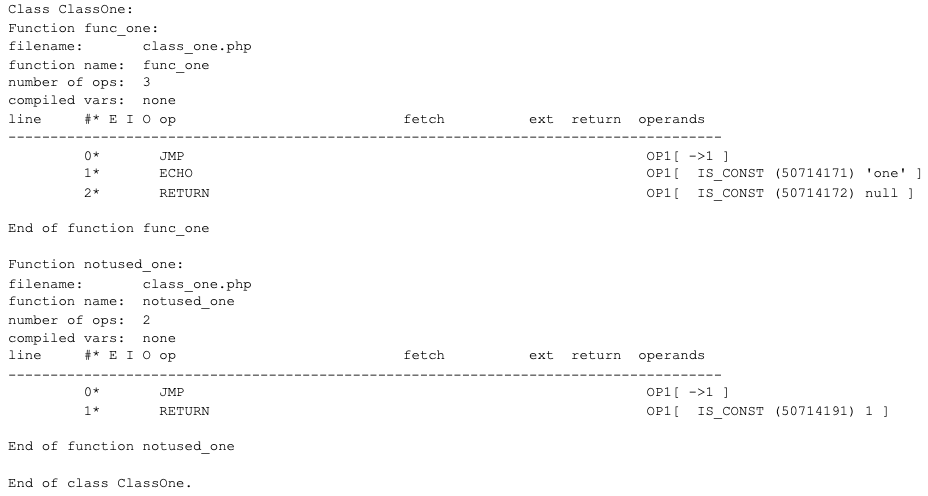
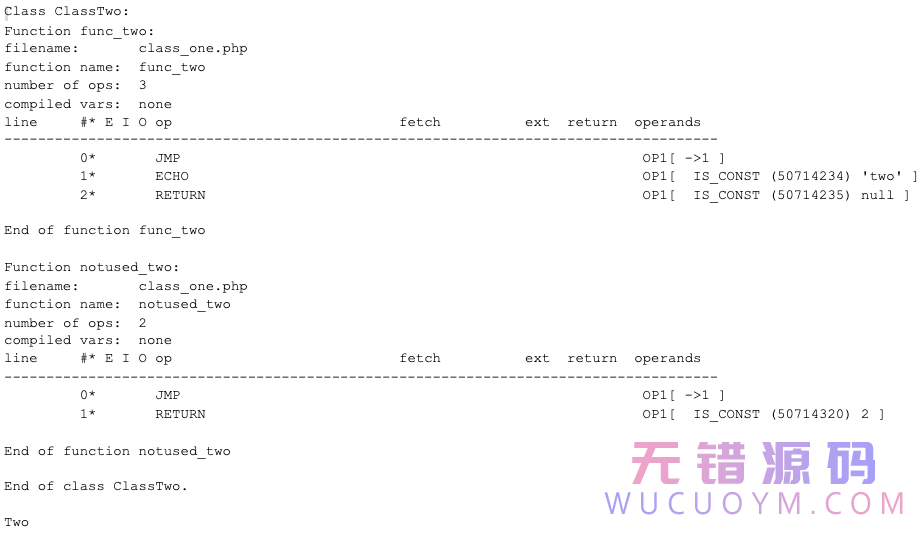
    Before you leave, let’s see a fully decoded class.php. I’ve had to split the output up into multiple images due to the size.

    “main” function
    ClassOne
    ClassTwo and the output (“Two”)

    There you have it. By hooking zend_execute() and fixing opcodes using SourceGuardian’s own decoder logic, we can dump an encoded file with VLD’s functionality. As I said before, the decoder was implemented to target encoded PHP 5.4 files on an x86_64 Linux environment. If you find any bugs or see improvement opportunities, please feel free to reach out

  • PHP:vld扩展的安装与使用

    PHP:vld扩展的安装与使用

    一、安装

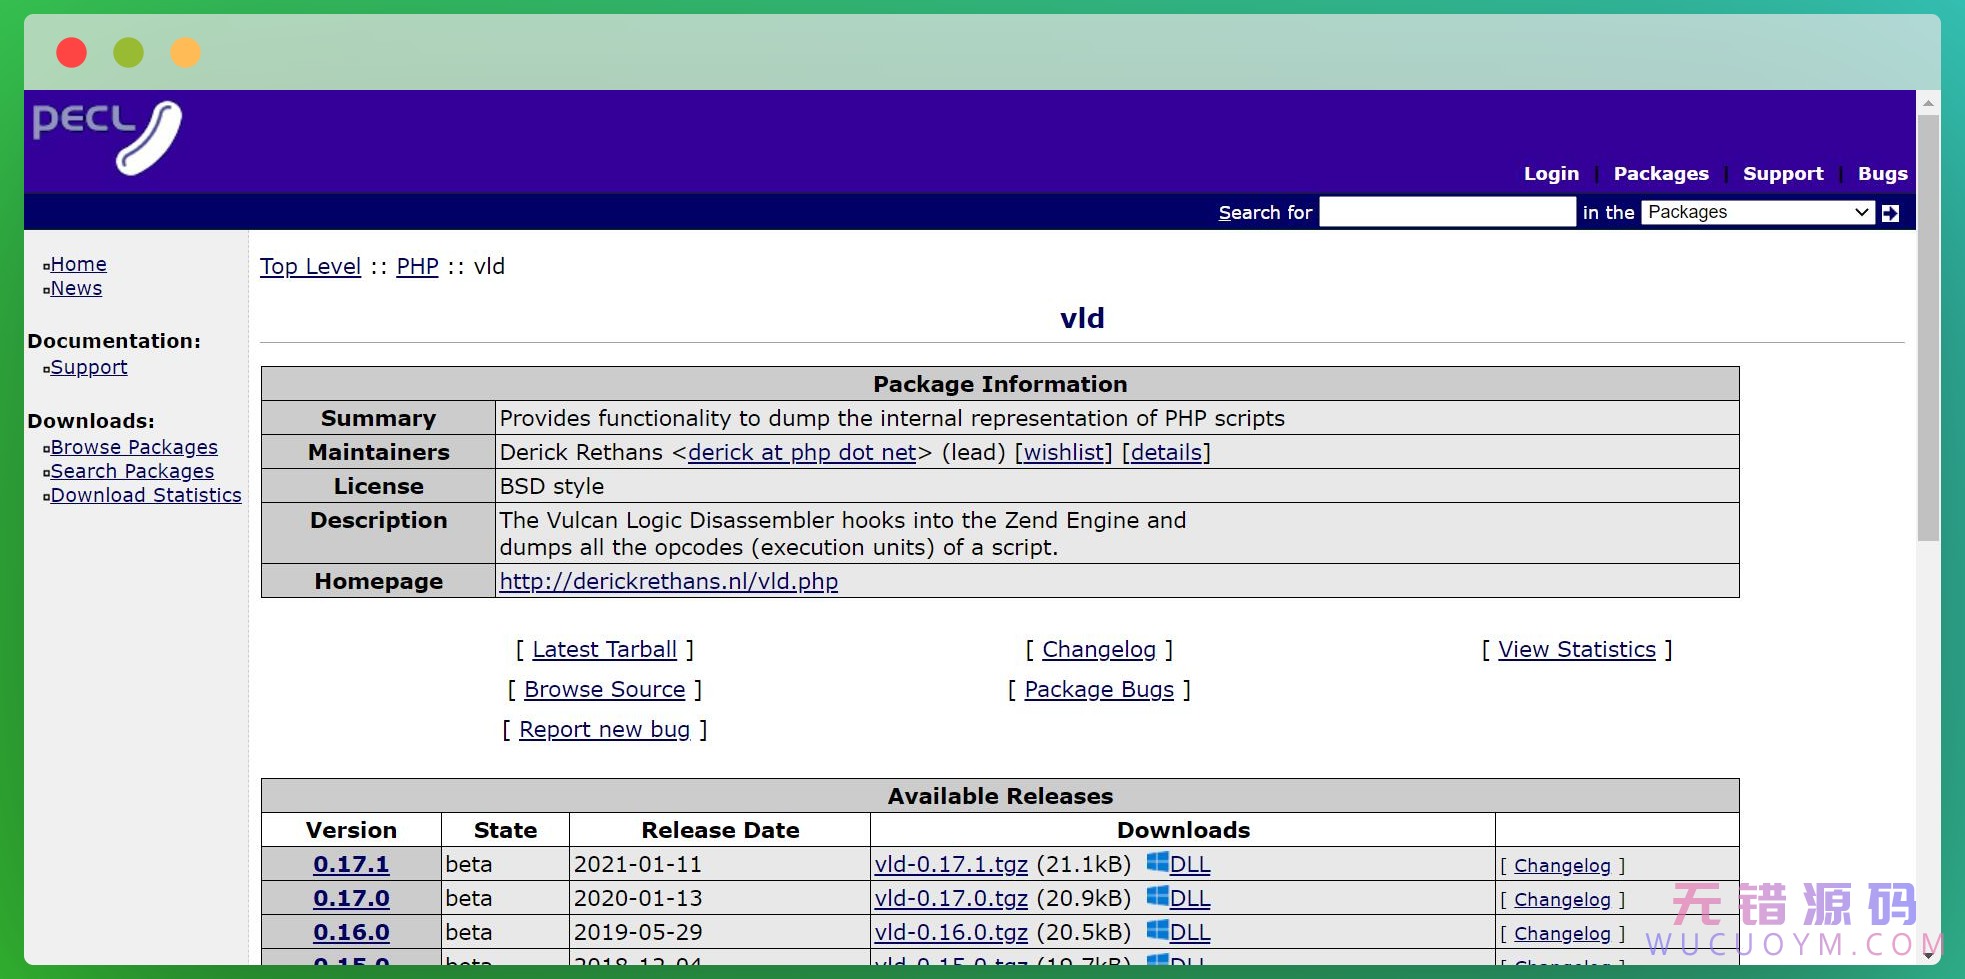
    1、下载官方插件安装压缩包

    官方网址:http://pecl.php.net/package/vld

    下载命令:

    wget http://pecl.php.net/get/vld-0.17.0.tgz
    

    注:下载的URL是在相对的版本链接上,点击右键,复制链接即可

    2、解包

    解包命令:

    tar zxvf vld-0.17.0.tgz 
    

    3、编译和安装

    进入解压后的vld目录:

    cd vld-0.17.0/
    

    扩展php扩展模块:

    phpize
    

    使用locate找php-config路径:

    locate php-config

    注:locate命令没有的话可以使用命令:【# yum -y install mlocate 】 安装后使用 【#  updatedb】 更新数据后可以直接使用

    配置编译vld的php-config路径(替换?): 

    ./configure --with-php-config=? --enable-vld

    编译安装:

    make && make install
    

    编辑php.ini,添加vld.so新扩展:

    extension=vld.so
    

    4.重启php配置生效

    二、使用

    注意:当有多个PHP版本时,运行php命令,需要指定装有vld扩展的php版本路径命令!

    1.linux多PHP版本下指定PHP版本执行命令?

    以php7.4版本为例,该版本执行文件命令路径为:

    /www/server/php/74/bin/php
    

    进入命令行的配置文件.bashrc,添加:

    alias php74=/www/server/php/74/bin/php

    就可以用php74 执行命令了!

    2.vld命令,显示opcode

    ①显示opcode,并显示运行结果

    php74 -dextension=vld.so -dvld.active=1 test.php

    ②只显示opcode

    php74 -dextension=vld.so -dvld.active=1 -dvld.execute=0 test.php
    

  • PHP:利用vld扩展SG11解密基础学习

    PHP:利用vld扩展SG11解密基础学习

    什么是SG11?

    • Source Guardian,一种PHP加密器,可以说是目前最好的加密方式了,多用于保护源代码不被盗取倒卖。

    • 它的代码特征是文件中包含:sg_load(

    • 搜索后,发现这类SG11解密方面的教程非常少,几乎没有。但也能看到有一些Decoder提供解密服务,价格基本在100-200元/文件。价格之贵,足以说明它的保密性了。

    解密原理

    通过安装PHP vld扩展,用操作码OP对PHP文件进行逆向解密。

    [content_hide]

    vld.c 文件
    
    //if (!VLD_G(execute)) {			
    //}
    
    vld_dump_oparray(&execute_data->func->op_array);
    return old_execute_ex(execute_data TSRMLS_DC);
    ----------------------------------------------------------------
    srm_oparray.c 文件
    
    #include "zend_smart_str.h"
    #include "ext/standard/php_var.h"
    
    static inline int vld_dump_zval_double(ZVAL_VALUE_TYPE value)
    {
    	return vld_printf (stderr, "%f", value.dval);
    }
    
    
    static inline int vld_dump_zval_array(zval* value)
    {
    	smart_str buf = {0};
    	php_var_export_ex(value,1,&buf);
    	smart_str_0 (&buf);
    	ZVAL_VALUE_STRING_TYPE *new_str;
    	new_str = php_url_encode(ZSTRING_VALUE(buf.s), buf.s->len);
    	int ret = vld_printf(stderr,"%s",ZSTRING_VALUE(new_str));
    	efree(new_str);
    	smart_str_free(&buf);
    	return ret;
    }
    
    case IS_ARRAY:          return vld_dump_zval_array (&val);

    [/content_hide]

  • 通过宝塔面板实现多端口建站与SG11解密

    通过宝塔面板实现多端口建站与SG11解密

    实践过程

    通过宝塔面板搭建网站

    说明 

    因为篇幅原因,在这里只写几个主要的小问题,也是我在之前第一次搭建过程中遇到的问题,具体搭建教程网上都有。

    • 在安装宝塔面板之前,请注意将云服务器的操作系统更换为 CentOS操作系统,因为我在初始配置中选的默认系统,结果不知何种原因,在安装宝塔面板后,无法安装Web服务器(Nginx)。3
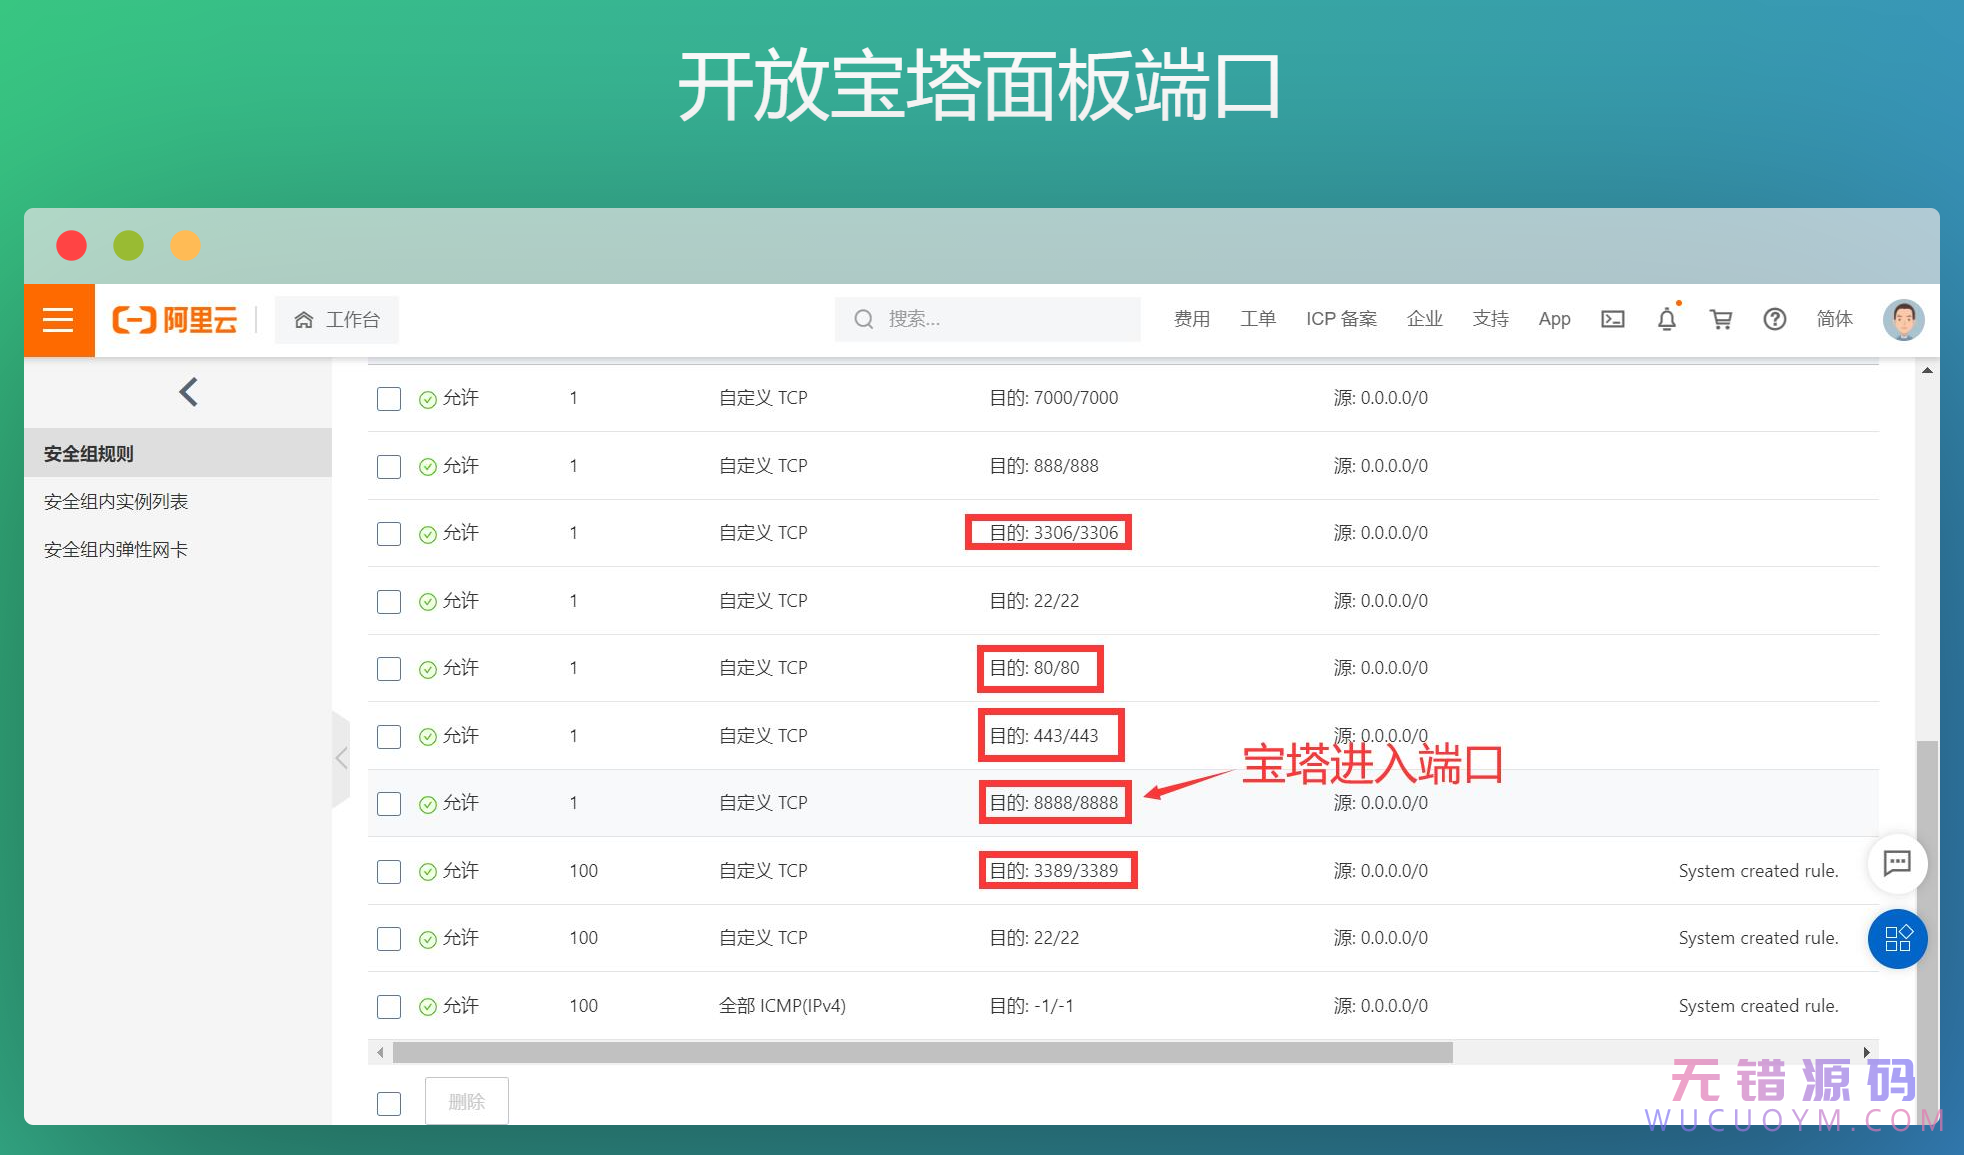
    • 记得一定要在安全组配置里开放宝塔面板的端口(8888),否则打不开,也可以把其他常用端口打开。4
    • 小技巧:如何在没有域名及二级域名的情况下,通过不同的IP端口来实现访问不同的网站内容?
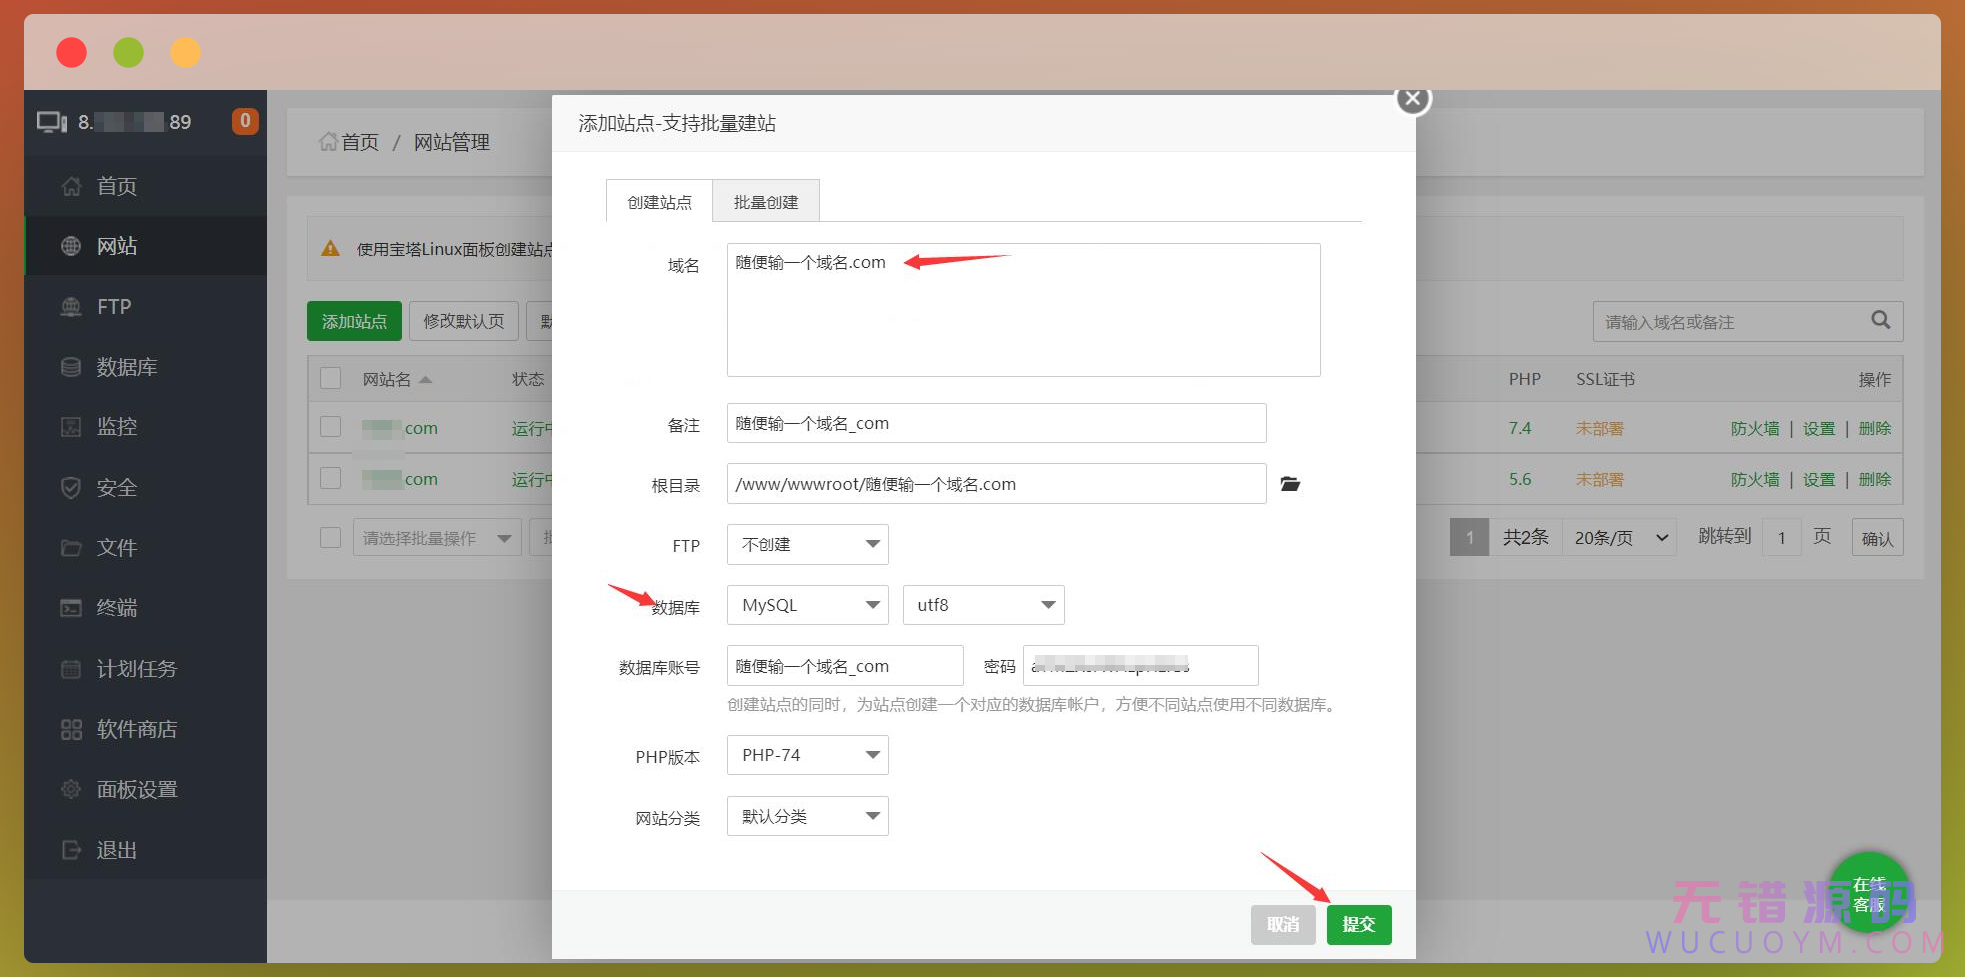
      1. 添加站点,随便输入一个域名(例:aliyun.com),创建数据库,提交。5
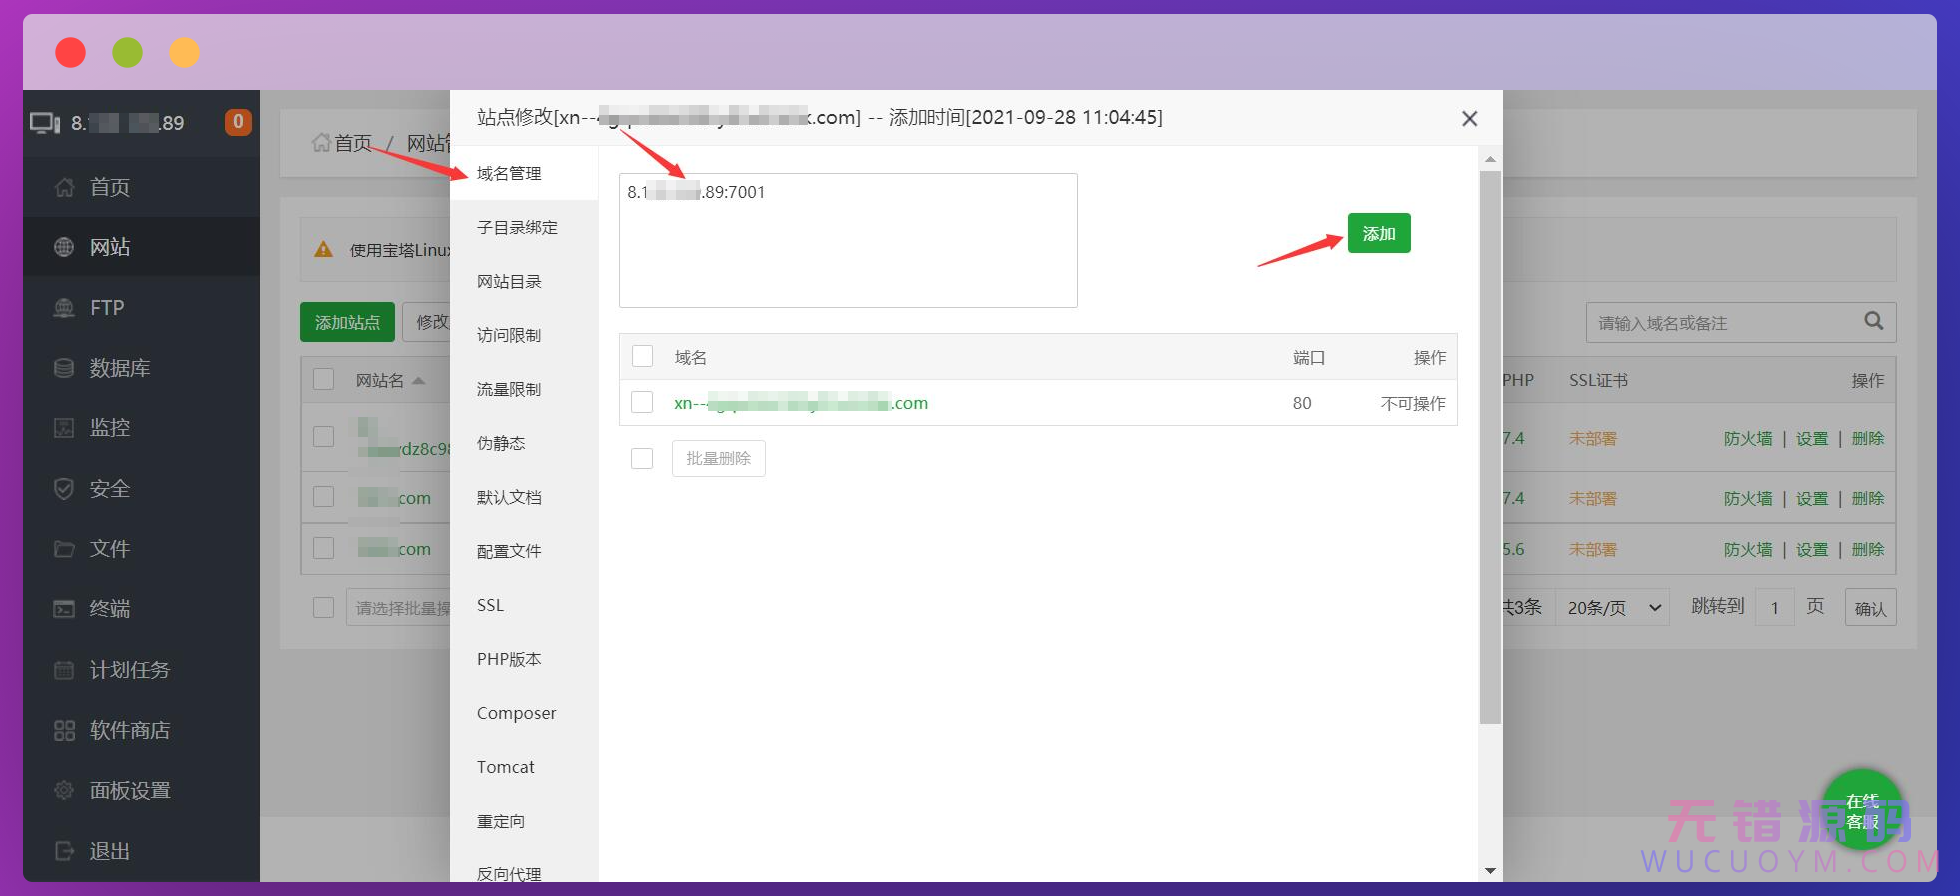
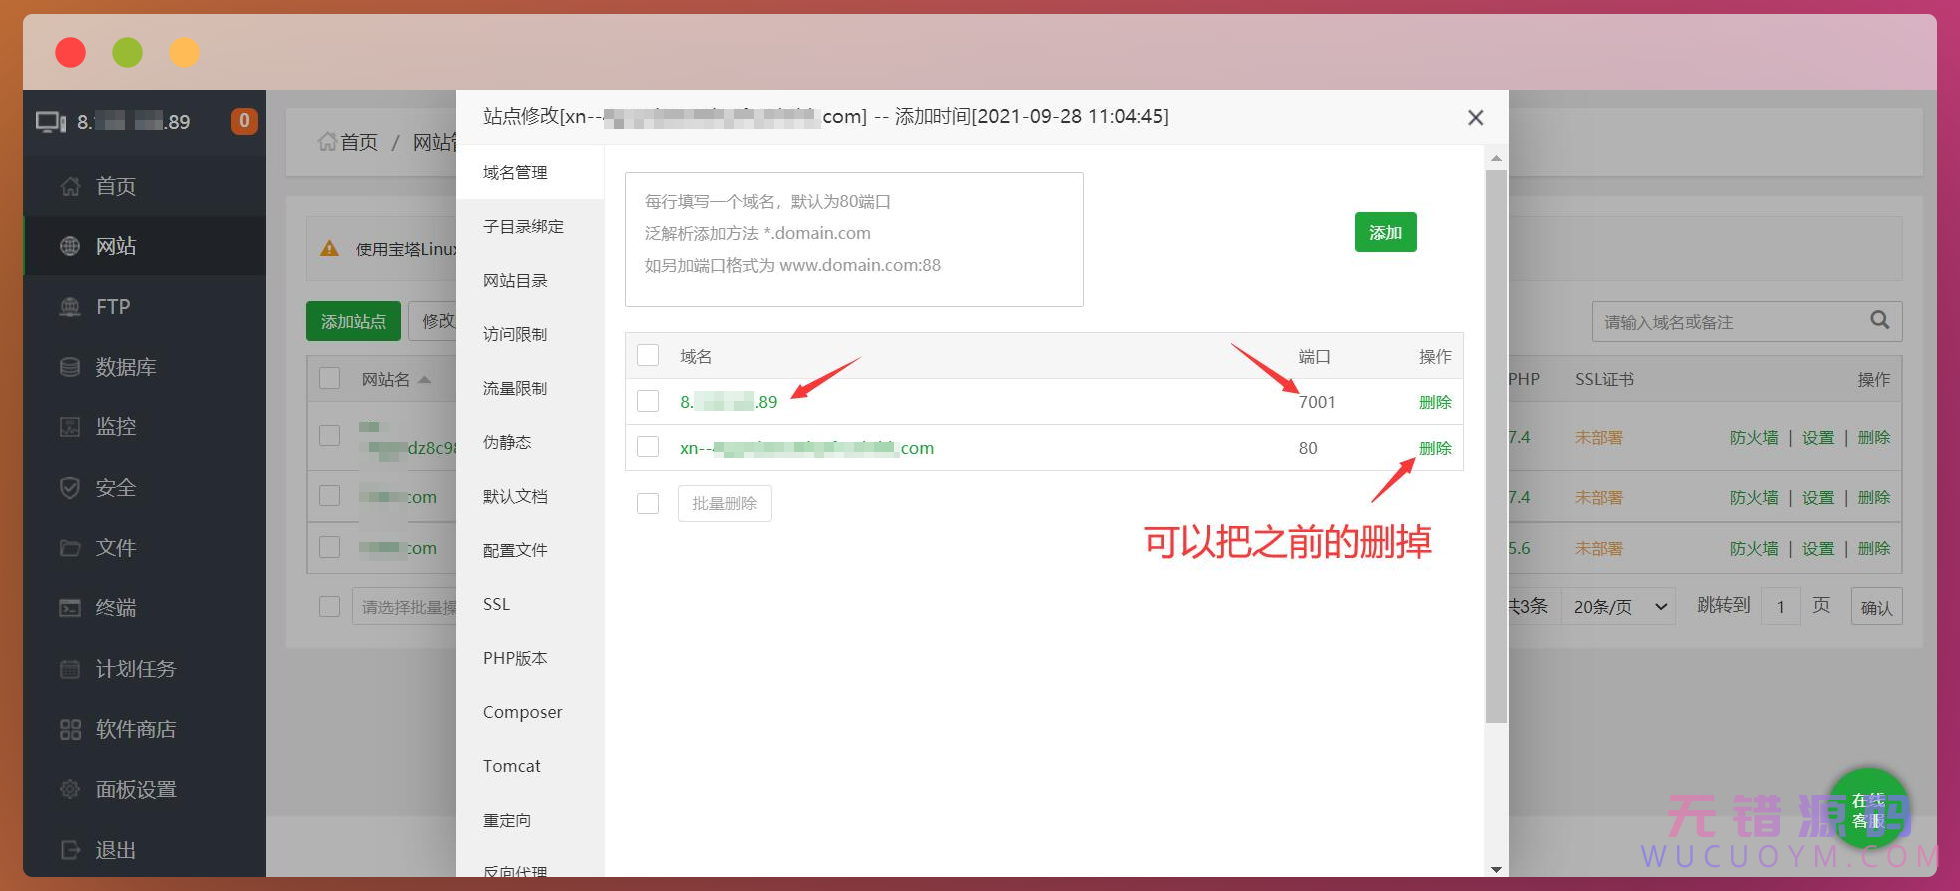
      2. 在设置-域名管理,添加域名(格式:IP:端口号)(ps:端口号尽量避开常用端口),然后添加,如下图。6添加成功,可以把之前的那个删掉。7
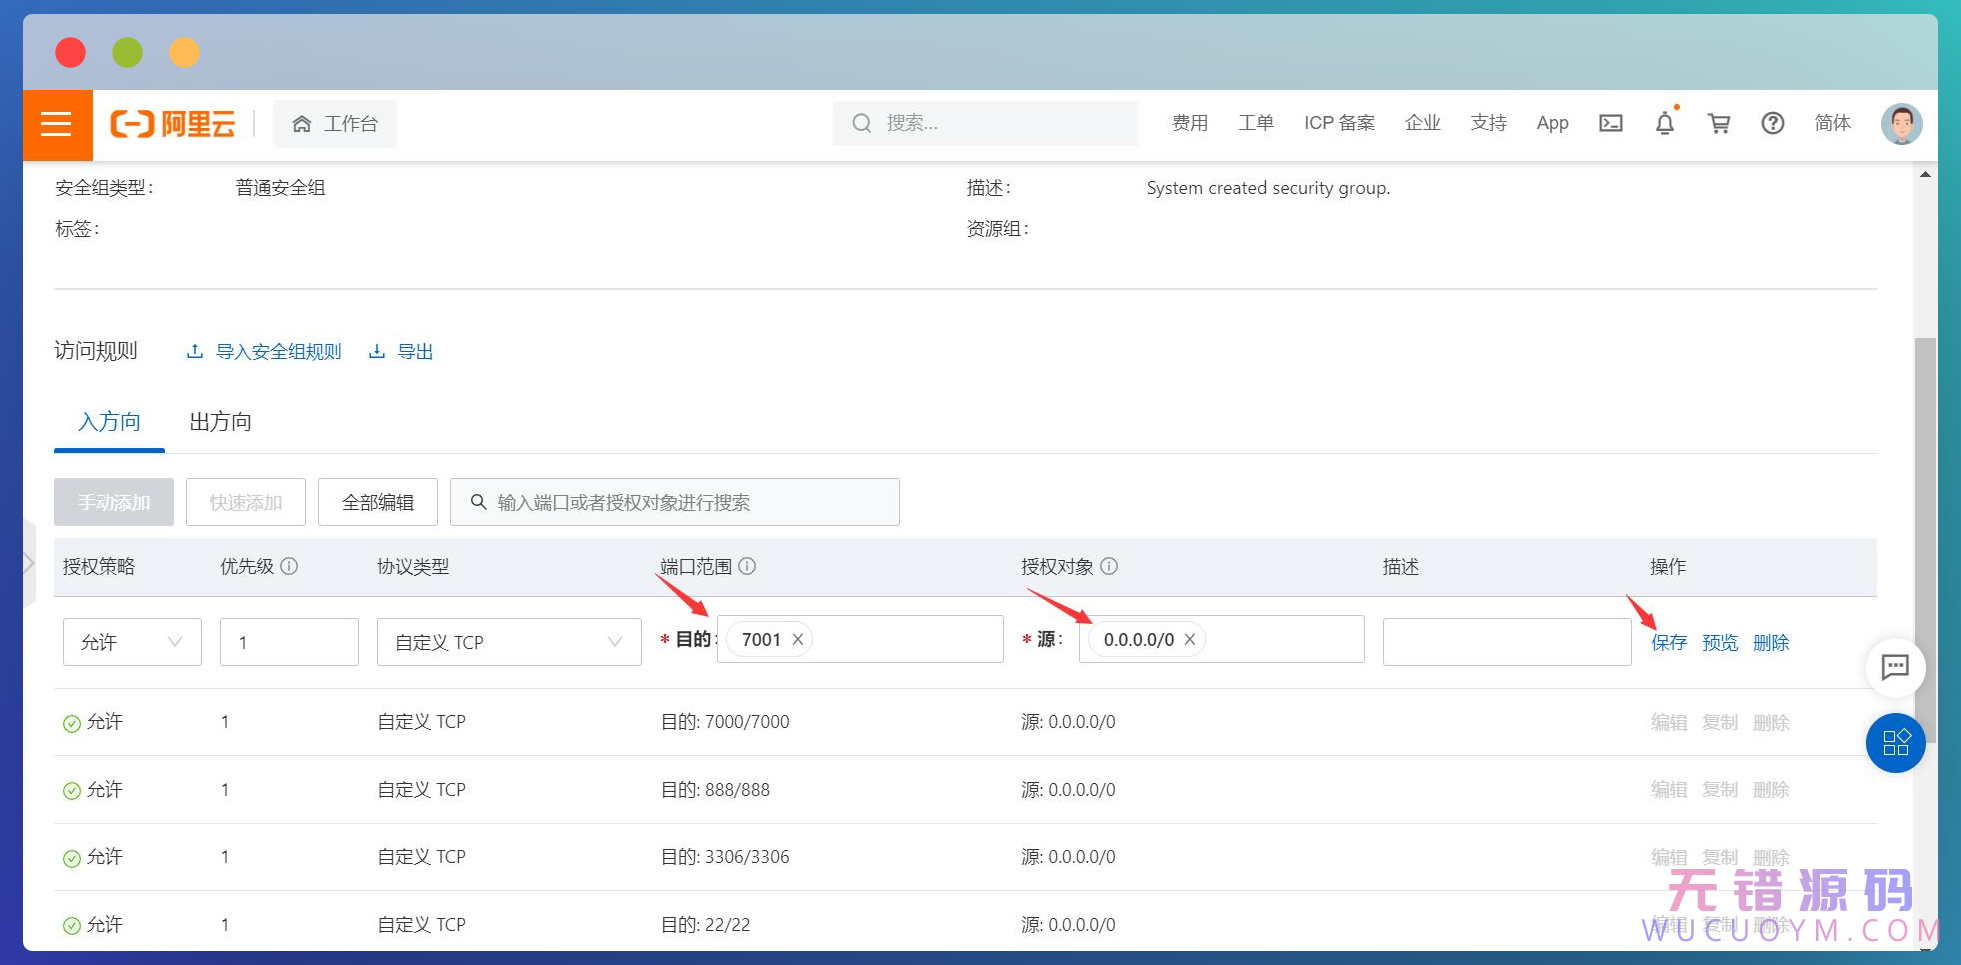
      3. 在安全组/防火墙中,开放上一步添加的端口号,只有配置了端口号,我们才能打开网站。8
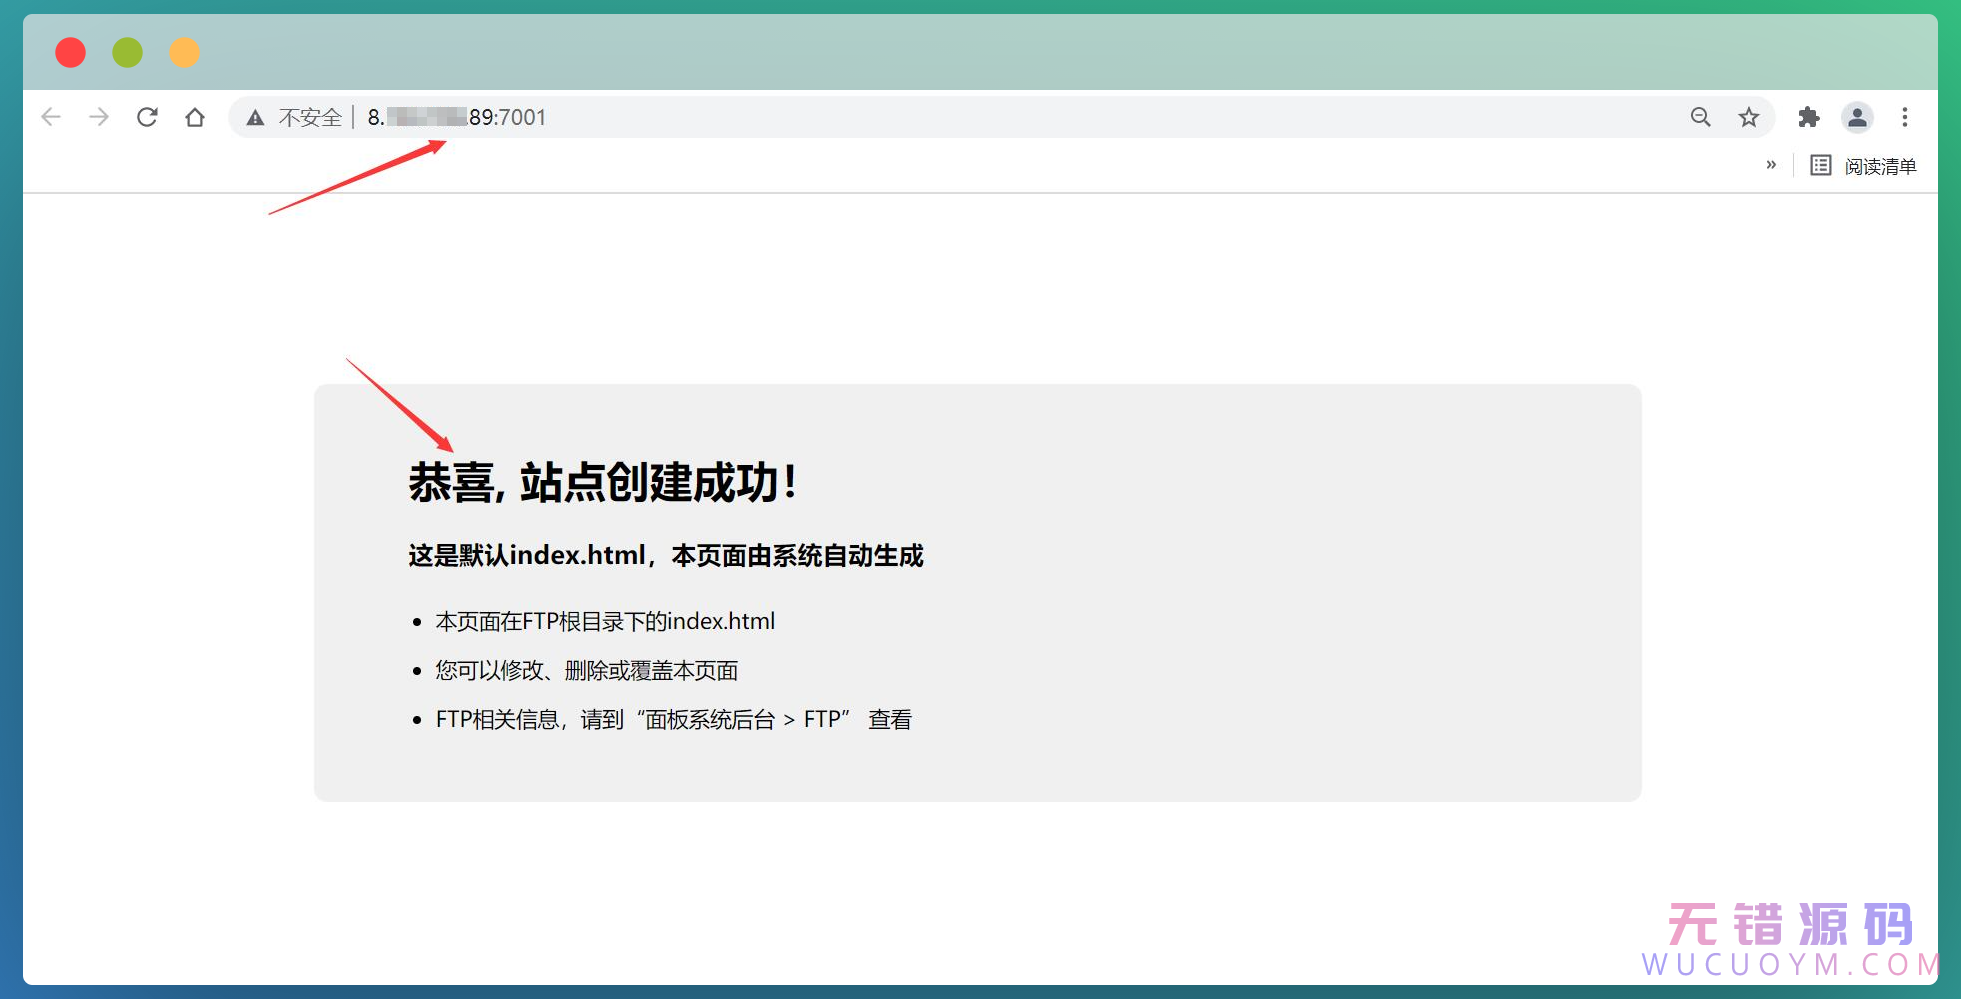
      4. 在浏览器输入地址,网站创建成功。按照这样的步骤,我们就可以创建不同的IP端口地址进入不同的网站了。9

    SG11解密

    What?

    • Source Guardian,一种PHP加密器,可以说是目前最好的加密方式了,多用于保护源代码不被盗取倒卖。
    • 它的代码特征是文件中包含:sg_load(
    • 搜索后,发现这类SG11解密方面的教程非常少,几乎没有。但也能看到有一些Decoder提供解密服务,价格基本在100-200元/文件。价格之贵,足以说明它的保密性了。

    Why?

    因为最近买了一个源码,部分文件就是用SG11加密的,很想尝试给它破解了。(仅用于学习)

    How?

    结果国内SG11解密教程非常少,找了许久,才找到一个只有四小节的视频课程,这里就不放视频了,还有在外国网站上看到的 SG11解密教程,之后都会在无错源码上单独发出来。

    那么具体是怎么做的呢?

    1. 首先需要下载vld(PHP的扩展),然后把它上传到ECS服务器中,并解压。说明 什么是vld?是一个PHP扩展,它可以查看PHP程序的opcode,也就是操作码。10
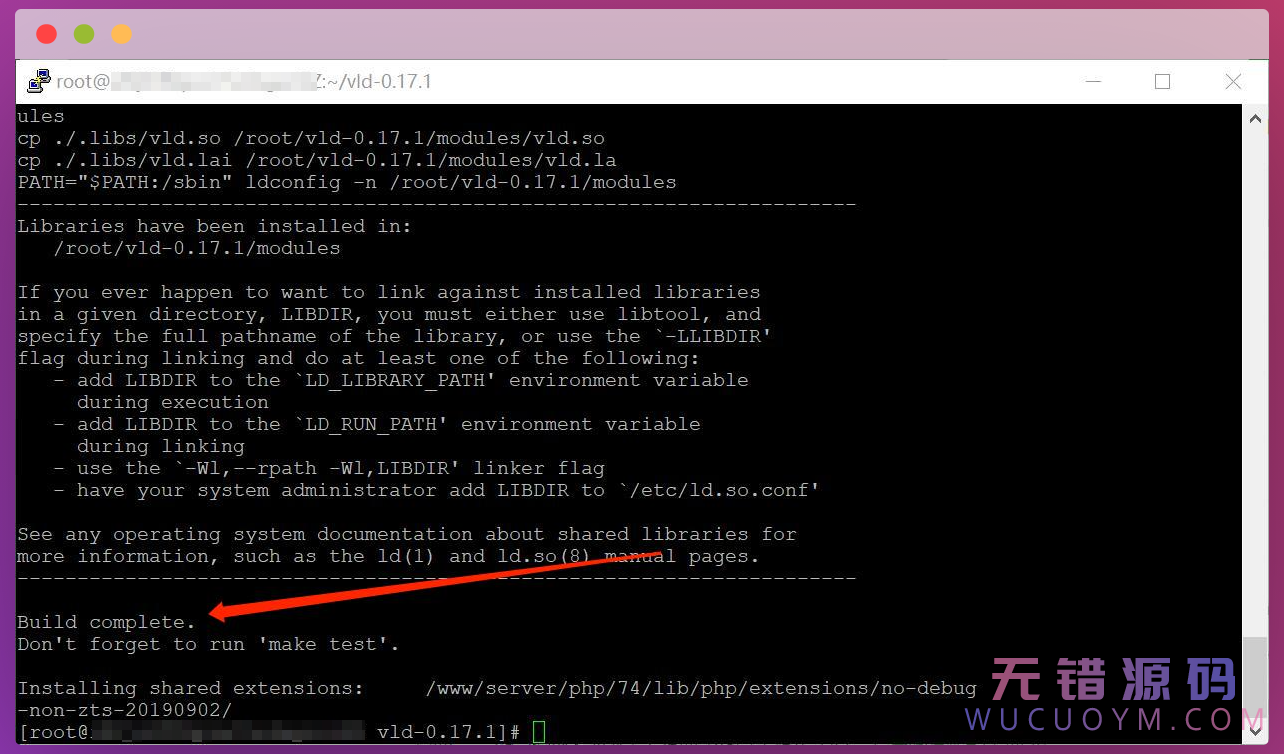
    2. 通过一系列配置(配置较多,就不放在这了),安装成功。11
    3. 简单操作:将一个简单加密文件解密。
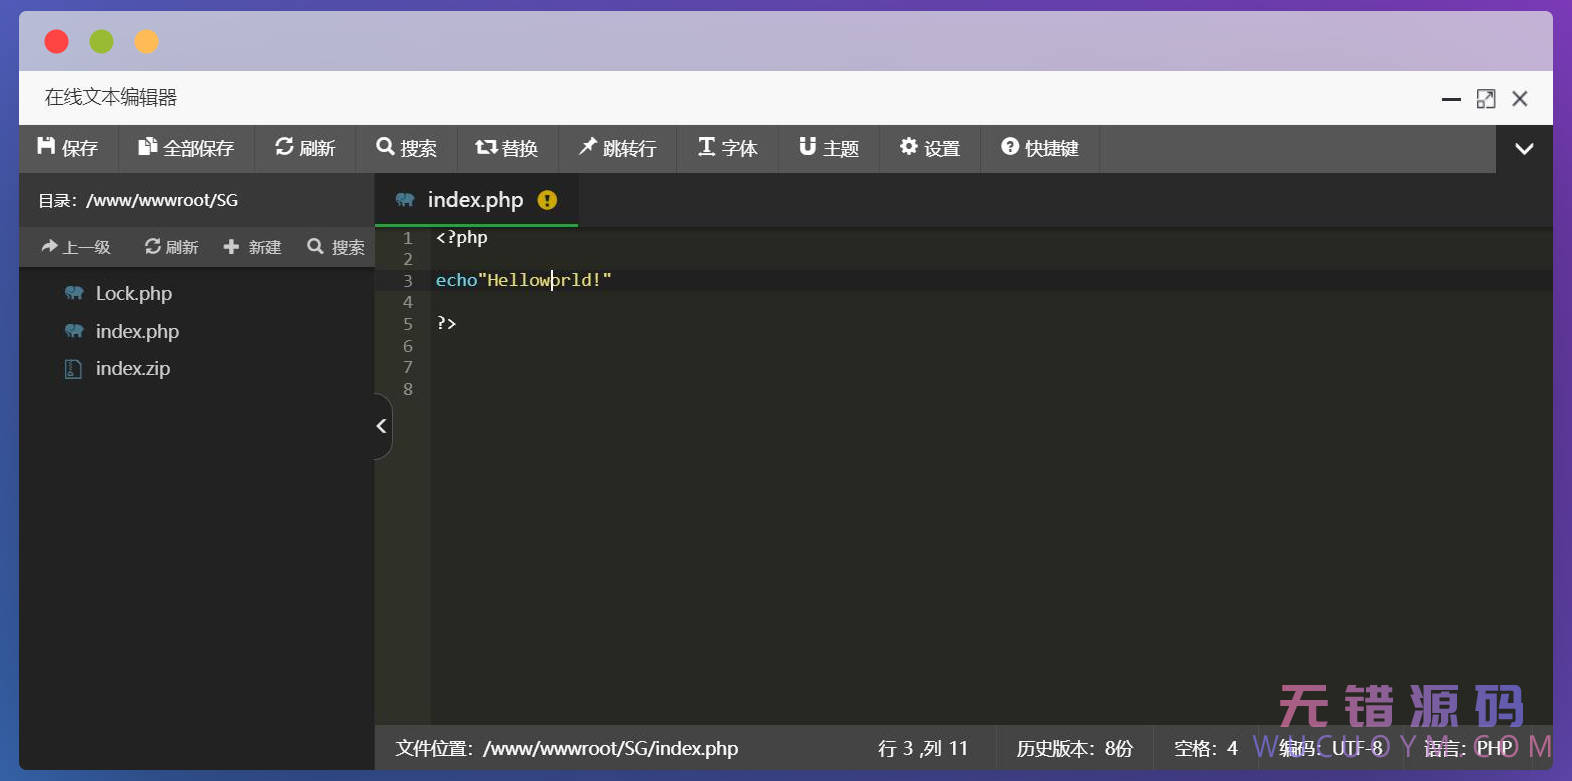
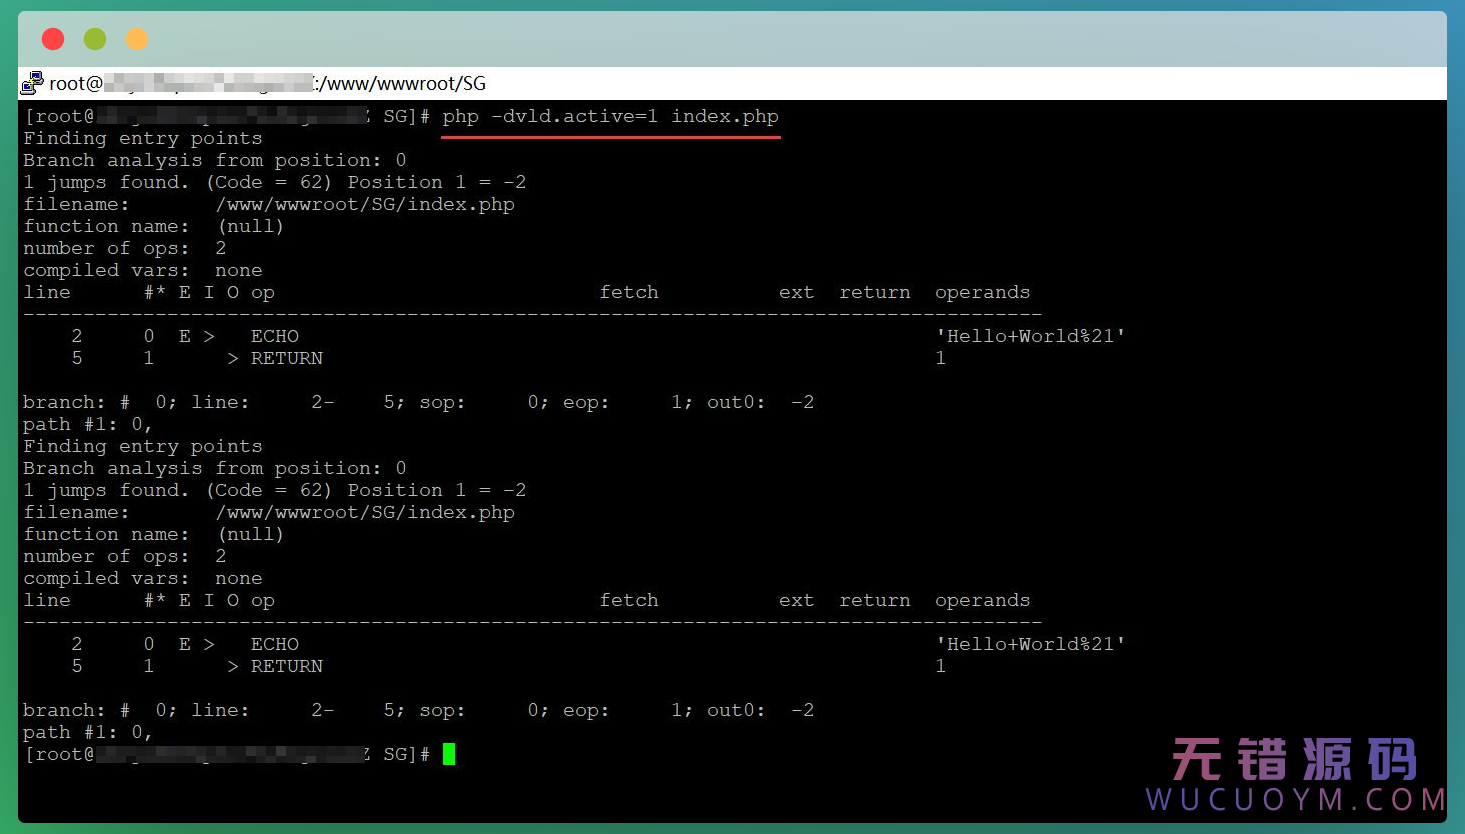
      1. 先写一个php文件,例如:Helloworld!12
      2. 输入命令php -dvld.avtive=1 index.php,然后就能看到它的操作码op。13
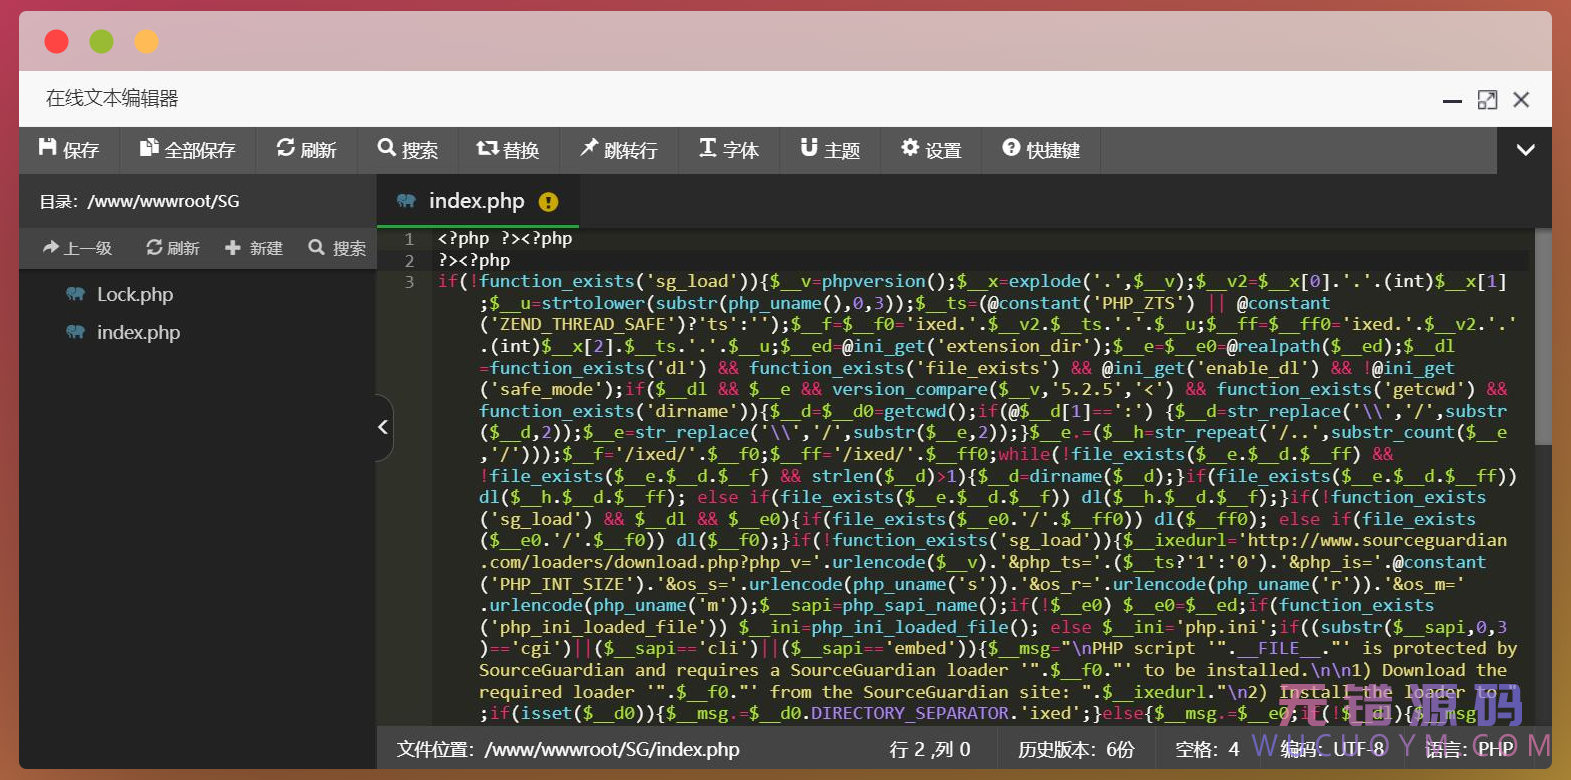
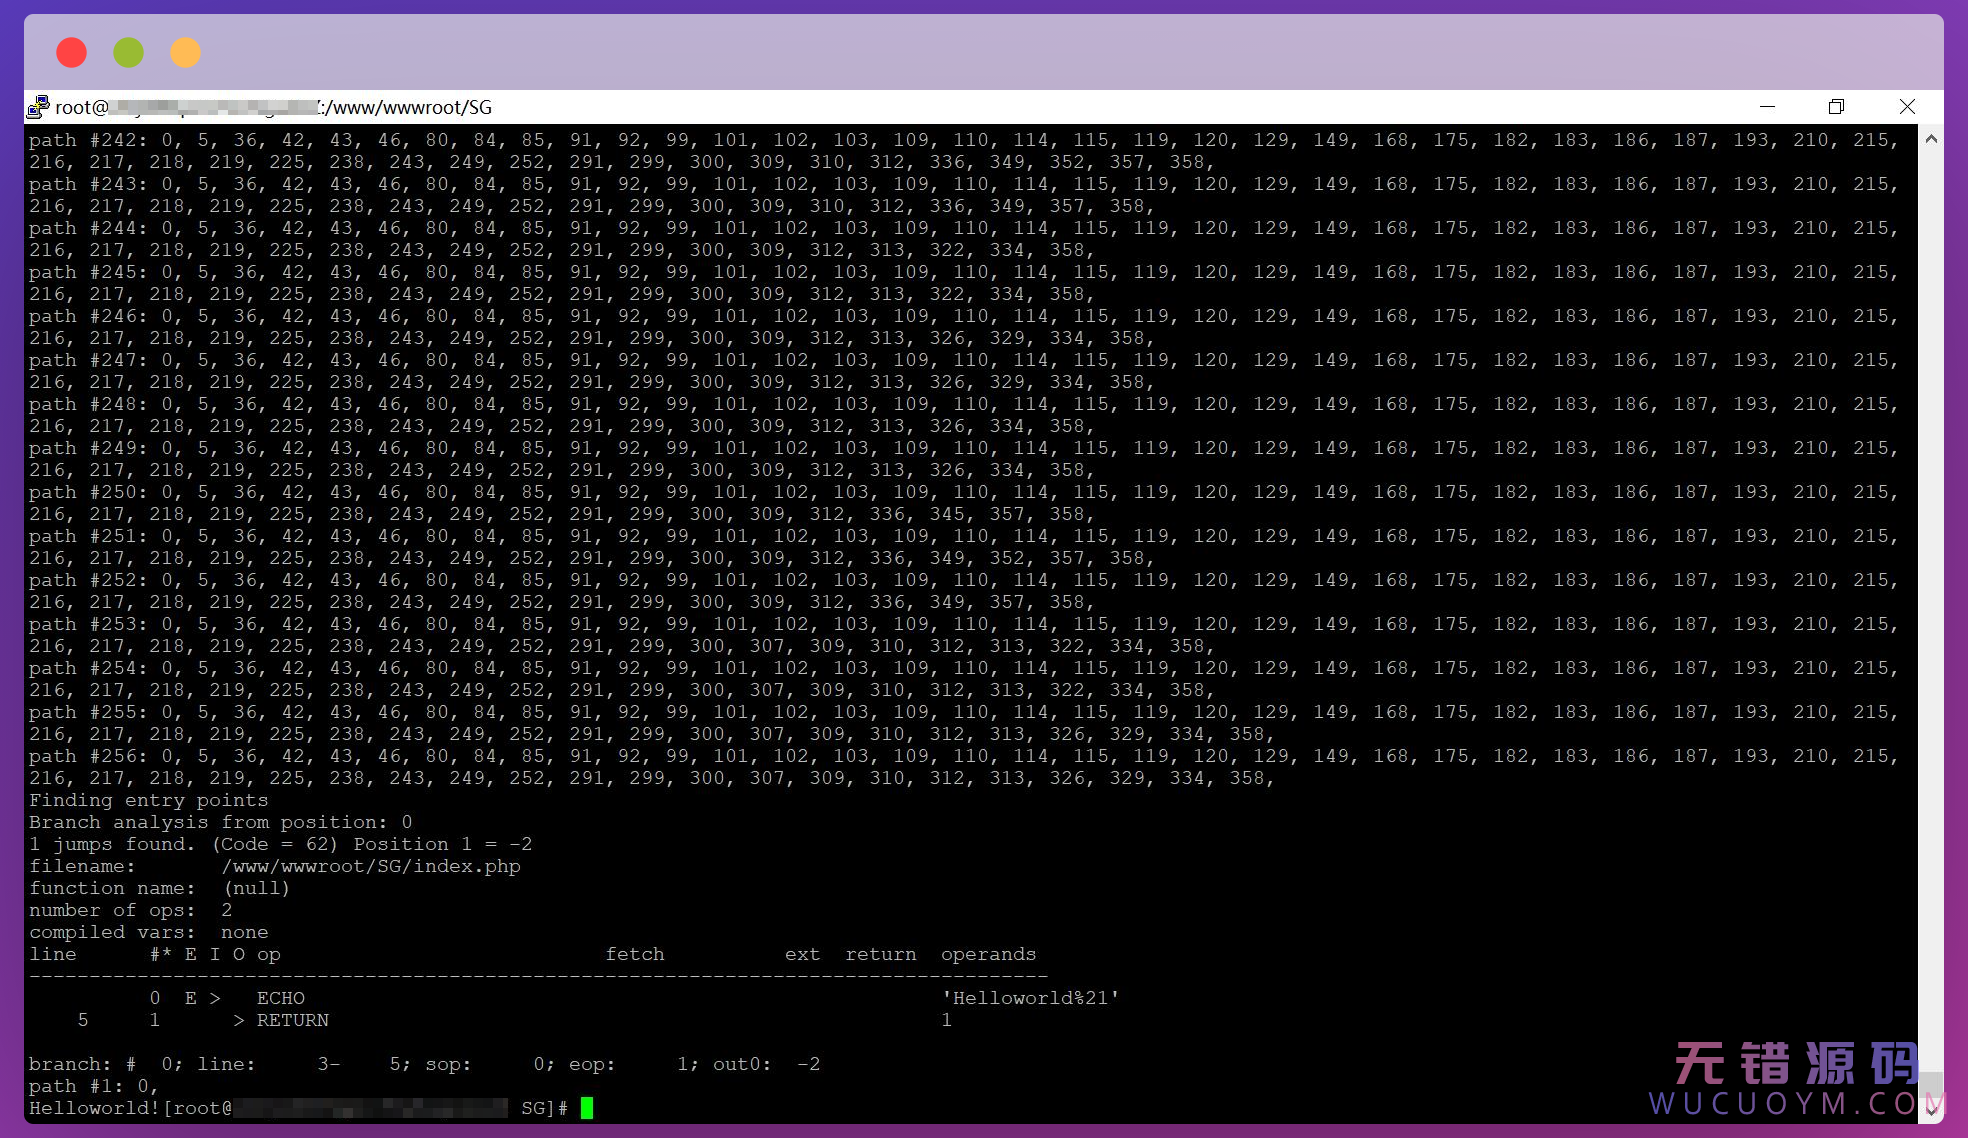
      3. 再来给index.php文件进行SG11加密。结果如下图。14
      4. 再次输入命令php -dvld.avtive=1 index.php ,如下图。15

    以上是我使用vld对SG11加密文件解码的一个基本操作,具体解密还需要一定的操作码知识和PHP知识,利用操作码对PHP文件进行逆向解密。

  • m3u8的ts文件的PES加解密分析以及示例

    m3u8的ts文件的PES加解密分析以及示例

    一、前言

    最近有朋友问我,某个视频网站也是阿里ts加密方式。恰巧51假期,就拿来分析一番,一看代码与之前某视频网的加密方法几乎完全一样。唯一不同的是 AES解密时逻辑稍有不同。还有一些奇怪的问题,同时发现,自己写过的代码,自己都已经不理解了,之前吾爱发的解密文章,被xx了,综合种种吧,冒出了写此文,算是一个复习,同时把方法分享给大家。此外,前些日子有个朋友在帖子中提到了PES解密的问题,希望此文也可以帮助到他。@VOOV

    二、TS文件结构概述

    1、几个基本概念
    ES流(Elementary Stream) 基本码流,不分段的音频、视频或其他信息的连续码流。
    PES流 把基本流ES分割成段,并加上相应头文件打包成形的打包基本码流。PES是打包过的ES,已经插入PTS和DTS,一般一个PES是一帧图像。
    TS流(Transport Stream) 传输流,将具有共同时间基准或独立时间基准的一个或多个PES组合(复合)而成的单一数据流(用于数据传输)。
    其数据内容可包含视频、音频、字幕等数据。将一个视频切成多个ts文件,实现视频的分段传输。多用于电视媒体。

    2、ts文件格式
    ts文件由ts数据包组成,每个包大小为188字节(或204字节,在188个字节后加上16字节的CRC校验数据,其他格式一样),每个数据包存储的内容可能不同,可能是视频、音频、字幕,或索引表信息,索引表就类似于一本书的目录,通过目录,就可以找到需要的章节,章节就类似于视频或音频等数据。
    注:本文所描述的ts包,均为188字节。

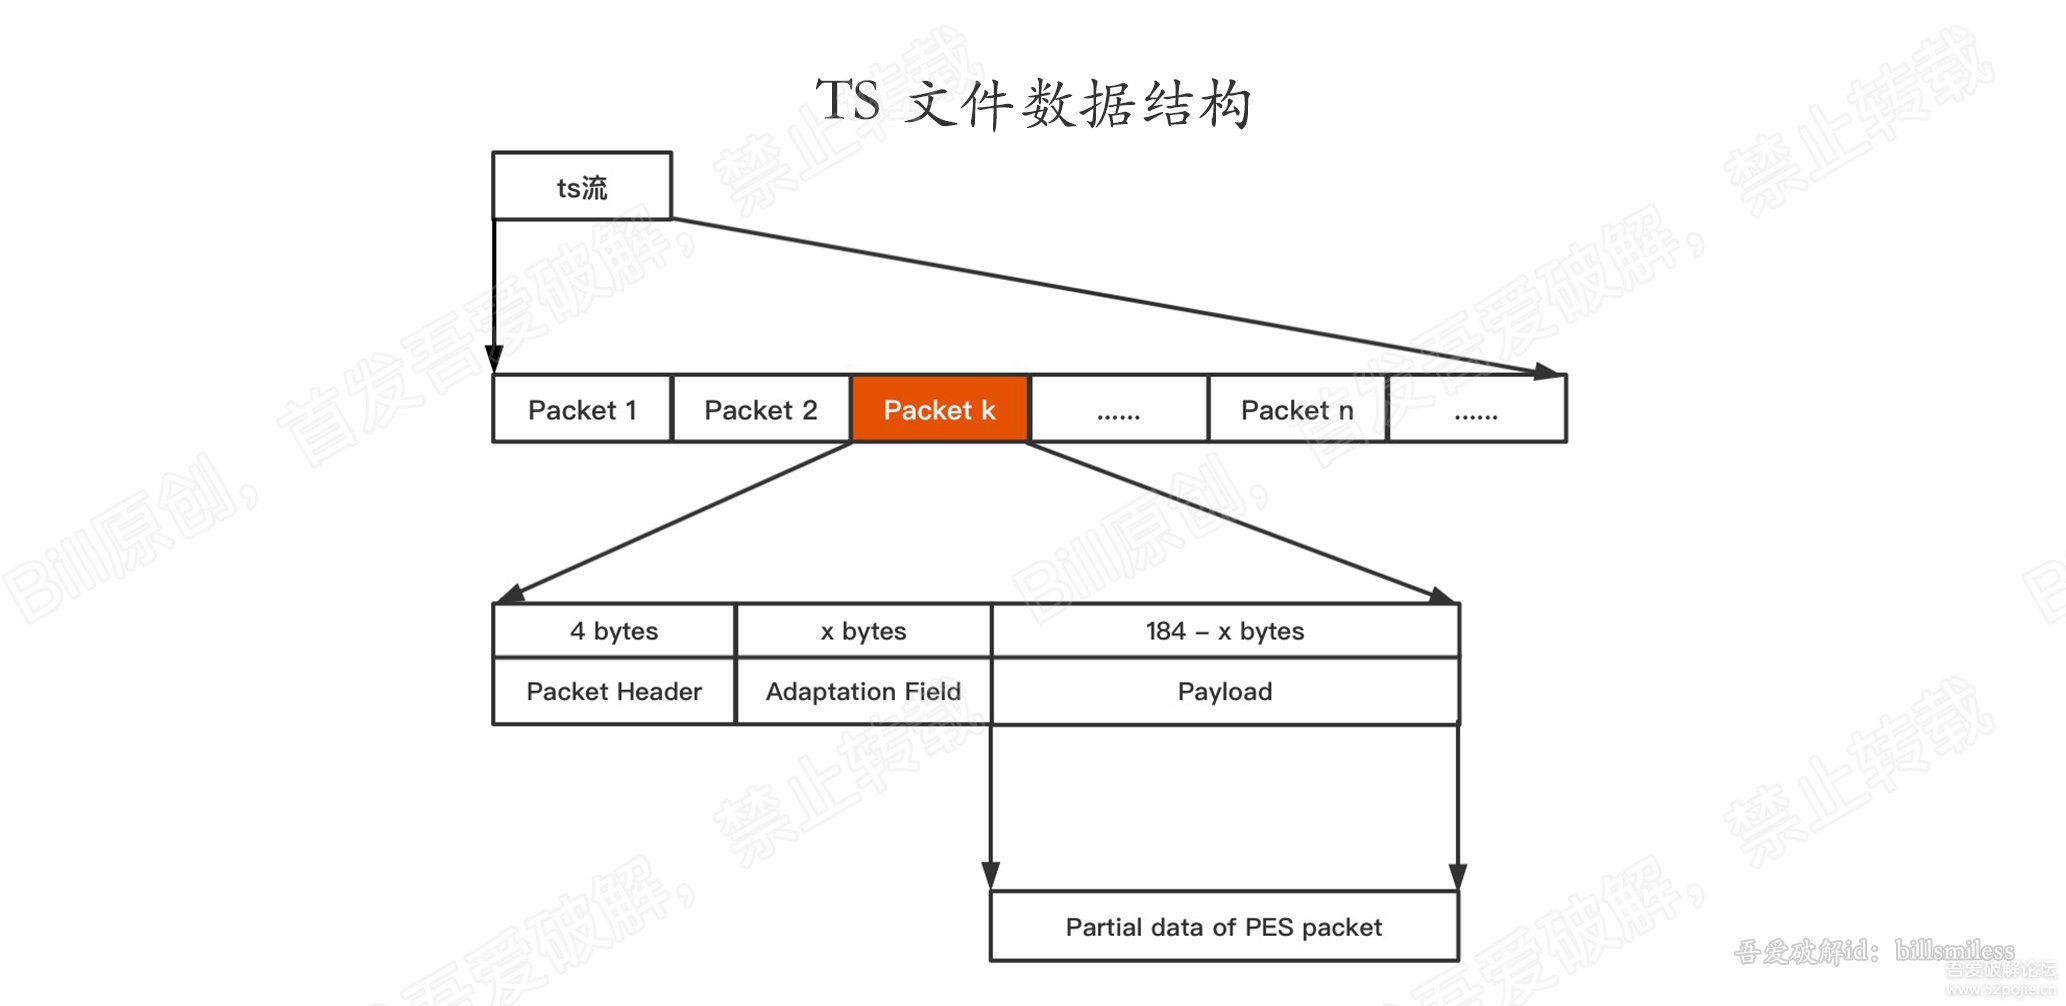
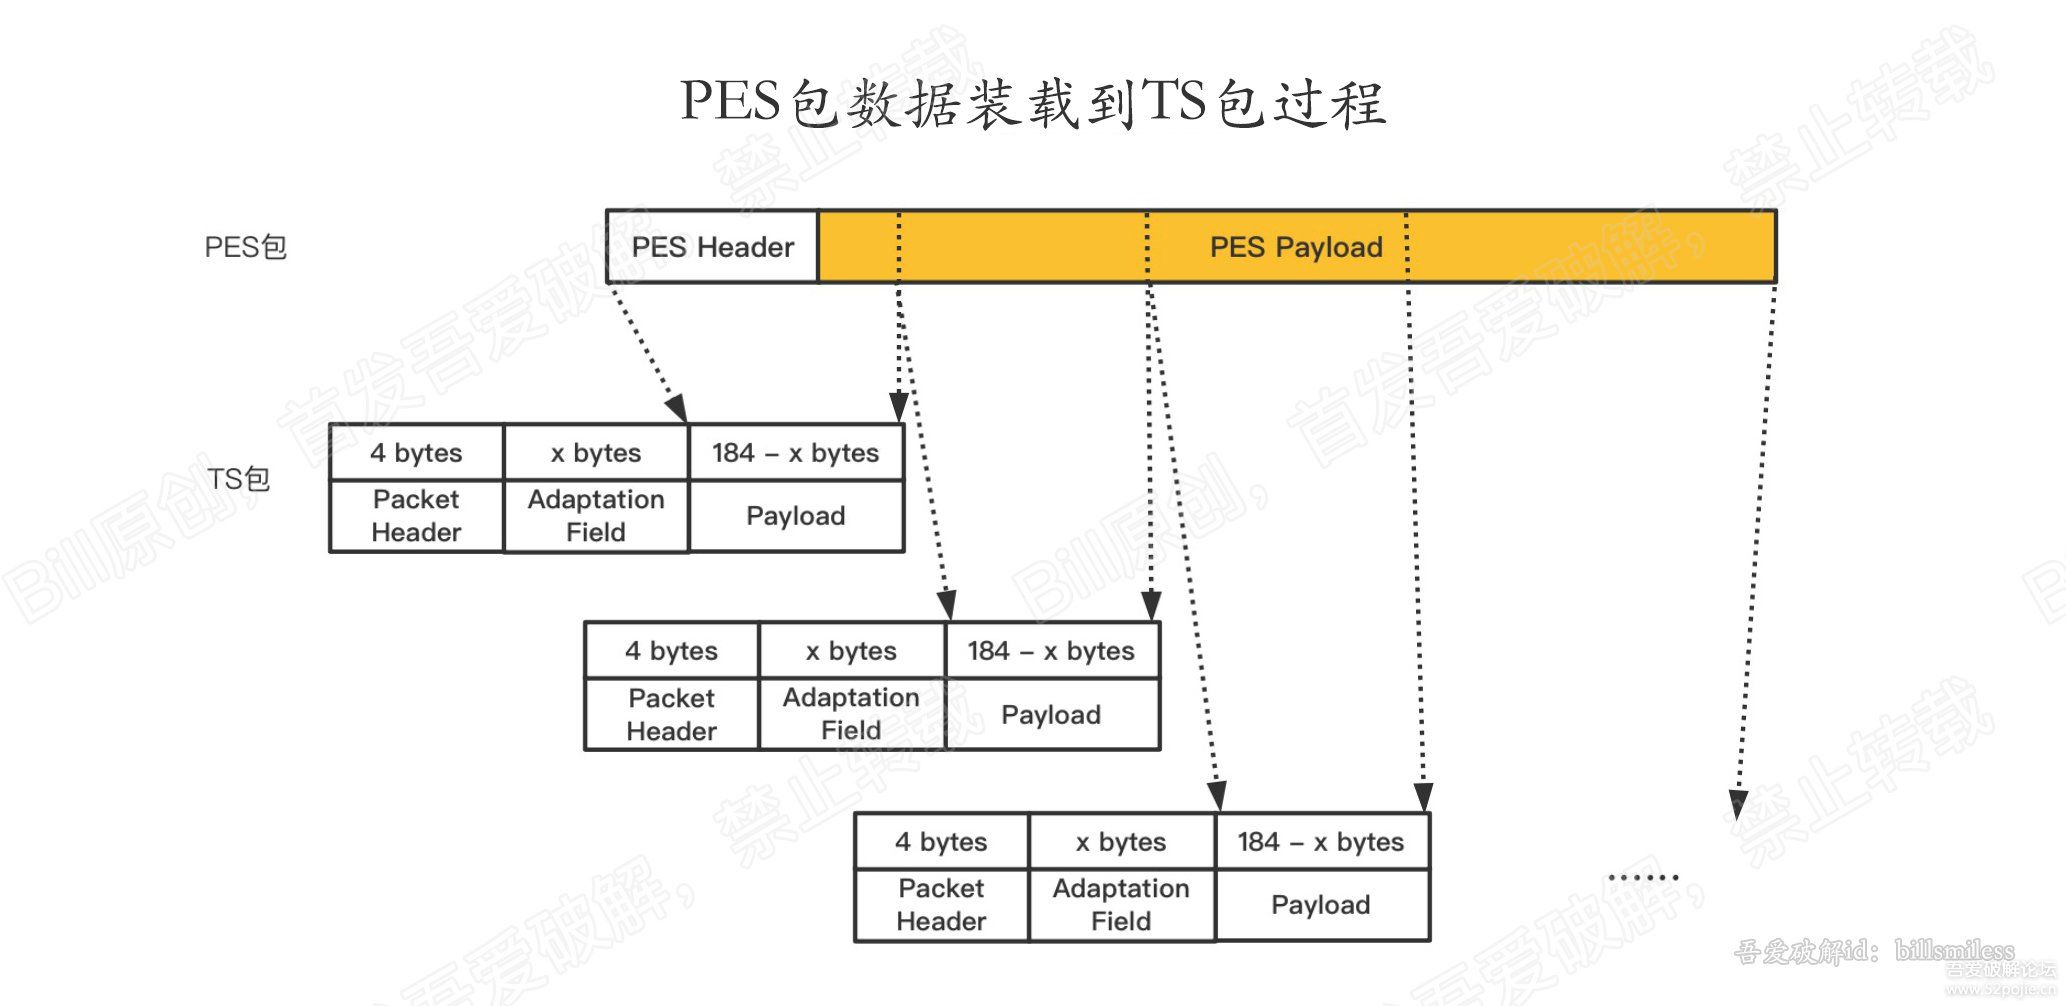
    ts数据包 由 4字节包头、附加数据(一般用来填充,为了满足188字节)、负载数据(即PES的部分数据)如下图:

    一个完整的PES包数据,可能存在于多个ts数据包中,也就是说,一个ts包中,可能含有pes包的包头,也可能仅仅含有pes包的负载数据.
    下图展示了,PES包是如何转为TS包的。

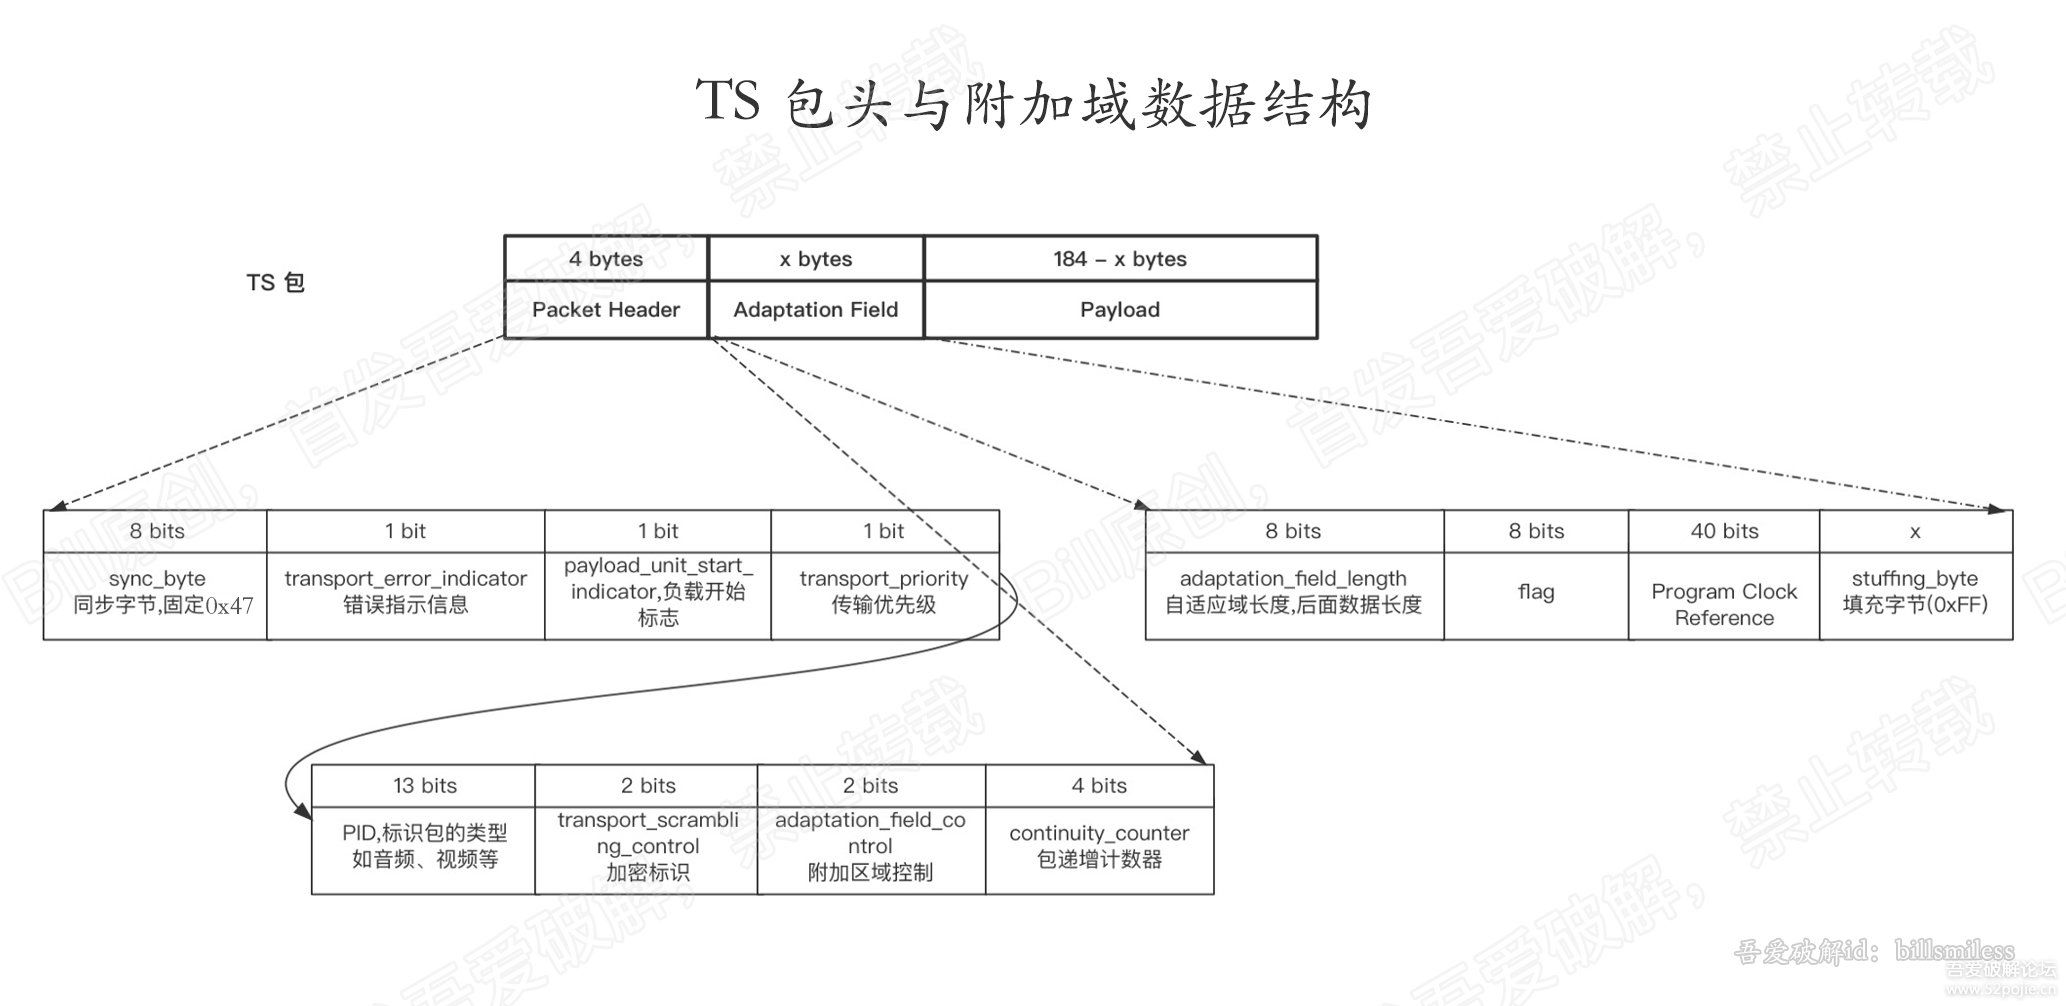
    下面来分析占4字节(32比特)ts包头的结构以及附加域(长度不定)的结构。先上图。

    这里我们仅分析我们用到的字段,其中头中用到4个字段值,附加域只用到长度字段。如下表。

    序号标识位数说明
    0sync_byte8 bits同步字节,固定是0x47
    即每个ts包的首字节都是0x47
    2payload_unit_start_indicator1 bit负载单元开始标识
    用来判断是否是pes包的起始包
    若为0,则表示非起始包。
    非PES起始包,不含有PES包头
    4PID(Packet ID)13 bitsts包的数据类型
    ts包有几种数据类型:
    PAT、PMT、音频、视频、字幕等
    6adaptation_field_control2 bits附加域数据标识,有如下值:
    00:供未来使用,出ISO/IEC所保留
    01:无adaptation field,仅有效载荷
    10:仅有Adaptation field,无有效载荷
    11:Adaptation field后,带有效载荷
    翻译下:
    因为ts包长度固定188字节,因此
    若附加域数据过多,就会无法装载payload
    附加域中的字段
    0adaptation field length8 bits自适应域长度,后面数据长度
    除去本字段外,附加域其余字段的长度

    表中提及的PAT、PMT相当于一本书的目录,PAT相当于目录的目录,通过他们就可以找到某视频的位置。
    PAT的pid为0,首先我们就会分析PAT。
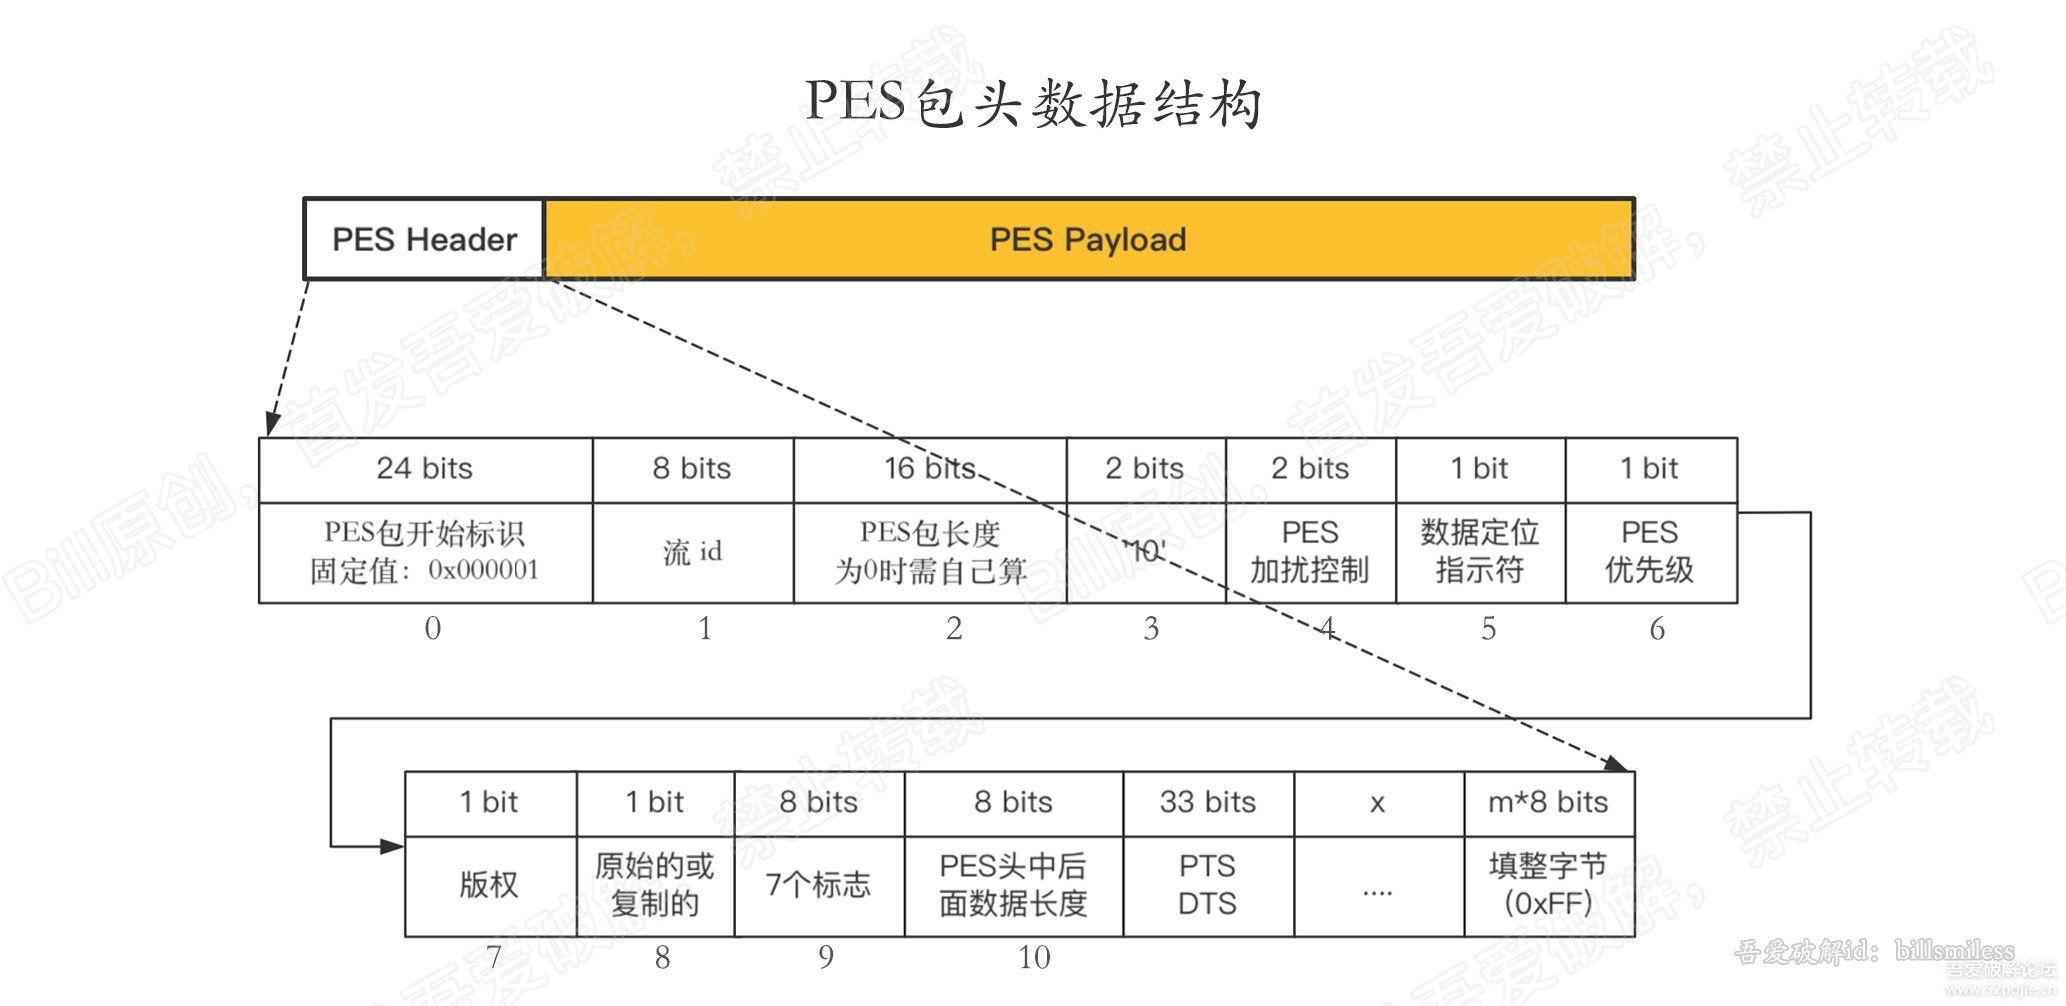
    接下来分析下PES头的数据格式。为我们后面解密做铺垫。先上图。

    字段很多,只分析我们需要的字段。如下表:

    序号标识位数说明
    0pes开始标识24 bitspes包开始标识
    固定值:0x000001
    10PES头中后面数据的长度8 bitspes头后面字段的长度
    pes头的长度就等于:
    本字段以及之前所有字段的长度
    加上本字段的值

    这里其实只要拿到pes头数据的长度。显然通过第10个字段,就可以计算出pes头的长度了。
    以上知识点,就可以支撑我们继续分析ts文件的加解密了。

    三、ts加密分析

    结合代码,我们分析下加密的逻辑。

    为了便于调试,这里我用未解密的video.ts文件作为样例,以及自己写的解密demo,来分析。
    (关于demo以及源代码等,我会放在文末)

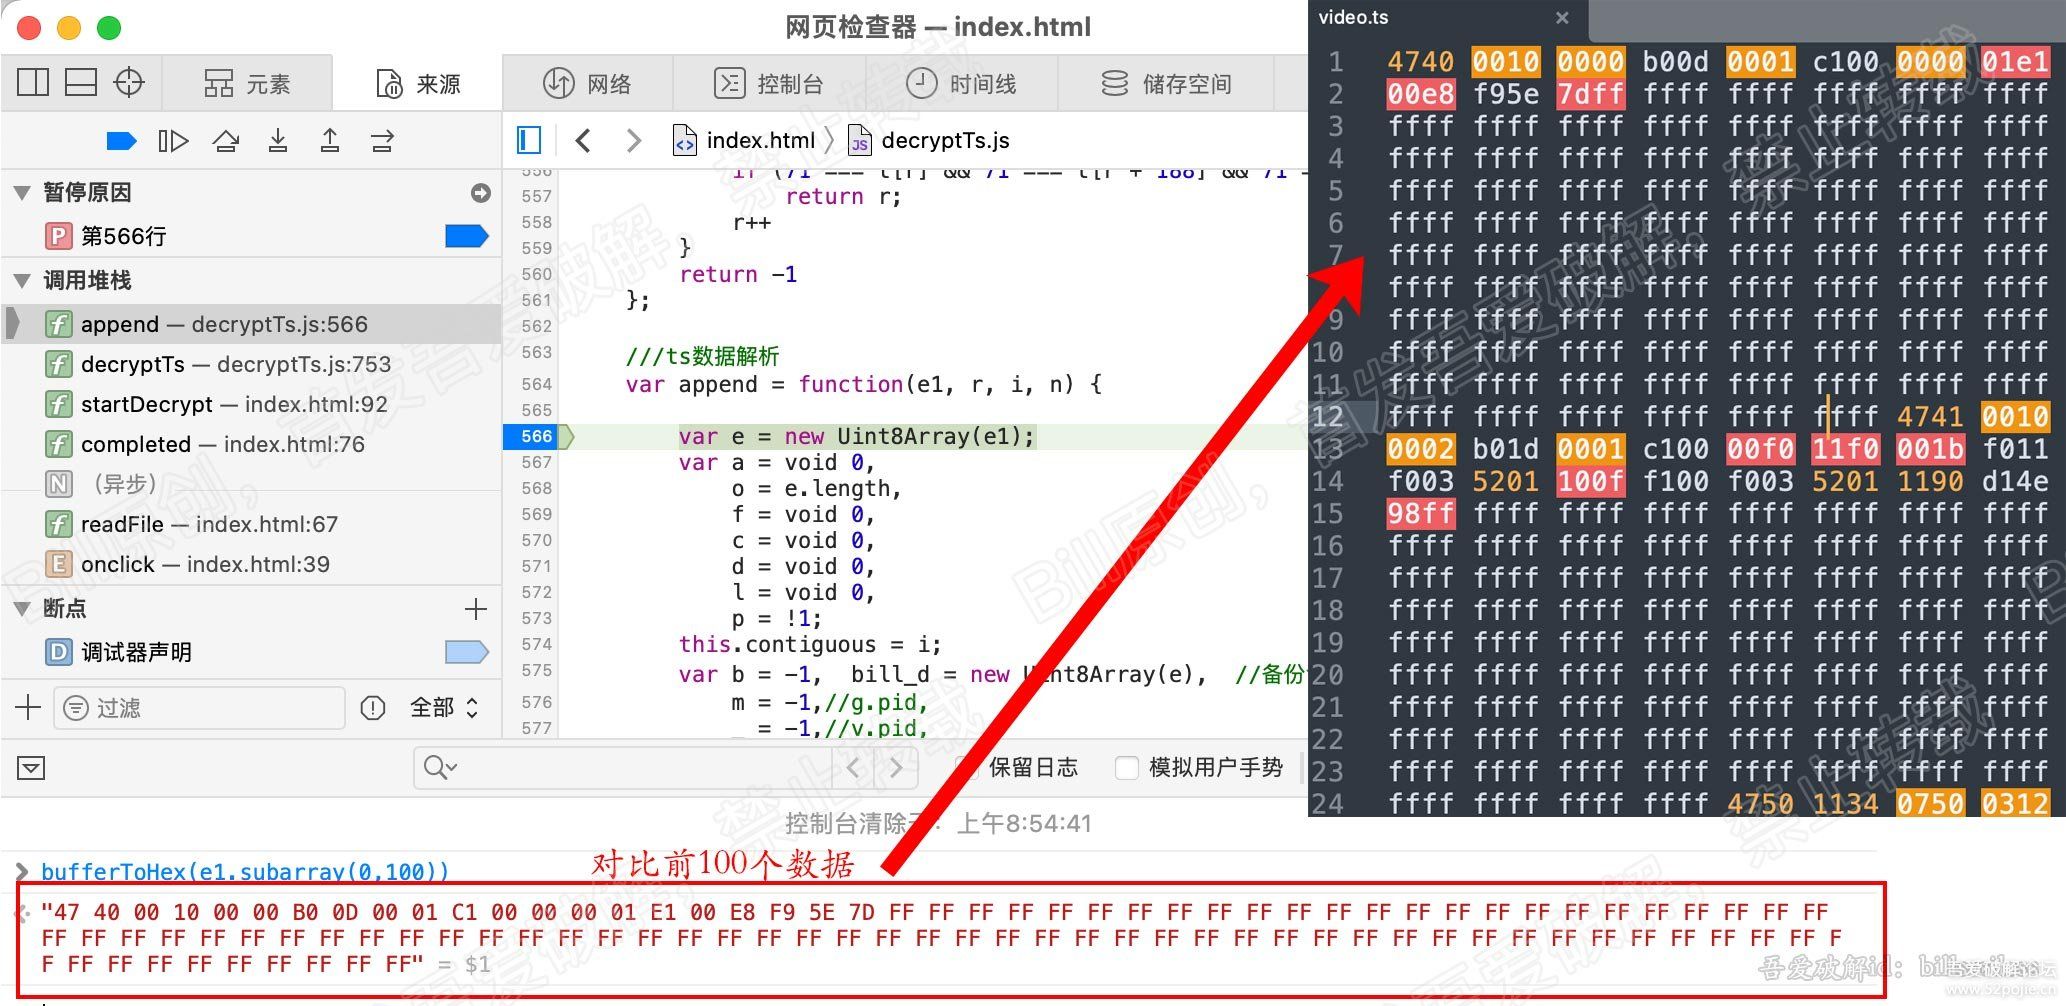
    用其他软件(我用SublimeText)以16进制的形式,打开video.ts。
    这个一直开着,用来与代码读取的数据进行对比。看我们代码读的数据是什么。为什么这么读。

    a、首先找到ts文件数据解析函数。这里就是append(…)函数。(关于如何定位此函数,请参考我之前的文章)

    运行demo, 输入key,导入ts。提前在append函数首行打上断点。点击开始解密。会进入我们的断点。

    接下来看下我们传入的ts数据。

    以16进制的形式打印e1的值,与我们的video.ts数据对比,是一致的。
    看下图(此步骤,没啥意义,就是为了找找感觉)

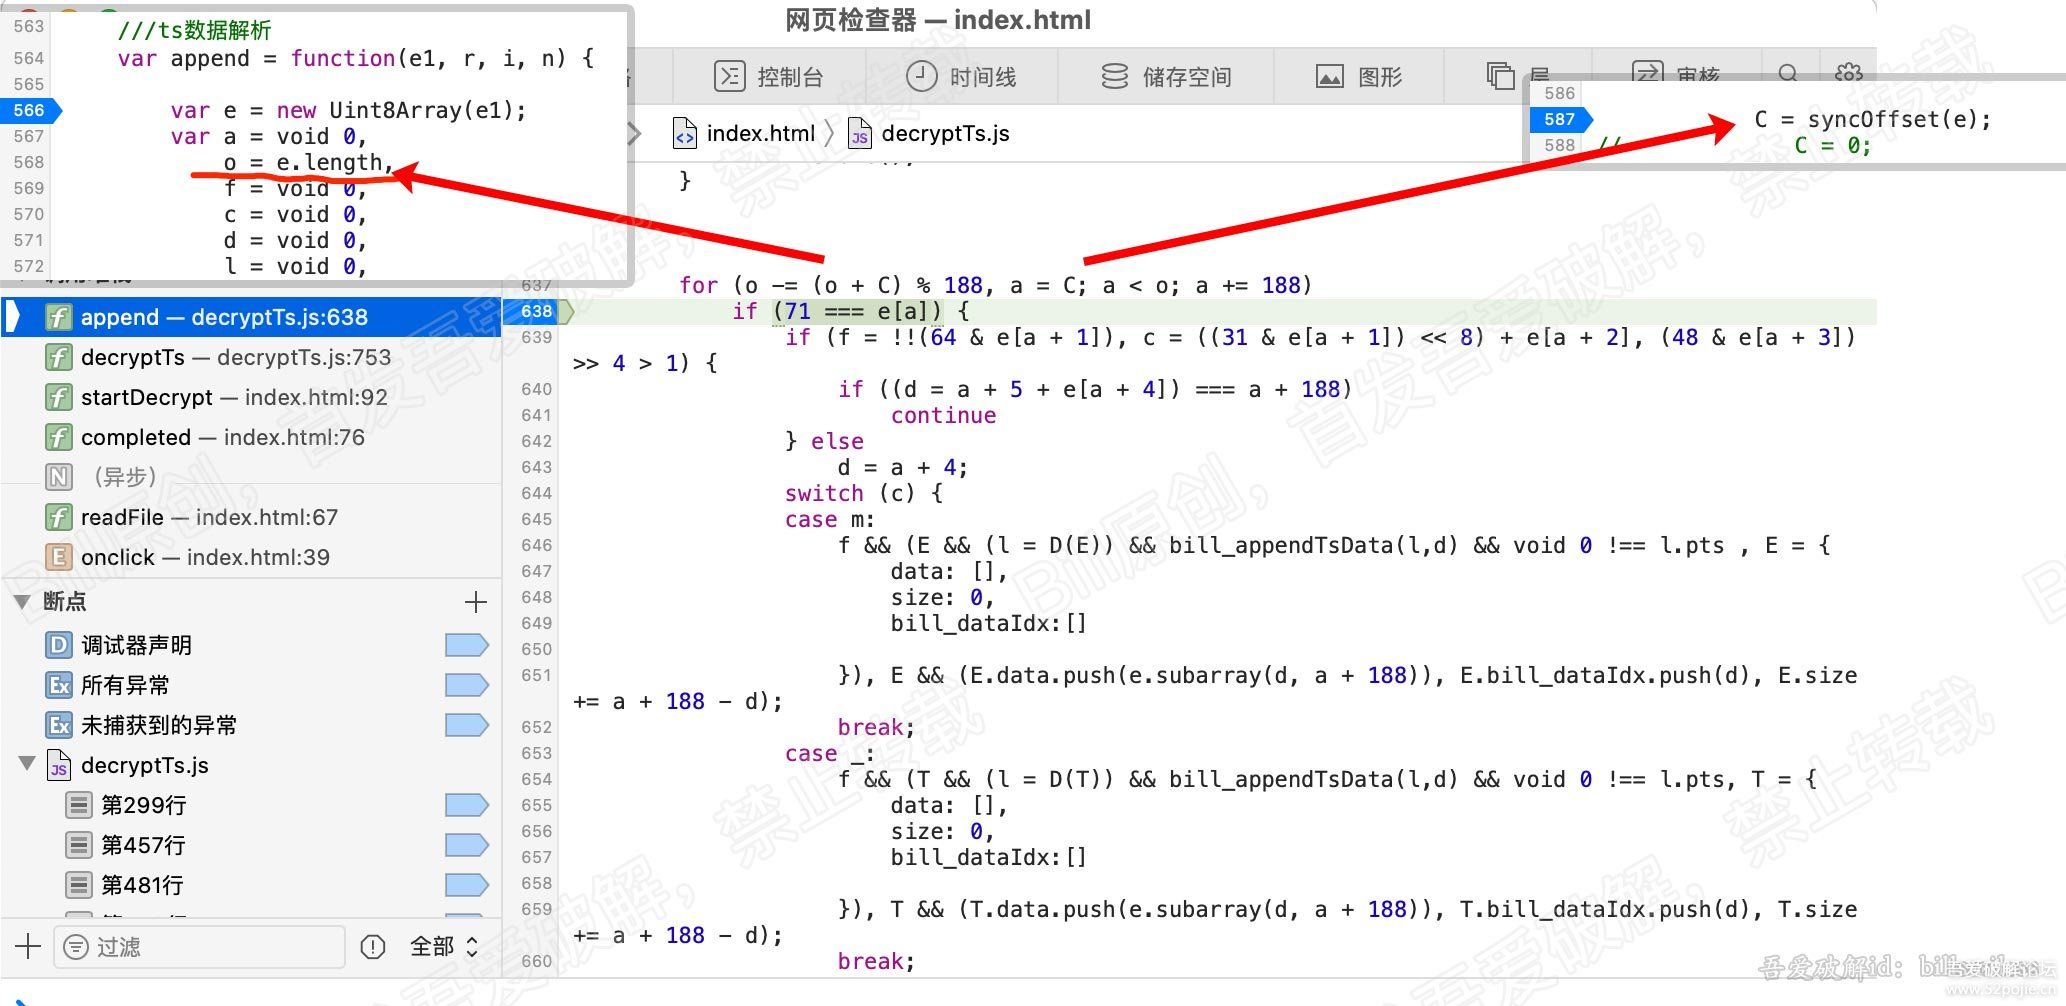
    继续,在587行 C = syncOffset(e); 代码处添加断点,继续执行,程序会停留在此断点。
    此函数是在找 ts包的起始偏移,因为每个ts包都是188字节,
    所以此函数就通过判断连续3个188字节的首字节是否是71(16进制0x47), 若是则确定此索引为起始索引。
    我们这里都是0,也就是ts文件的第一个字节就是0x47,细心的朋友,已经发现了。

    接下来进入循环开始解析ts数据了。注意代码中 bill开头的函数与变量,是用来解密的。暂时忽略。
    在638行,也就是for循环的第一行,加断点,继续执行,会停在这里。我们分析下for循环的条件。先看看图。

    看637行的for循环

    for (o -= (o + C) % 188, a = C; a < o; a += 188)

    这里C是587行同步偏移返回的值,我们这里都是0。所以for循环就等于以下:

    for (o -= o % 188, a = 0; a < o; a += 188)

    这就清晰多了
    这里只有2个变量,a和o,a初始值是0,然后每次循环累加188,看看o是哪里来的。
    在本函数的第三行,也就是568行,看到 o = e.length, e在上一行,就是我们ts数据的uint8数组。
    因此,o就是ts数据的总长度, 那么o -= o % 188,是什么意思?
    先用总长度对188取余,然后总长度再减去余数, 也就是说,是为了保证我们循环总长度为188的整数倍。
    为什么这么做?是为了循环体内,不出现数组越界情况。(循环内部会分析)
    延伸下,这里循环结束后,取余出去的那部分数据不就没有分析到了嘛。
    所以当循环结束后,还得解析取余出去的那部分数据。这样整个ts文件数据就都被解析到了。

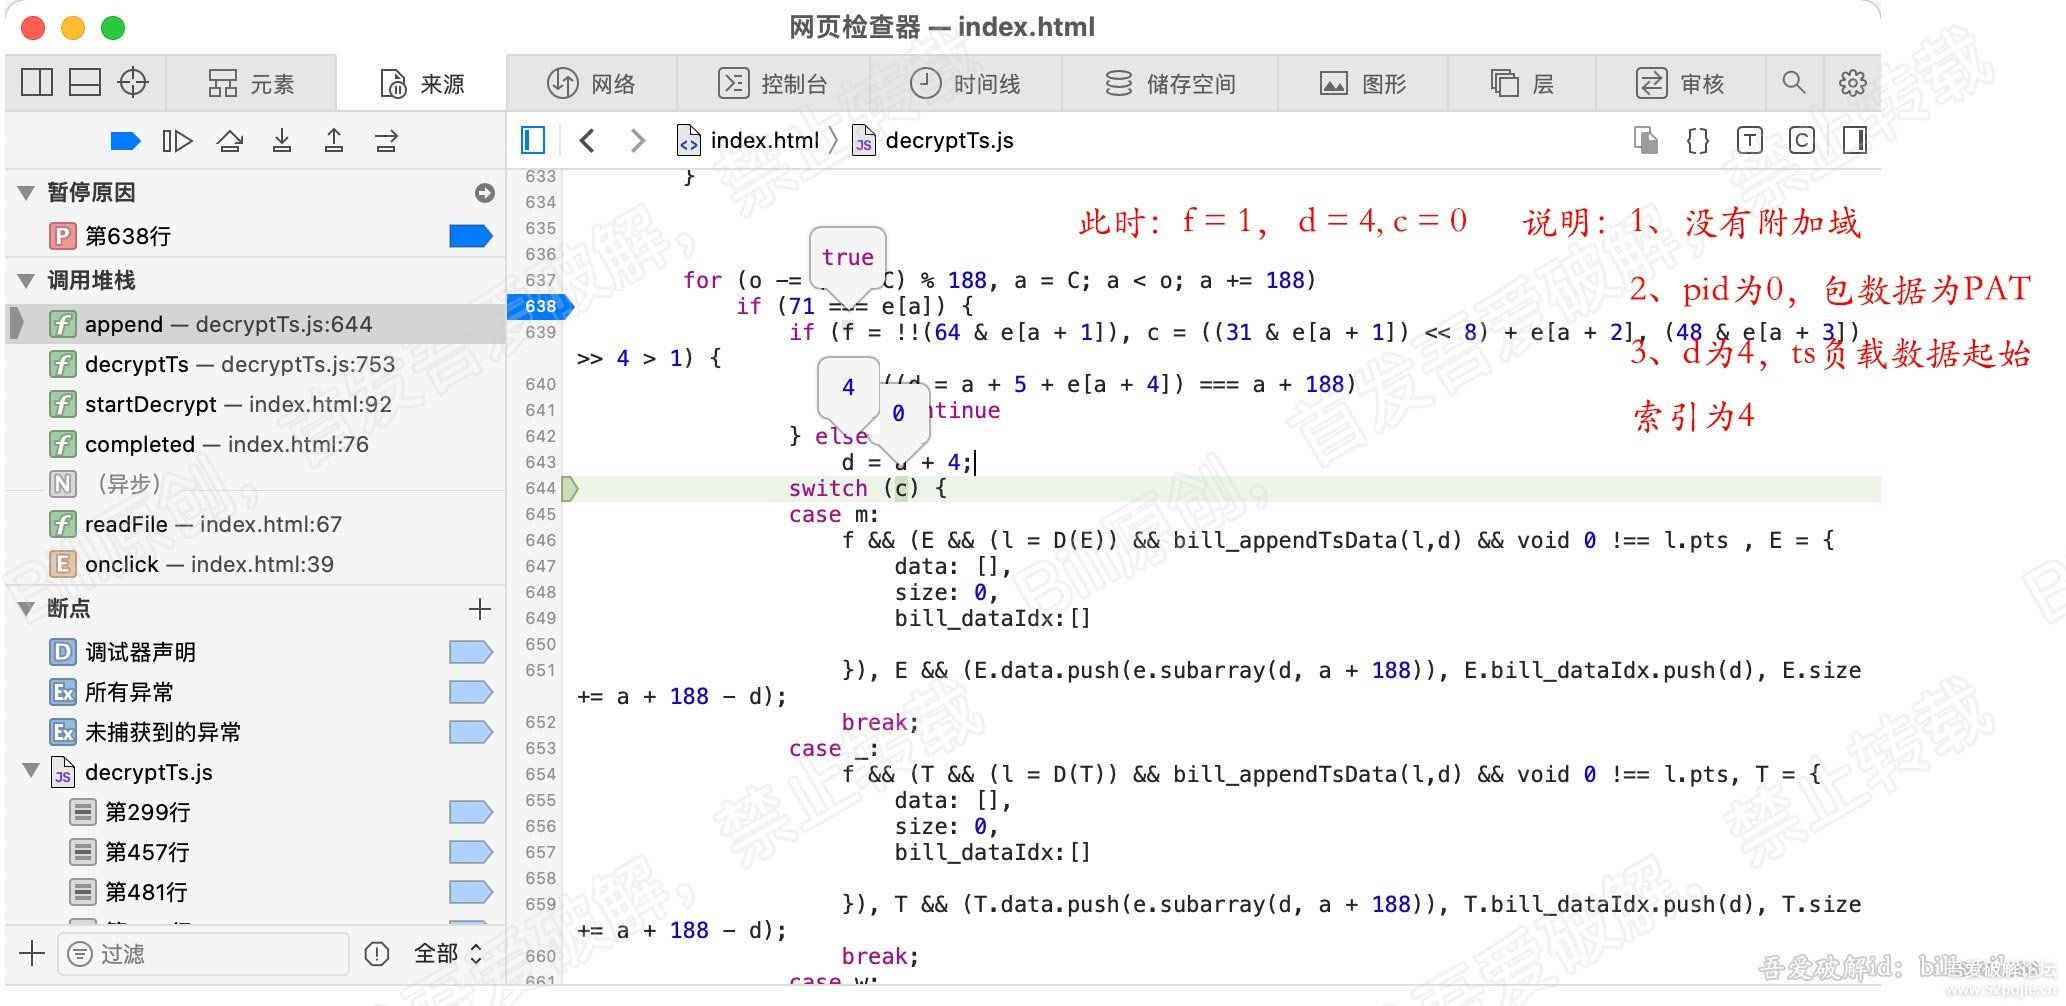
    继续,看638行的 if (71 === e[a]) ,显然这是在判断ts包的首字节是否为71(71是十进制,16进制0x47)
    如果首字节是0x47,则分析此包数据。否则直接报错。
    此时a为0,那么我们看看e[0]的值,确实是71。
    去之前打开的video.ts文件,看看第一个字节是不是0x47。一定是的。

    目前,我们是在video.ts文件的第一个字节处,也就是第一个ts包。此时方便我们查看本地的video.ts的数据。
    所以结合ts文件格式和代码,我们分析下一段代码,就是 639->643行间的 if…else…

    先来看 639行:

    if (f = !!(64 & e[a + 1]), c = ((31 & e[a + 1]) << 8) + e[a + 2], (48 & e[a + 3]) >> 4 > 1)

    好家伙,看着就懵逼的感觉。
    可以看到,if条件内,有3个语句,逗号分割,当最后一个语句为真时,就会进入if内部。
    也就是说,前2个语句,就是执行下,跟if条件没啥关系。那也得分析&#128516;

    先来看第一个语句

    if (f = !!(64 & e[a + 1]), c = ((31 & e[a + 1]) << 8) + e[a + 2], (48 & e[a + 3]) >> 4 > 1)

    叹号取反,双叹号就是负负得正。等于没有。所以只看: 64 & e[a + 1]

    我们知道a是0,那么e[a+1],显然就是video.ts的第二个字节的值。
    我们可以看到,e[1]的值也为64 , 然后再 与 64 进行与运算。
    我们把64都转为2进制(1个字节8bits, 所以补足8位)
    64:  0100 0000
    64:  0100 0000

    然后进行与运算。
    可以发现和64进行与运算的目的,就是取 取本字节8位中的左起第二位。
    该bit就是ts头中的第9位(0开始),前面我们分析过 ts头的第9位是payload_unit_start_indicator,
    即负载标志位。判断本ts包的负载数据是否是pes的起始包。
    (不理解的话,可以翻阅ts文件结构概述章节)

    因此我们可以知道
    f 即判断本ts包的数据是否是pes的起始包。(若是起始包,包含pes头)
    若是起始包,则f为1,否则0

    继续看第二个语句:


    直接翻译下:
    把 第二个字节的值 和 31 进行与运算,然后左移8位,再和第三个字节值 相加。
    分析过程省略,大家自行操作。
    上结果,c的值就是 ts头中占有13个比特的pid。
    pid代表了ts包的数据类型,可以是音频,视频、PAT、PMT或其他

    c = ((31 & e[a + 1]) << 8) + e[a + 2]
    

    此时的pid,不用看,一定是0,0代表是PAT。
    这里再介绍下PAT与PMT。
    PMT存储了媒体的目录信息,哪个视频在哪里,哪个是音频等
    PAT则是存储了PMT的信息,PMT在哪之类的。

    因此一开始一定是先解析PAT,通过PAT找到PMT,解析PMT找到我们需要的 音视频数据。

    继续看第三个语句:

    (48 & e[a + 3]) >> 4 > 1
    翻译:
    第四个字节和48进行与运算,右移4位,然后看是否大于1

    分析略,直接上结果:

    给(48 & e[a + 3]) >> 4 起个名字叫k吧,
    k的值就是 ts包头的32位占2bits的 adaptation_field_control,附加区域控制字段。
    该字段的值,用来判断附加区域是否存在,大于1 表示存在 附加域。(具体可看上一章节)

    由此,我们可以知道,只要存在附加域,就会进入if内部。
    若不存在附加域,则执行else,稍后分析。

    先来看if内部,也就是640行:

    if ((d = a + 5 + e[a + 4]) === a + 188)

    因为此时,a=0,所以简化下d的等式:
    d = 5 + e[4]   ===  188

    翻译下: ts的第5个字节值加上5。
    我们知道ts的头是4个字节,并且此时在if内部,即是存在附加域的。
    因此 我们去上一章节 看下附加域的数据格式,可以知道:
    第一个字节(8bits)代表的是adaptation_field_length, 即附加域后面的数据长度。就是此字节后面的数据长度。
    那么再加5,就表示算上 4字节的ts头长度,以及 adaptation_field_length 所占的1字节。
    也就是说 d = 5 + e[4] 的值,就是 ts头长度 和 附加域长度 之和,
    那么和188比较是为什么?  因为ts包的总长度为188,当ts头和附加域的总长度已经达到188时,就不会存在负载数据了,
    所以就不必继续分析此包,直接 continue,继续下一个包解析。

    好,接下来看看else代码,就一行,643行:d = a + 4;
    相信大家应该能猜到了。这里的4就是ts头的长度,d = a + 4,d 即表示ts负载数据的起始索引了。

    综上, 简单总结下这个if … else …

    1、f: 计算ts包的负载数据是否是pes的包的起始包。
    2、c: 计算ts包的pid
    3、判断是否存在附加域,若存在计算附加域和ts头的总长度。得到ts负载数据的起始索引d的值。
    4、若不存在附加域,则 ts负载数据的起始索引 d 的值为:包起始索引 + 4(ts头的长度)。

    结论:f表示是否是pes起始包, c代表pid, d表示ts包负载数据的起始索引。
    f、c、d 后面会一直用。 如下图:

    接下来就是 switch 语句了。

    switch (c) {
        case m:
            f && (E && (l = D(E)) && bill_appendTsData(l,d) && void 0 !== l.pts , E = {
                data: [],
                size: 0,
                bill_dataIdx:[]
     
            }), E && (E.data.push(e.subarray(d, a + 188)), E.bill_dataIdx.push(d), E.size += a + 188 - d);
            break;
        case _:
            f && (T && (l = D(T)) && bill_appendTsData(l,d) && void 0 !== l.pts, T = {
                data: [],
                size: 0,
                bill_dataIdx:[]
     
            }), T && (T.data.push(e.subarray(d, a + 188)), T.bill_dataIdx.push(d), T.size += a + 188 - d);
            break;
        case w:
            f && (A && (l = D(A)) && bill_appendTsData(l,d) && void 0 !== l.pts , A = {
                data: [],
                size: 0,
                bill_dataIdx:[]
     
            }), A && (A.data.push(e.subarray(d, a + 188)), A.bill_dataIdx.push(d), A.size += a + 188 - d);
            break;
        case 0:
            f && (d += e[d] + 1), S = R(e, d);
            break;
        case S:
            f && (d += e[d] + 1);
            var O = k(e, d, true, false);
            m = O.avc, m > 0 , _ = O.audio, _ > 0 , w = O.id3, w > 0 , p && !b && (p = !1, a = C - 188), b = !0;
            break;
        case 17:
        case 8191:
            break;
        default:
            p = !0
    }

    我们前面分析知道 c 就是pid, 因此,switch,就是根据pid来进行解析不同数据包。

    看下 switch的case值:
    case m: , case _: , case w: , case 0:, case S:, case 17:, case 8191: , defalut:
    只有 m 、_ 、w 、 S ,4个变量的未知。

    我们知道此时 c的值是0, 会进入 case 0 分支的代码,
    此处是解析PAT,S = R(e, d); 得到S的值。

    看S分支的代码,我们可以看到其中会给 m,_,w 3个变量赋值,其实S是解析PMT。

    PMT解析完,就得到了 其他3个case 分支的值,我们继续看其他 case m,_,w 分支的代码,
    非常像,只是变量不同。通过分析知道,此3个分支就是解析加密数据的部分。在此不再叙述。

    接下来就分析这3个分支的一个, 就选第一个case m

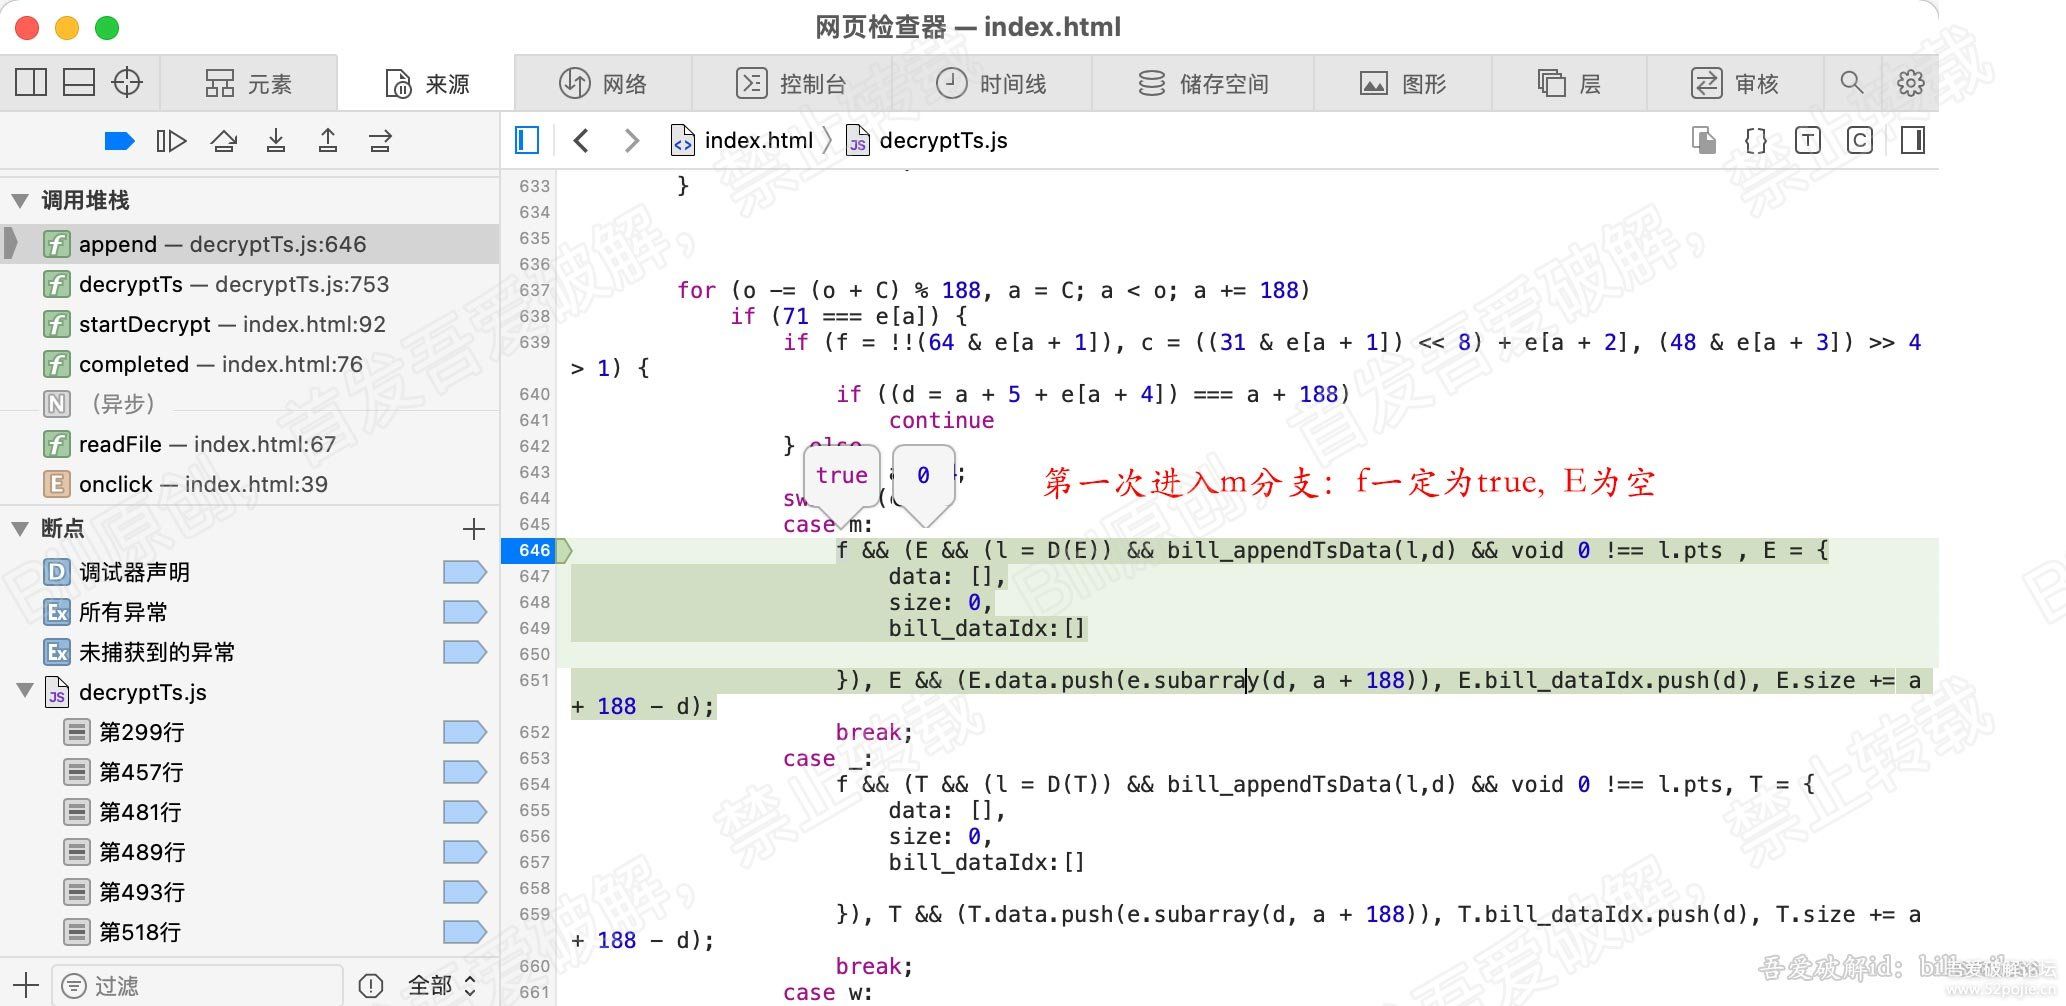
    直接在case m 分支内部第一行打断点,即646行,其他断点全部过掉,然后继续执行。程序停在了646行。

    分析下变量的值:
    首先分析:f,表示是否是pes起始包。 此时的f的值一定是 1(true),为什么?
    因为我们是第一次进入m分支,说明我们第一次解析pid为m的类型ts包,第一次解析此包,说明它一定是pes的起始包。
    所以 f 一定是1, 结合上一章节pes包在ts包中的装载格式,就会明白,pes的包被分割到不同的ts中,
    那么切割到第一个ts 包中的pes数据,一定包含pes的包头,所以该ts的 f 值一定是1 。如下图:

    f 是1 ,就会继续执行f后面的代码。

    接下来一行一行分析下 case m 的代码。bill_开头的代码,暂时过滤,是解密用的。

    case m:
        f && (E && (l = D(E)) && bill_appendTsData(l,d) && void 0 !== l.pts , E = {
            data: [],
            size: 0,
            bill_dataIdx:[]
     
        }), E && (E.data.push(e.subarray(d, a + 188)), E.bill_dataIdx.push(d), E.size += a + 188 - d);
        break;

    有两个语句以逗号分割,两个语句之间是依次执行。

    分析语句1:
    f && (E && (l = D(E)) && bill_appendTsData(l,d) && void 0 !== l.pts , E = {
            data: [],
            size: 0,
            bill_dataIdx:[]

        })

    翻译以下:
    当 f 为真时, 若E 有值,则执行 (l = D(E)) && bill_appendTsData(l,d) && void 0 !== l.pts,并给E重新赋值
                            若E 为空,则直接给E赋值
    当 f 为假时, 后面代码不会执行,语句1结束

    这里 l = D(E), 此代码将加密的PES数据解密,返回给l

    分析语句2:
    无论语句1如何执行,语句2都会执行。

    E && (E.data.push(e.subarray(d, a + 188)), E.bill_dataIdx.push(d), E.size += a + 188 – d);

    若E 为真,则给E的data添加 e的索引d到a+188之间的数据, 给E的size累加值: a + 188 -d ,这是刚才添加数据的长度。
    若E 为空, 则结束

    我们知道 d是 ts包负载数据的起始索引,d > a, a是ts包的起始索引。所以 e.subarray(d, a + 188),这个数据,就是ts包的负载数据。

    因此语句2的目的就是:将ts包的负载数据添加到 E.data中,同时记录下添加的数据的总大小。

    我们将语句1和2一起翻译下:

    当f为真时,即ts包负载是pes的起始包,若E为存在值,则直接去解密E的数据,返回给l,
    接下来则给E重新赋值,然后将此时ts的负载数据,添加到E.data中,并记录总大小size

    当f为假时,即ts包负载不是pes的起始包,将此时ts的负载数据,添加到E.data中,并记录总大小size

    我们可以发现规律,只有当 f 为真时且E数据存在,会去解密pes数据,且解密的数据是 f为假时, 添加到E.data中的数据。

    由此,我们可以得出,加密的数据是一个完整的PES数据,(PES头未加密,需要在pes解析中分析才能知道)。且这些PES数据存在于多个ts包中。

    接下来分析PES解密函数:l = D(E)

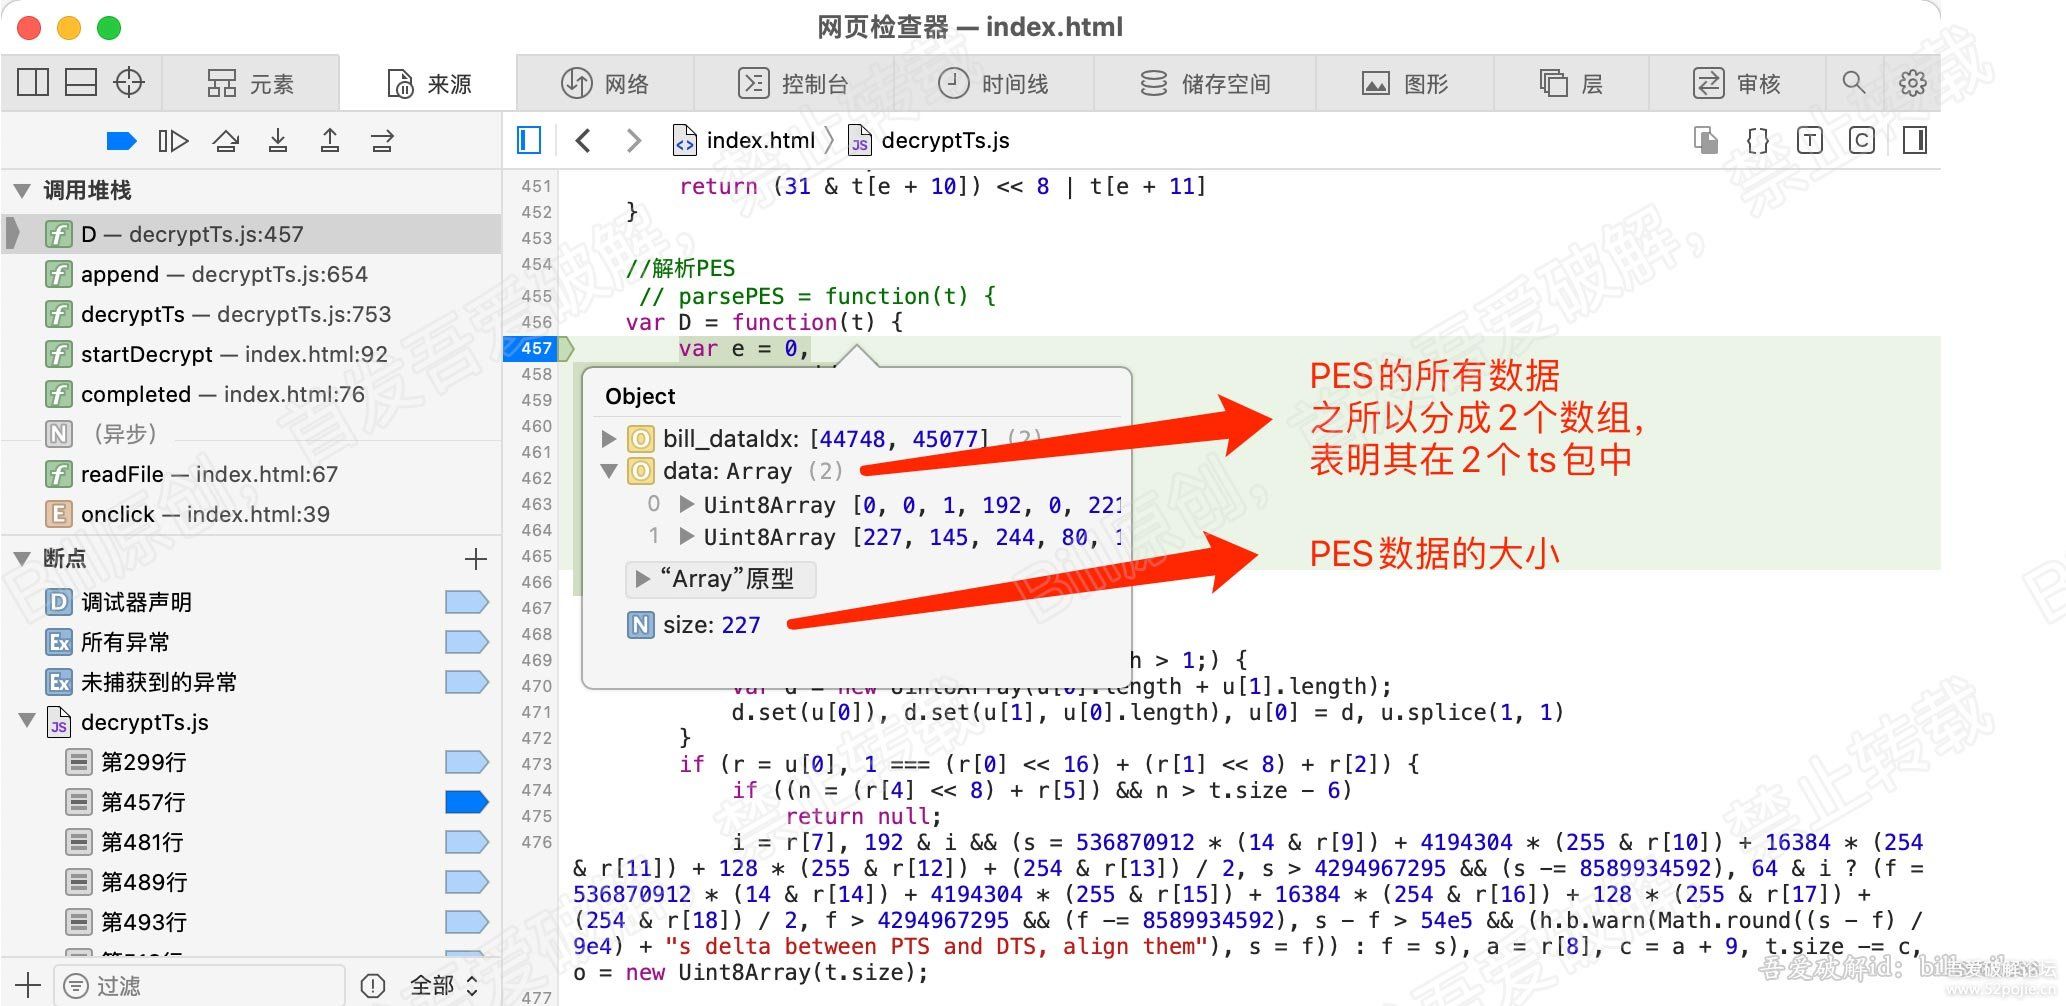
    在此函数的第一行,即:457行,打断点,删除其他断点,继续执行。会停留在此处。

    查看下传进来的参数t的值,其实就是上个函数的E的值,发现有size与data。
    其中data即pes的数据,data是个数组,数组内的元素其实是 存在于各个ts包中的pes数据。看图:

    直接断点到493行,在这里我们分析下 c 的值,这个比较重要。

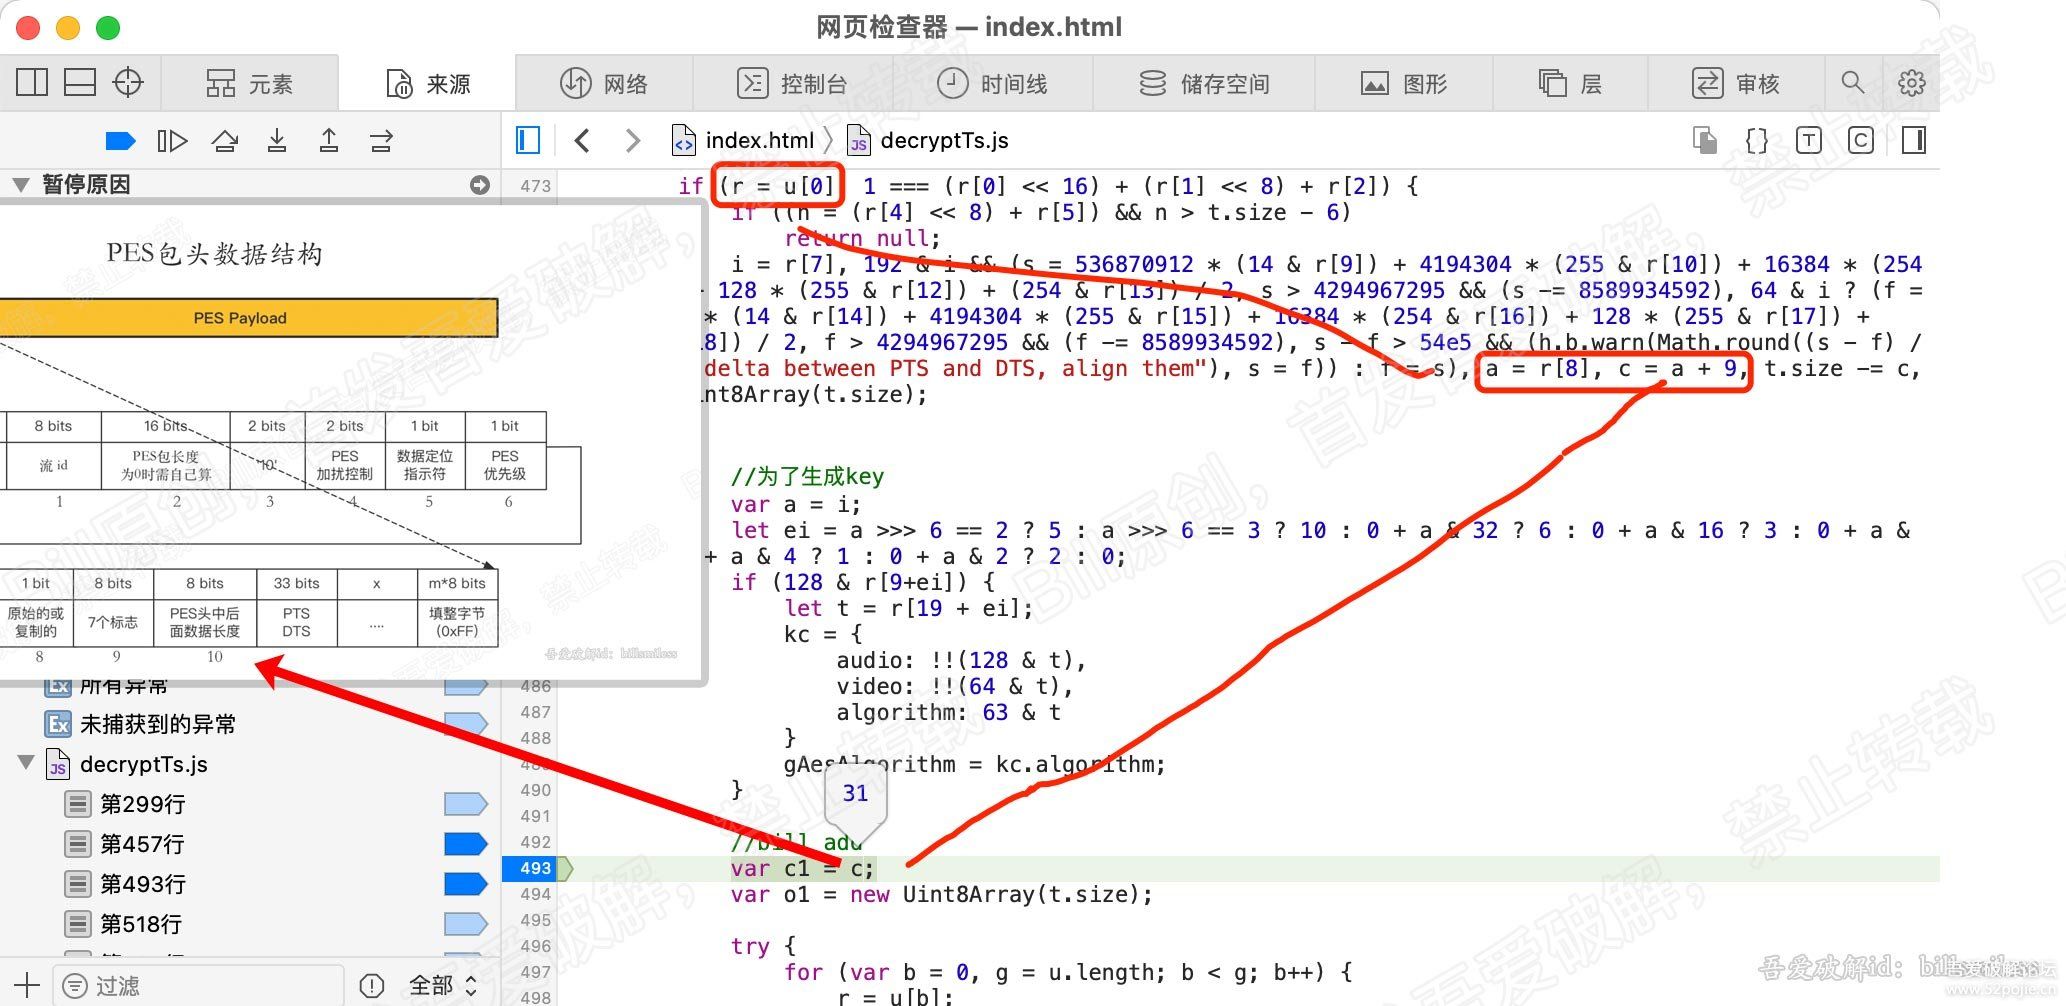
    在476行, c = a + 9, a = r[8] , r = u[0], u其实就是我们的传进来的t.data
    我们观察下u[0]的数据,发现开头的三个值是 0 0 1, 这3个值是 0x 00 00 01,表示PES包的开始。
    所以u[0], 就是第一个ts包的负载,也就是包含pes包头的负载数据。

    也就是说,r = u[0]的数据中是有pes头数据的。
    结合我们上一章节的PES头数据格式,分析下a = r[8], 可以知道r[8]就是PES中占8bits的,PES头中后
    面数据长度的字段。也就是说,r[8]的值就是PES头中,此字段后面的数据的长度。

    那么 c = a + 9, 其实就是 PES头的总长度。此处c的值为31。

    因为r[8]字段的值代表PES头后面剩余数据的长度,
    加上本字节以及之前字节的长度,所以就是PES头的总长度了。

    接下来继续分析:
    将断点设在518行,继续执行,程序停留在518行。
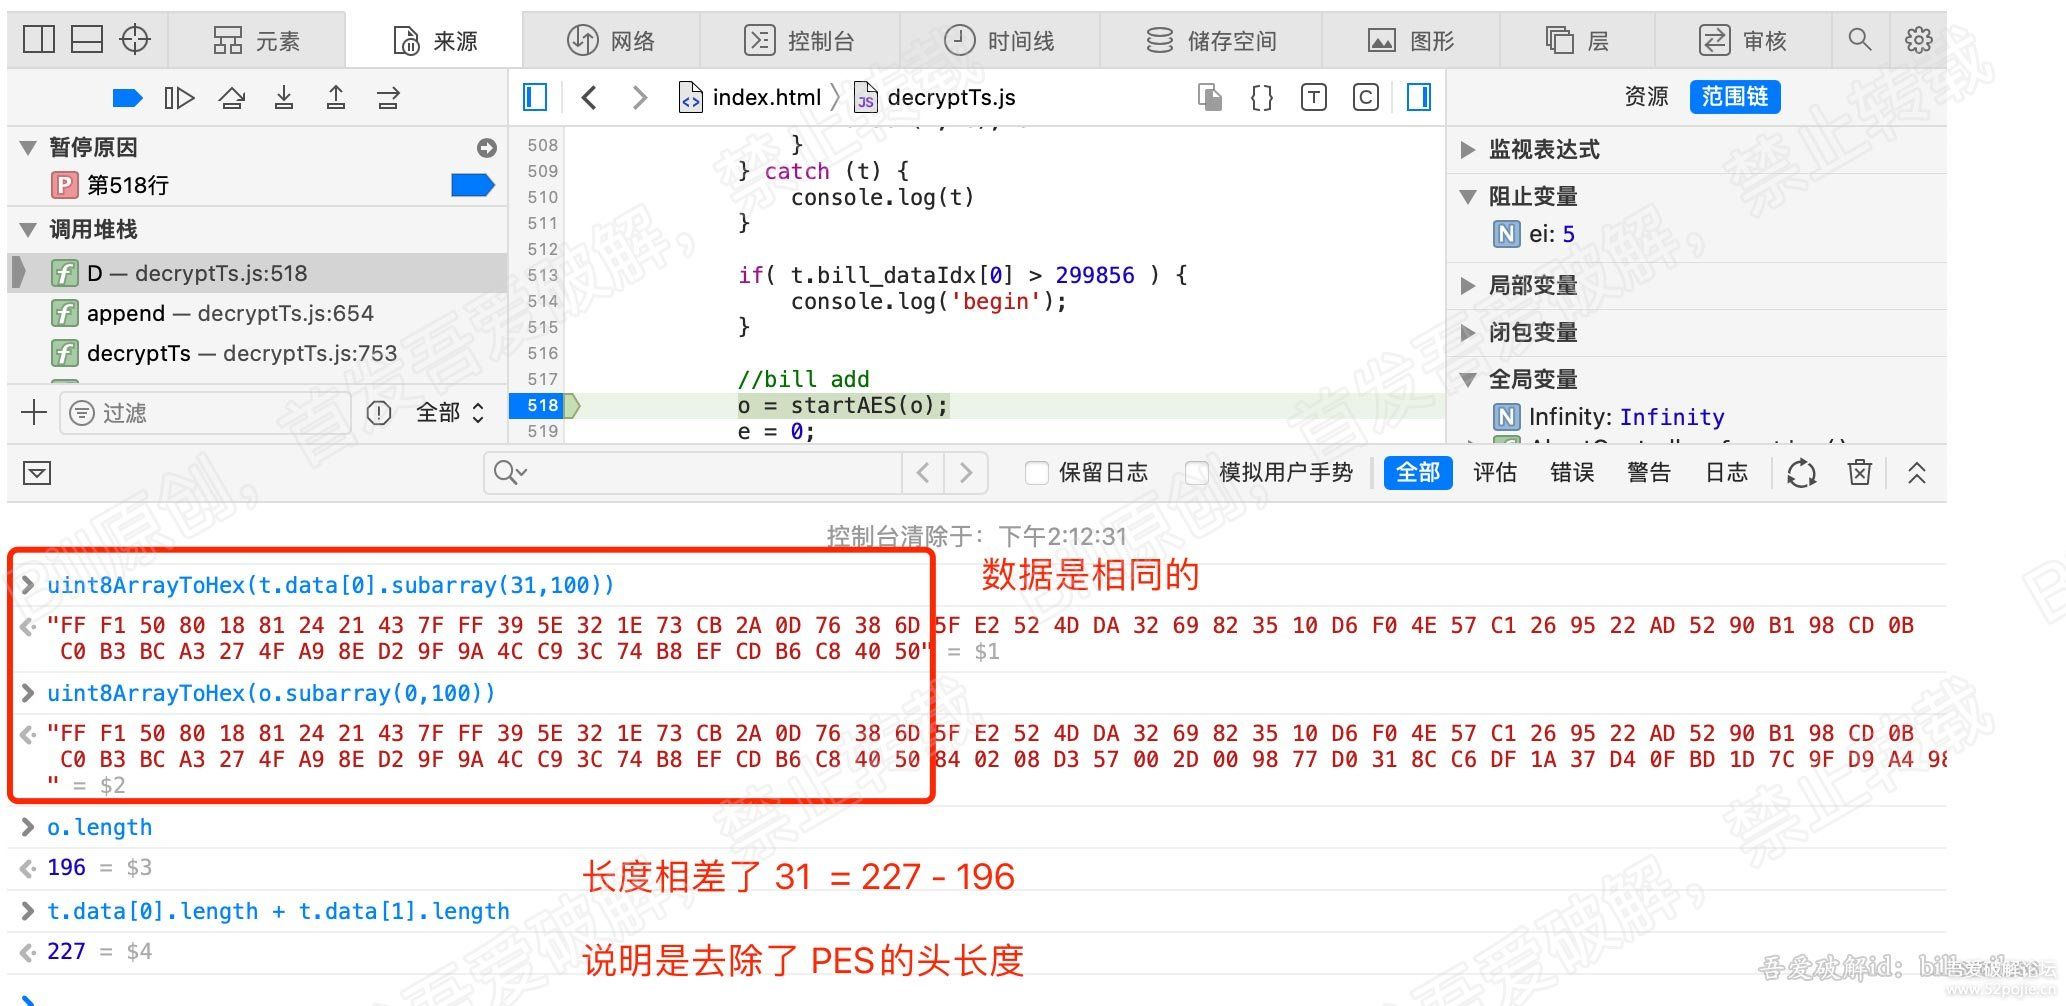
    查看下o的值、长度,以及t.data的第一个的值,对比下。看图:

    可以看到o的值比t.data的总长度少了 31,就是c的值。
    再看o的值与t.data[0]的数据从第31个索引开始,是不是完全相同了。

    说明上面497行的for循环做的事就是:将PES的数据合并到一起,并去除PES头的数据。o便是结果。

    for (var b = 0, g = u.length; b < g; b++) {
        r = u[b];
       [/b] var v = r.byteLength;
        if (c) {
            if (c > v) {
                c -= v;
                continue
            }
            r = r.subarray(c), v -= c, c = 0
        }
        o.set(r, e), e += v
    }

    再看518行:o = startAES(o);
    此代码就是将 去除PES头的数据进行解密。得到解密后的数据。

    本函数将解密后的PES数据返回。进行下一步处理。

    由此我们知道,此ts的加密方式是对每个pes的负载数据(去除pes头)进行加密的。

    至此,ts的加密逻辑分析完成。
    总结下:

    1、程序首先加载ts数据
    2、每188个字节的循环,解析ts包
    3、根据包的数据类型(pid判断),去进行不同的解析。
    4、先解析PAT、得到PMT、得到其他媒体数据音视频等
    5、将存在于多个ts包中的pes包的数据以及总大小,保存至变量。
    6、将取得的PES包的数据和大小,传递给pes解析函数
    7、解析函数将所有pes数据组装到一起并去除PES头
    8、将组装的后的 pes数据,传给AES解密函数进行解密
    9、得到解密后的PES数据,返回给播放器

    我们现在知道了ts的数据是如何解析的,数据是在哪里解密的,以什么形式加密的。
    那么接下来就来分析下,我们如何对ts文件进行解密。

    四、如何进行解密

    聪明的你,估计已经想到了。既然我们在上一章节拿到了解密数据,那么把解密数据,替换掉加密数据,然后重新保存ts,不就ok了吗

    我只能说,聪明!!!

    先分析下思路:
    我们已知道 加密数据存在于多个ts包中,将多个ts中的数据提取,然后整和,再去解密,得到解密的整和数据。

    所以,我们就要将 解密后的数据 进行拆分 到多个ts中。

    得到解密的数据: 多个ts包 –> 得到待解密的pes –> 得到解密的数据

    将解密数据还原: 解密的数据 –> 拆分到解密数据 –> 复原到多个ts包中

    如何拆分解密的数据?
    根据解密时,传递进来的整和的pes数据的size来进行拆分。

    如何复原到ts包中?
    记录解密时,获取pes数据时,pes数据所在的索引。
    根据索引将相应的数据替换ts中的数据。

    下面来具体操作:
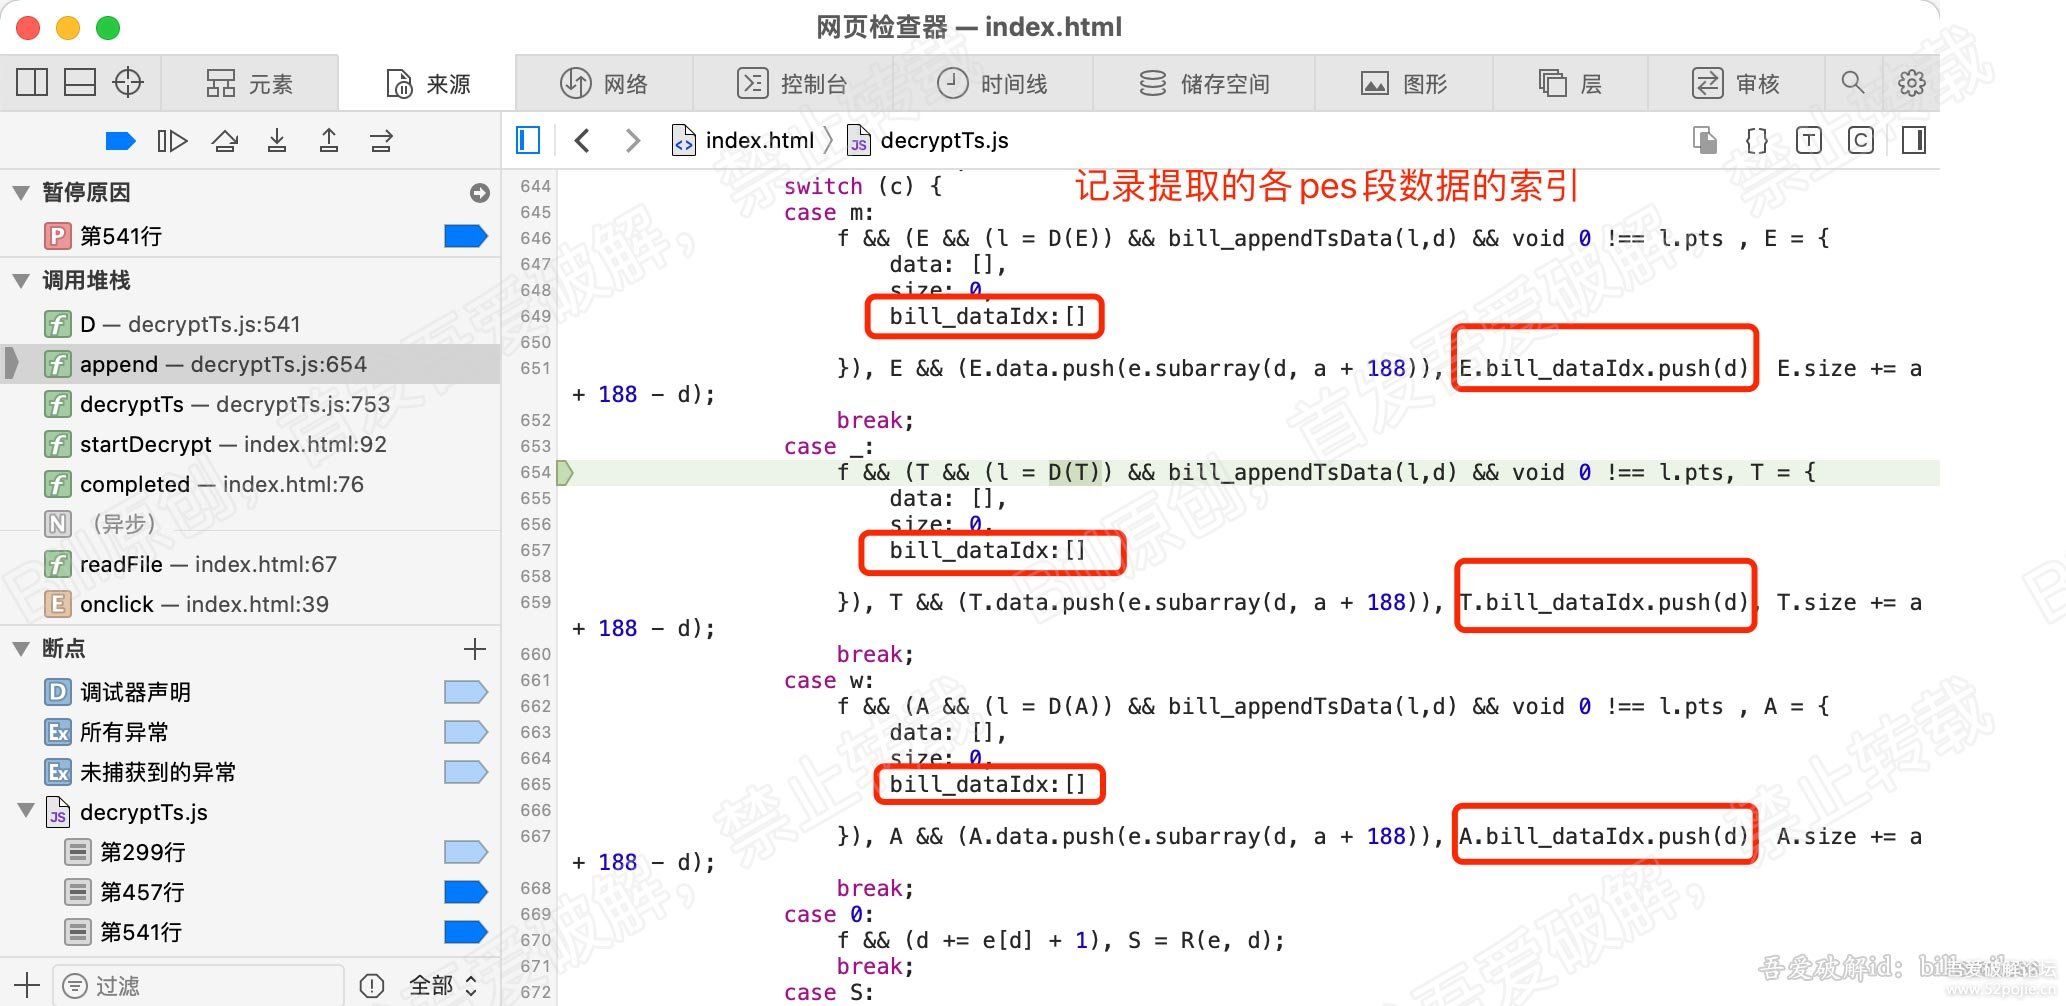
    1、首先在ts中提取pes数据时,记录下提取数据的索引。
    因为此时记录的索引是包含PES的头的长度。实际的解密数据是不包含PES头的。
    所以我们要把索引传递到pes解析函数中,因为只有在pes解析函数中,才能拿到pes头的长度。
    拿到pes头的长度后,把有pes包头的 的数据的索引值去掉pes头的长度。

    上代码,在所有提取pes数据的地方,添加索引数组,并记录提取pes数据的索引。看图:

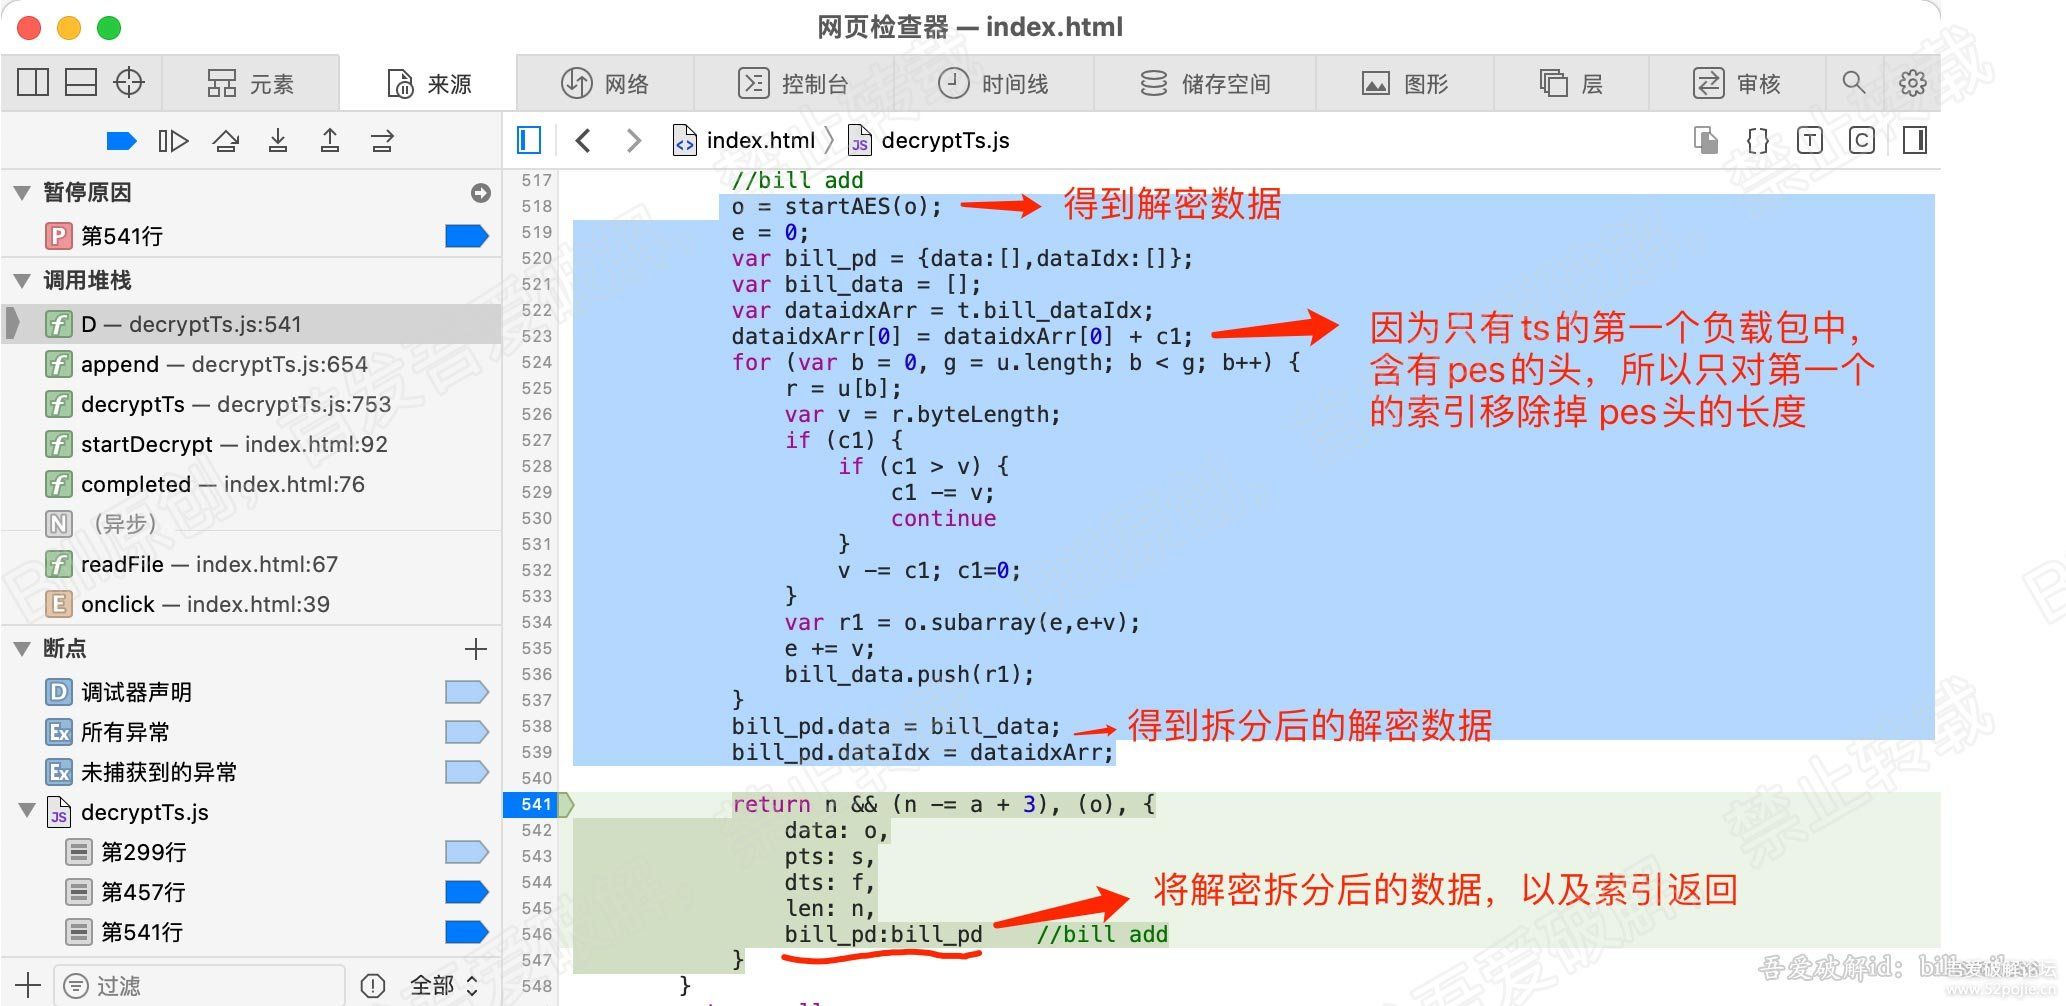
    2、接下来在解析pes的函数中,对得到的pes解密数据进行拆分。

    其实拆分与组合是类似,方向相反。根据传进来的pes数据的大小,以及ts包的数量来拆分。

    拿到解密的数据,拆分后,将数据保存,同时将第一个含有pes头的索引加上pes头的长度。

    将索引和拆分的数据,一同随其他数据返回。

    每解析一个pes,我们就替换一个原始的未解密的pes数据。看图:

    3、在解析ts的append函数中,收到拆分了解密的PES数据以及索引后,开始替换ts的原加密数据。

    先看下解密的数据替换的函数:

    function bill_appendTsData(nd, idx) {
        //idx 没有用到,可忽略
         
        var i = 0,j = 0;
        let dataArr = nd.bill_pd.data;
        let idxArr = nd.bill_pd.dataIdx;
        let len = dataArr.length;
        if( len != idxArr.length ) {
            console.log('数据索引与数据数量不同');
            return;
        }
         
        for( i = 0; i < len; i++ ) {
            let darr = dataArr[i];
            let didx = idxArr[i];
             
            for ( j = 0; j < darr.length; j++) {
                bill_d[didx+j] = darr[j];
            }
        }
    }

    其实很简单,根据拿到的解密的数据和数据在ts文件的索引,替换相应的数据。
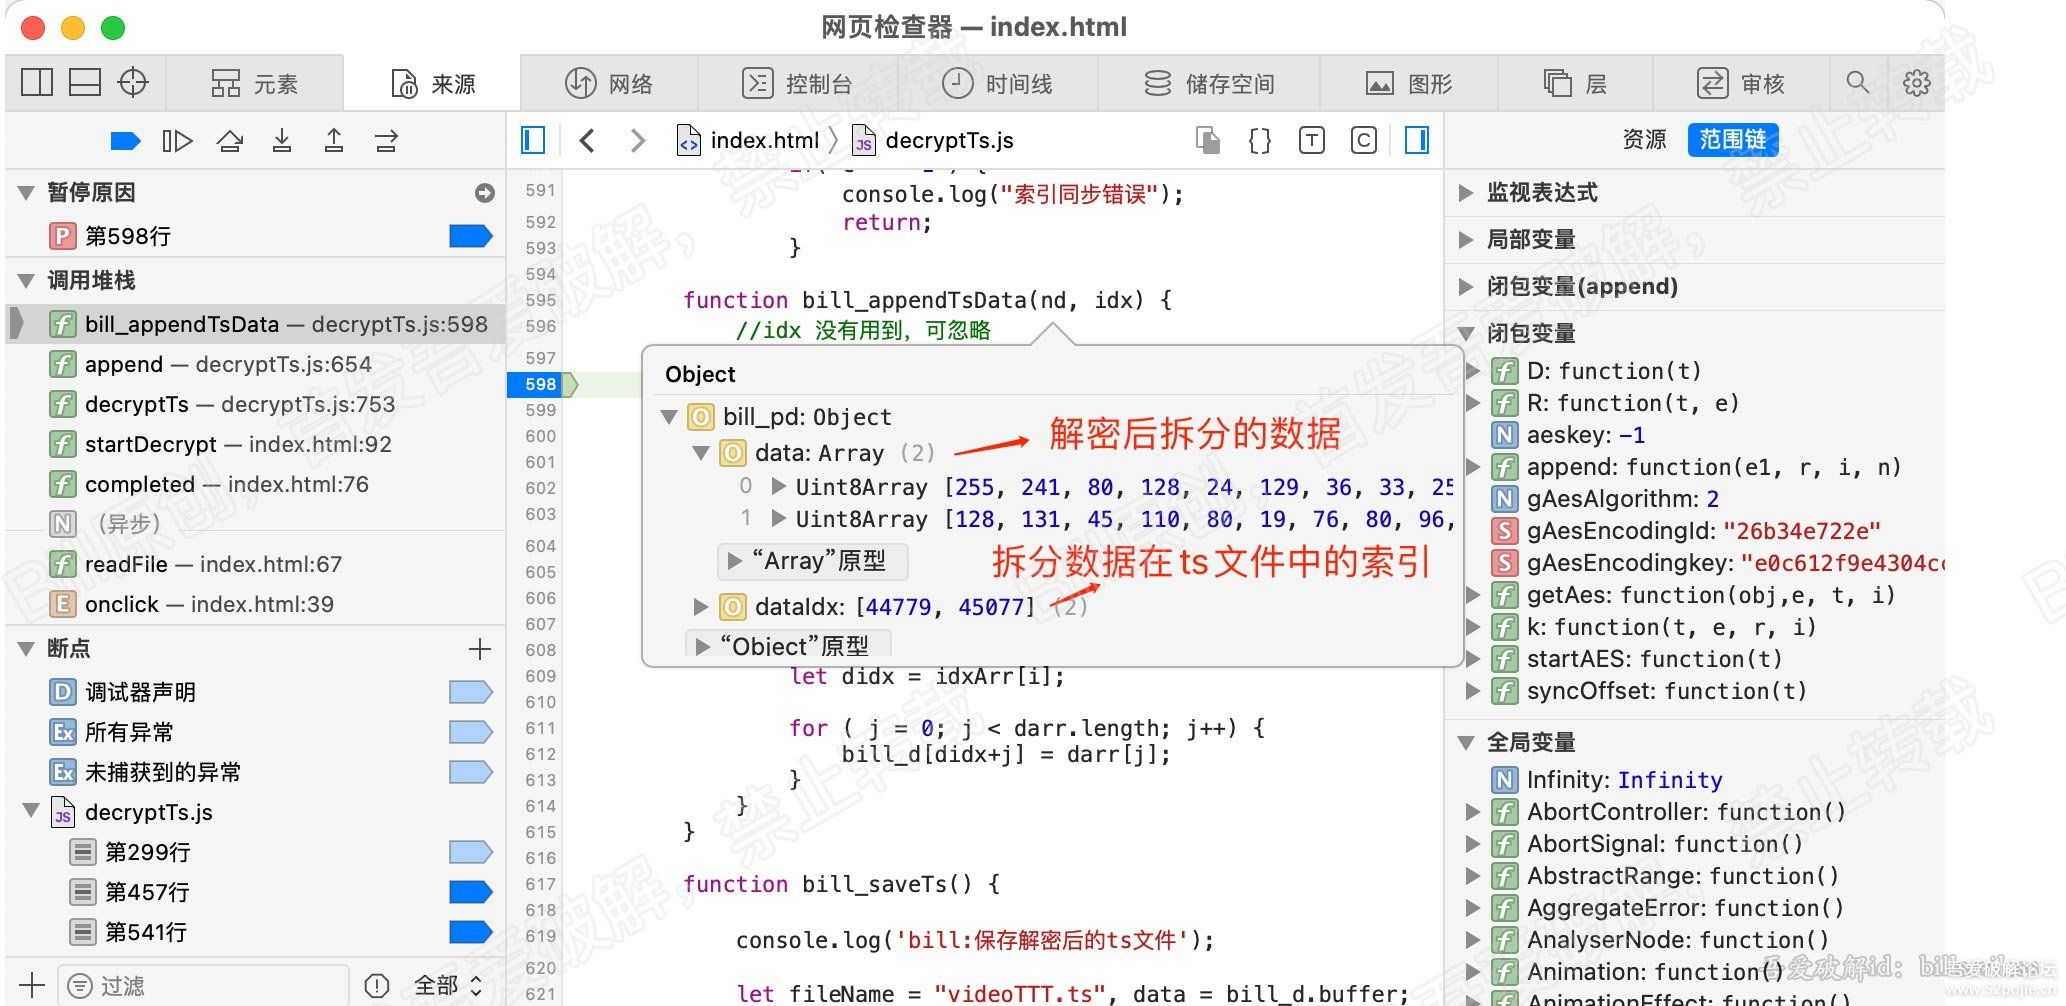
    这里打了个断点,看下接收到的拆分后的解密数据以及索引。

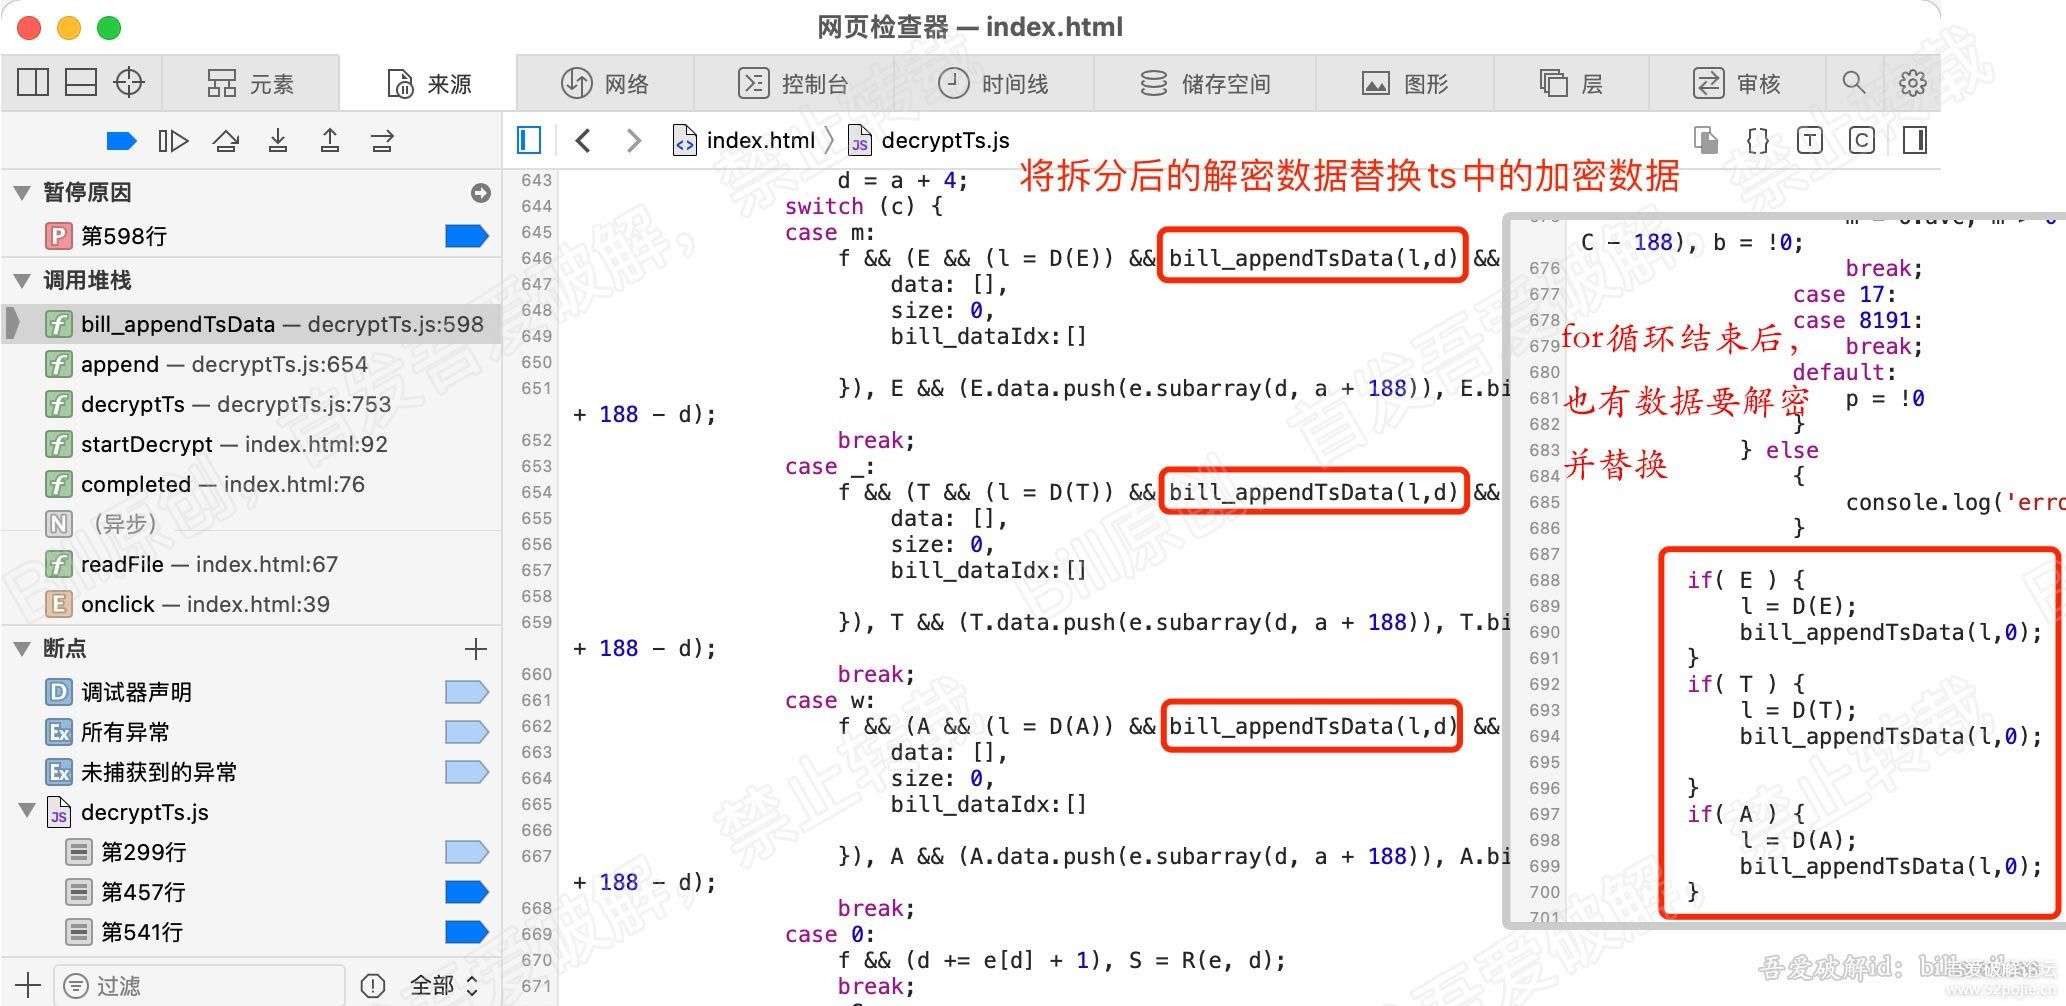
    这是替换函数,看下在哪里调用替换函数。在收到解密的pes数据后,紧接着就调用。
    此外,当for循环结束后,还需要对3个类型的ts包的数据,进行解密一次。
    为什么这么做?大家思考啊

    至此,PES解密分析就完成了。

    五、总结以及demo

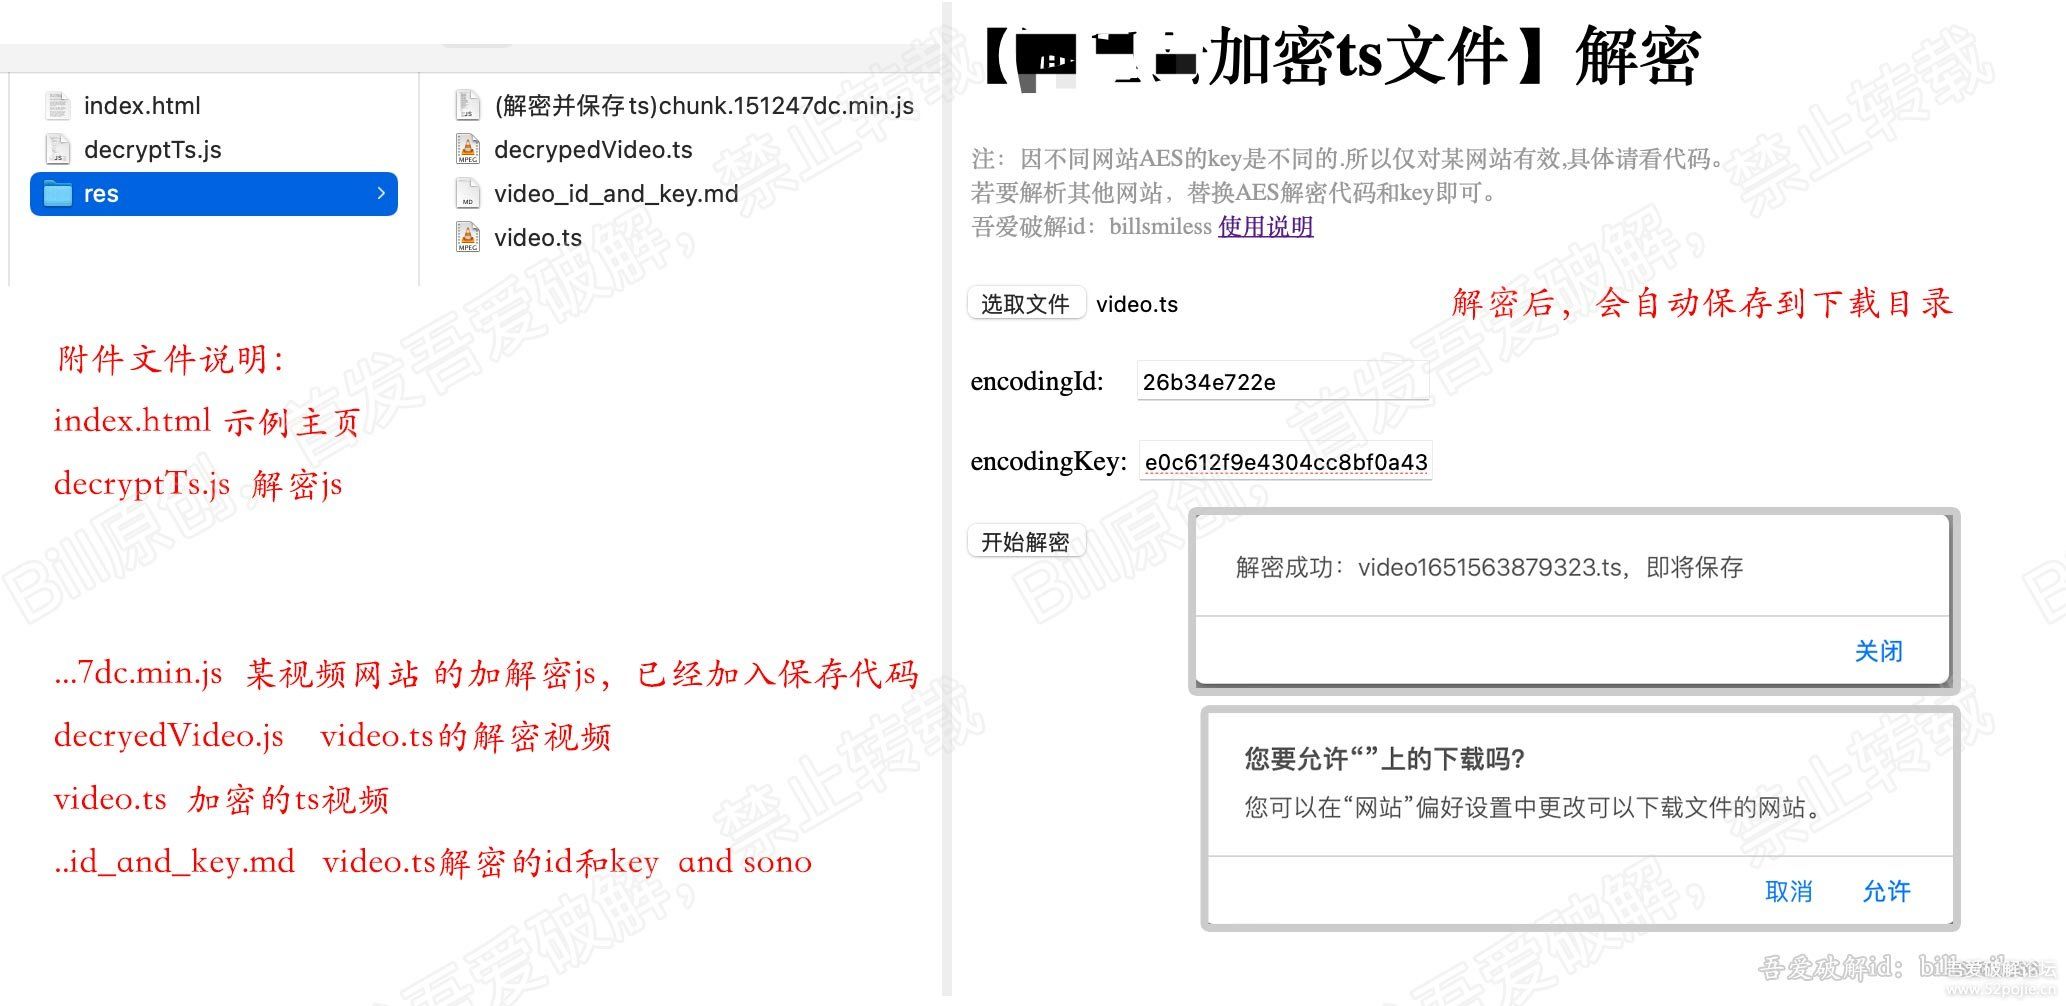
    demo源码和示例视频,我上传到网盘了,下图为demo示例

    总结
    1、在某代码中,js函数如果不写返回值,竟然不会返回。之前代码正常。
    2、关于ts包和pes包的关系,理解了很久,最后结合代码和文章,才弄清楚最终逻辑,有些文章内容是错的,会带跑偏。
    3、对于代码中ts头和pes头的分析,也思考了很久,有时候半天想不明白。
    4、对于ts数据格式,什么PAT等等各种表,懵逼的狠。也是结合代码,总算梳理明白了。
    5、文章写了3天,梳理ts的知识,梳理代码,准备素材,再整理成文,期望对大家有所帮助。
    6、因本人水平有限,文中若有错误之处,还望各位批评指正,共同进步。

  • JSJIAMI V7 最新解密工具

    JSJIAMI V7 最新解密工具

    JSJIAMI的作者好像除了会吹牛也没有什么其它本事了。。。。。

    每次新版本出来都说自己加密算法牢不可破,每每被打脸,真的很无语。

    其它,javascript这种前端语言,无论你怎么加密,最后都是要被脱裤子的。

    今天分享一个最新的jsjiami v7版本的解密工具。

    老套路:先看V7加密前的源代码。

    (function(w, d) { 
    
     w.update = "2023年7月16日05:34:29更新"; 
    
     d.info = "本站历时1年半研发的新版本V7初版,具有多态性加密,破解难度更高。"; 
    
     d.feedback = "由于刚刚上线,有问题积极反馈,请联系QQ 11223344"; 
    
     d.tips = "如遇不兼容,请先暂时用v6加密,并反馈给我们。"; 
    
    })(window, document);

    我们直接在jsjiami的官网给他进行加密

    加密后的代码如下

    /*
     * 加密工具已经升级了一个版本,目前为 jsjiami.com.v7 ,更新了加密算法,缩减了体积;
     * 另外 jsjiami.com.v7 已经强制加入校验,注释可以去掉,但是 jsjiami.com.v7 不能去掉,其他都没有任何绑定。
     * 誓死不会加入任何后门,JsJiami.com 加密的使命就是为了保护你们的Javascript 。
     */
     var version_='jsjiami.com.v7';(function(_0x5002d1,_0x5f4aa0,_0x21acac,_0x378094,_0x3bf05d,_0x1281b6,_0x1624a5){return _0x5002d1=_0x5002d1>>0x6,_0x1281b6='hs',_0x1624a5='hs',function(_0x5cbc36,_0x5b6dd5,_0x2fc331,_0x523dae,_0xd0f20d){var _0x5a5a5a=_0x2cd7;_0x523dae='tfi',_0x1281b6=_0x523dae+_0x1281b6,_0xd0f20d='up',_0x1624a5+=_0xd0f20d,_0x1281b6=_0x2fc331(_0x1281b6),_0x1624a5=_0x2fc331(_0x1624a5),_0x2fc331=0x0;var _0x1d1aa8=_0x5cbc36();while(!![]&&--_0x378094+_0x5b6dd5){try{_0x523dae=-parseInt(_0x5a5a5a(0x101,'2z2L'))/0x1+-parseInt(_0x5a5a5a(0x110,']x6^'))/0x2+-parseInt(_0x5a5a5a(0x102,'%Uvw'))/0x3*(-parseInt(_0x5a5a5a(0x10f,'Qano'))/0x4)+parseInt(_0x5a5a5a(0x103,'*M8d'))/0x5*(parseInt(_0x5a5a5a(0xfe,'5a#$'))/0x6)+-parseInt(_0x5a5a5a(0xfc,'3YC5'))/0x7+parseInt(_0x5a5a5a(0x109,'HH(n'))/0x8+parseInt(_0x5a5a5a(0xfa,'FRel'))/0x9*(parseInt(_0x5a5a5a(0x108,'HH(n'))/0xa);}catch(_0x3e2001){_0x523dae=_0x2fc331;}finally{_0xd0f20d=_0x1d1aa8[_0x1281b6]();if(_0x5002d1<=_0x378094)_0x2fc331?_0x3bf05d?_0x523dae=_0xd0f20d:_0x3bf05d=_0xd0f20d:_0x2fc331=_0xd0f20d;else{if(_0x2fc331==_0x3bf05d['replace'](/[ISLQpueHXdyGKDEMqhTC=]/g,'')){if(_0x523dae===_0x5b6dd5){_0x1d1aa8['un'+_0x1281b6](_0xd0f20d);break;}_0x1d1aa8[_0x1624a5](_0xd0f20d);}}}}}(_0x21acac,_0x5f4aa0,function(_0x19788d,_0x1ccf28,_0x14321e,_0x3197ff,_0x12b5b8,_0x3371c0,_0x1c9ef8){return _0x1ccf28='\x73\x70\x6c\x69\x74',_0x19788d=arguments[0x0],_0x19788d=_0x19788d[_0x1ccf28](''),_0x14321e='\x72\x65\x76\x65\x72\x73\x65',_0x19788d=_0x19788d[_0x14321e]('\x76'),_0x3197ff='\x6a\x6f\x69\x6e',(0x134f3a,_0x19788d[_0x3197ff](''));});}(0x3280,0x32366,_0x2099,0xcc),_0x2099)&&(version_=_0x2099);function _0x2cd7(_0x5f8b48,_0x4c46ef){var _0x20998f=_0x2099();return _0x2cd7=function(_0x2cd77b,_0x3f633c){_0x2cd77b=_0x2cd77b-0xfa;var _0x67ef06=_0x20998f[_0x2cd77b];if(_0x2cd7['nfRiKE']===undefined){var _0x412be3=function(_0x16570f){var _0x92b478='abcdefghijklmnopqrstuvwxyzABCDEFGHIJKLMNOPQRSTUVWXYZ0123456789+/=';var _0x4f3209='',_0x586c05='';for(var _0x3497c0=0x0,_0x51756a,_0x5cd8e8,_0x1b668e=0x0;_0x5cd8e8=_0x16570f['charAt'](_0x1b668e++);~_0x5cd8e8&&(_0x51756a=_0x3497c0%0x4?_0x51756a*0x40+_0x5cd8e8:_0x5cd8e8,_0x3497c0++%0x4)?_0x4f3209+=String['fromCharCode'](0xff&_0x51756a>>(-0x2*_0x3497c0&0x6)):0x0){_0x5cd8e8=_0x92b478['indexOf'](_0x5cd8e8);}for(var _0x1ab439=0x0,_0x505f90=_0x4f3209['length'];_0x1ab439<_0x505f90;_0x1ab439++){_0x586c05+='%'+('00'+_0x4f3209['charCodeAt'](_0x1ab439)['toString'](0x10))['slice'](-0x2);}return decodeURIComponent(_0x586c05);};var _0x3274ed=function(_0x1faa60,_0x43cfdb){var _0x566996=[],_0x2ac031=0x0,_0x49ffa1,_0x35152e='';_0x1faa60=_0x412be3(_0x1faa60);var _0x3c4505;for(_0x3c4505=0x0;_0x3c4505<0x100;_0x3c4505++){_0x566996[_0x3c4505]=_0x3c4505;}for(_0x3c4505=0x0;_0x3c4505<0x100;_0x3c4505++){_0x2ac031=(_0x2ac031+_0x566996[_0x3c4505]+_0x43cfdb['charCodeAt'](_0x3c4505%_0x43cfdb['length']))%0x100,_0x49ffa1=_0x566996[_0x3c4505],_0x566996[_0x3c4505]=_0x566996[_0x2ac031],_0x566996[_0x2ac031]=_0x49ffa1;}_0x3c4505=0x0,_0x2ac031=0x0;for(var _0x1a42d6=0x0;_0x1a42d6<_0x1faa60['length'];_0x1a42d6++){_0x3c4505=(_0x3c4505+0x1)%0x100,_0x2ac031=(_0x2ac031+_0x566996[_0x3c4505])%0x100,_0x49ffa1=_0x566996[_0x3c4505],_0x566996[_0x3c4505]=_0x566996[_0x2ac031],_0x566996[_0x2ac031]=_0x49ffa1,_0x35152e+=String['fromCharCode'](_0x1faa60['charCodeAt'](_0x1a42d6)^_0x566996[(_0x566996[_0x3c4505]+_0x566996[_0x2ac031])%0x100]);}return _0x35152e;};_0x2cd7['FldXek']=_0x3274ed,_0x5f8b48=arguments,_0x2cd7['nfRiKE']=!![];}var _0x424401=_0x20998f[0x0],_0x15e8f3=_0x2cd77b+_0x424401,_0x102d5f=_0x5f8b48[_0x15e8f3];return!_0x102d5f?(_0x2cd7['EJEGxI']===undefined&&(_0x2cd7['EJEGxI']=!![]),_0x67ef06=_0x2cd7['FldXek'](_0x67ef06,_0x3f633c),_0x5f8b48[_0x15e8f3]=_0x67ef06):_0x67ef06=_0x102d5f,_0x67ef06;},_0x2cd7(_0x5f8b48,_0x4c46ef);}function _0x2099(){var _0x5d7835=(function(){return[version_,'djTQsHDjXXiGaqXmdiEK.SpcCyMoXmhIE.evMu7L==','uSoTjKpdTmkBWO0IW5RdHSoSWPG','taDEW5bnW7CJaIVcGq','W4FdUwPRW7NcLvFcSSklxSkCdW','5Awj6yov5lUr5yEg5A+b77+66k6W5yE25PM15PsA55A5lSkN5yIv5A6R77Yq5BQ95yYl6AwM57Mg5OMk5lIo44c/','W6tdVmk/dMZcT8kQWQJdSCoOW54','W77cPSkPW5qwWPqqW5q','W58anZmgWO5yW4z1WOhcLCo/'].concat((function(){return['kmkHlSoNxXldJmktrmoJqqi','W5tcVwddOrxdLxHJ','W6xdUmk5bow4R8of5P+hW7lcRUAvMCk3qGdcTYDcmSk85PIA5Psd','WO8oWPa/W5yObvS1','kSkaW4X5WQHSW5XknZ0SCW','WOqvDuCWjmklW67dUa','a3ORlfzEm8oxWOhcL8o1WOq','WOqdWPnqWOOom3unpmov','yZvtWORcJ8kP'].concat((function(){return['BmosdmojW5njWQOf','WPxdOgxdVa','WOOzWP/cVsJcLSkomCo8','WOuEWPNdMhNdL8kJc8obW7xcPCki','W5W8sCo0W58','WP81WPhdPeLUWQHxv8kGd8kC','Emo4FSk9','55EM5lMg5yQr5yIT5lMr57Mn77+d5P+k6zw26AcK56wO5P+25y+36Asm77YF6k6p6igu57g+WR/dOSokW6FdQaJcOa7cL0O+'];}()));}()));}());_0x2099=function(){return _0x5d7835;};return _0x2099();};(function(_0x394129,_0x1eef7b){var _0x1e3e4e=_0x2cd7,_0x4b9b40={'oebqw':'本站历时1年半研发的新版本V7初版,具有多态性加密,破解难度更高。'};_0x394129[_0x1e3e4e(0x105,'xsOl')]=_0x1e3e4e(0xff,'FRel'),_0x1eef7b[_0x1e3e4e(0x10c,'YOEK')]=_0x4b9b40[_0x1e3e4e(0x10a,'@H%9')],_0x1eef7b[_0x1e3e4e(0x106,'#FO]')]=_0x1e3e4e(0x10d,'FRel'),_0x1eef7b[_0x1e3e4e(0x107,'5a#$')]=_0x1e3e4e(0x111,'vAEx');}(window,document));var version_ = 'jsjiami.com.v7';

    现在把这段加密后的代码丢到我们的解密工具中去

    看一下解密后的结果

    (function (_0x394129, _0x1eef7b) {
      _0x394129.update = "2023年7月16日05:34:29更新";
      _0x1eef7b.info = "本站历时1年半研发的新版本V7初版,具有多态性加密,破解难度更高。";
      _0x1eef7b.feedback = "由于刚刚上线,有问题积极反馈,请联系QQ 11223344";
      _0x1eef7b.tips = "如遇不兼容,请先暂时用v6加密,并反馈给我们。";
    })(window, document);

    我们可以看到,除了被混淆的变量,我们的javascript代码已经被完美的还原了,这样的js替换原有的js是可以完美运行的。

    解密大功告成。

    声明:本站解密方法严禁用于不法用途,一旦发现将封禁账号。

    虚拟物品属性特殊,售出后不退款。请思考清楚再拍。

    加密有不可预料性,不保证100%成功。