无错源码使用了Aws的cloudfront作为前端,来加速国内用户的访问速度。
使用cft的话如果分区域解析,国内使用cname,国外使用原始ip这样行不行呢。Route默认是不允许这样的操作的。
但我们可以通过一个骚操作来实现。
在route53里边新建一个二级域名作为cname域名,这个域名指向ip,然后在cname的geo设置国外,给中国设置为cft的别名,在默认里边使用我们刚才新建的二级域名,这样就可以了。

无错源码使用了Aws的cloudfront作为前端,来加速国内用户的访问速度。
使用cft的话如果分区域解析,国内使用cname,国外使用原始ip这样行不行呢。Route默认是不允许这样的操作的。
但我们可以通过一个骚操作来实现。
在route53里边新建一个二级域名作为cname域名,这个域名指向ip,然后在cname的geo设置国外,给中国设置为cft的别名,在默认里边使用我们刚才新建的二级域名,这样就可以了。

AWS cloudfront or Amazon cloudfront is a content delivery network(CDN) service. It deliver data into end users up on request through secure, low latency, high speed network. The AWS CDN physical servers, are integrated to AWS global infrastructure and with other AWS services like Amazon EC2, Amazon S3, Load Balancing etc.
The Amazon CloudFront charges are mainly based on below areas. The details can be found from the AWS website and using AWS monthly calculator. There will be a slight change in price according to the Region.
| DATA TRANSFER OUT (INTERNET/ORIGIN) HTTP/HTTPS REQUESTS INVALIDATION REQUESTS FIELD LEVEL ENCRYPTION REQUESTS DEDICATED IP CUSTOM SSL CERTIFICATES ASSOCIATED WITH A CLOUDFRONT DISTRIBUTION |
|---|
Currently the aws cloudfront has 216 Points of Presence or edge locations available or called by the name amazon CDN locations. Each edge locations are inter connected and sync our data automatically. The updated list can be found from the Amazon website itself.
| Terminology | Definitions |
|---|---|
| Distribution | An DNS endpoint name we can use to send traffic. Normally we point our domain name to the distribution via DNS |
| Origin | This is where our applications hosted. An origin can be either an Amazon S3 bucket or an HTTP server. |
| Behavior | A URL pattern and its associated caching behaviour. |
In our case we create multiple behaviors for the various WordPress URL requests and all that using single Origin and Distribution. Example Behavior are like WordPress admin pages should never be cached and other pages can be cached for a period of time.
In the case of WordPress, we have the following files/folders to think about
| Folder Paths or Files | Content or Usage |
|---|---|
| /wp-content/* and /wp-includes/* | Most of the static assets and theme files will likely be here |
| /wp-admin/* and /wp-login.php* | The admin pages |
| /wp-json/* | The root URL for the REST API |
| /contact/ | Replace this url with your own contact form url |
| /wp-signup.php | Used for visitor signups if your site supports it |
| /wp-trackback.php | Blog post trackback functionality |
| /xmlrpc.php | The WordPress API |
| /wp-cron.php | WordPress scheduled task functionality |
| /.well-known/* | This is a required route for Let’s Encrypt postbacks |
| Everything else | Homepage, sub pages, blog posts, etc. |
So lets get started and see how we can setup Amazon CloudFront with WordPress.
Using this policy key settings we specify the values in viewer requests that CloudFront includes in the cache key. The values that we include in the cache key are automatically included in requests that CloudFront sends to the origin. For WordPress websites we need create cache policy like below.
For that Log into the AWS management panel and go to the “CloudFront service” section.
Under “Policy” option and under “Cache” tab click “Create cache policy” button
A new window will open from there use below settings and hit create button.
| Give a Name for Policy we create, Like “Custom-Managed-Cache-Policy”. Minimum TTL 1 Maximum TTL 31536000 Default TTL 86400 Whitelist the headers “Host,origin and Referer” Allow “All” for Cookies and Query Strings. Compression support gzip only |
|---|
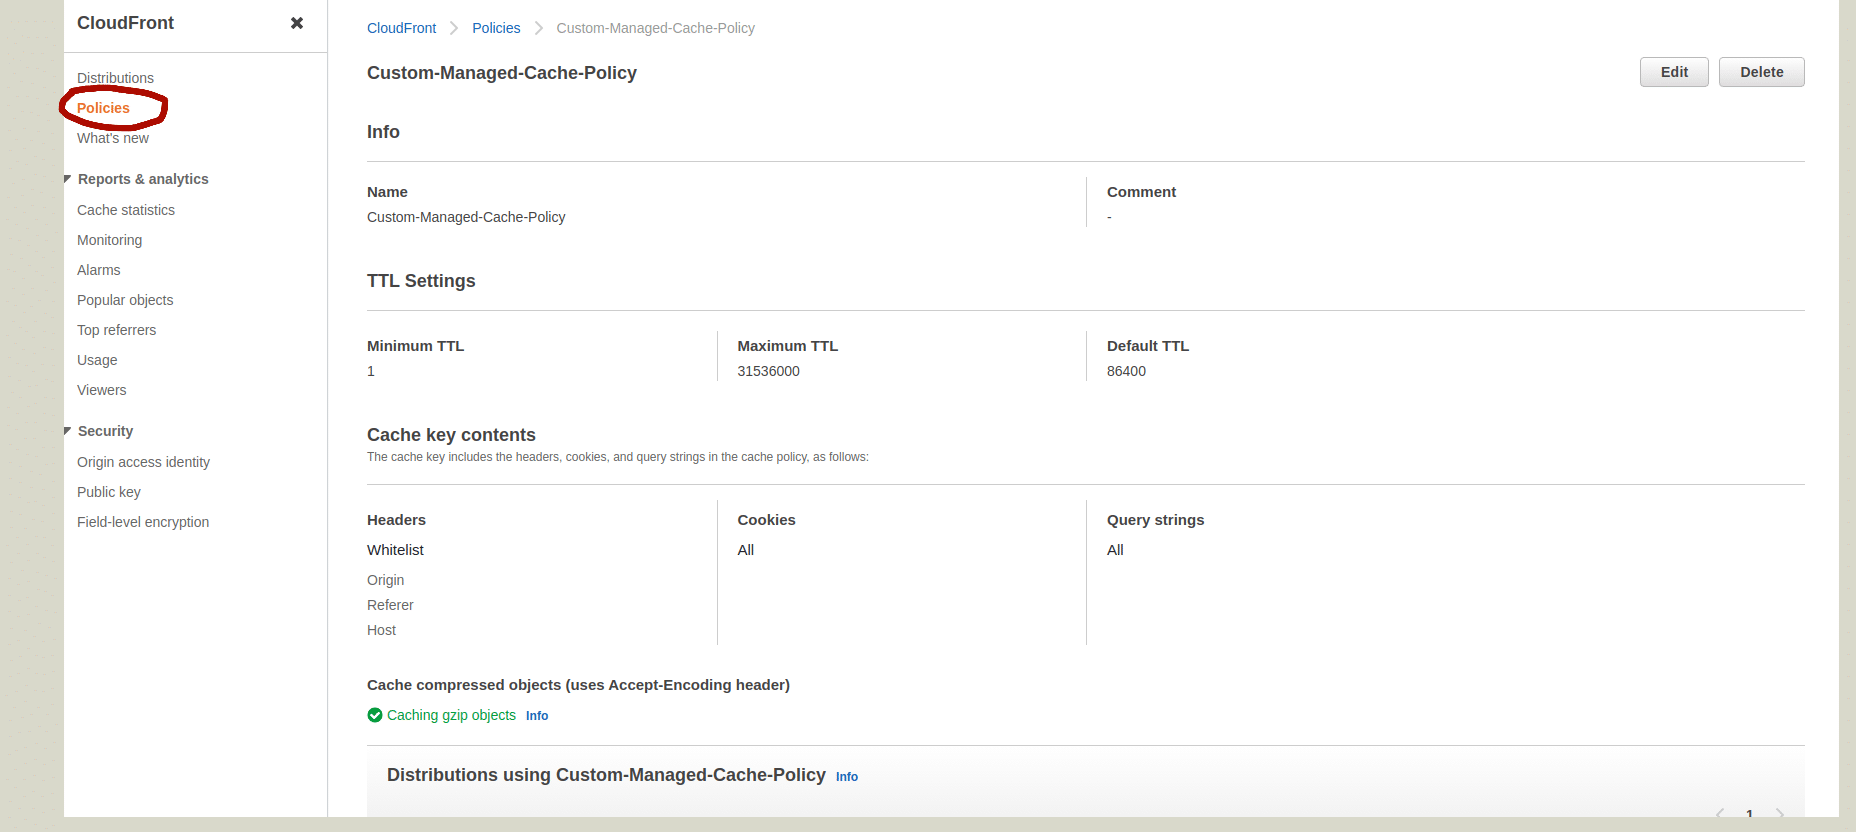
Refer above screenshot so you will get an idea about how the cache policy will look like. Now lets move to the next section.
In this section we are creating our own origin request policy to customise the information from the viewer request that you want CloudFront to include in the origin request for proper working of our WordPress websites. We needed this because Some information from the viewer request, such as URL query strings, HTTP headers, and cookies, is not included in the origin request by default. So lets get started.
From the AWS management panel itself and go to the “CloudFront service” section.
Under “Policy” option and under “Origin Request” tab click “Create origin request policy” button
A new window will open from there use below settings and hit create button.
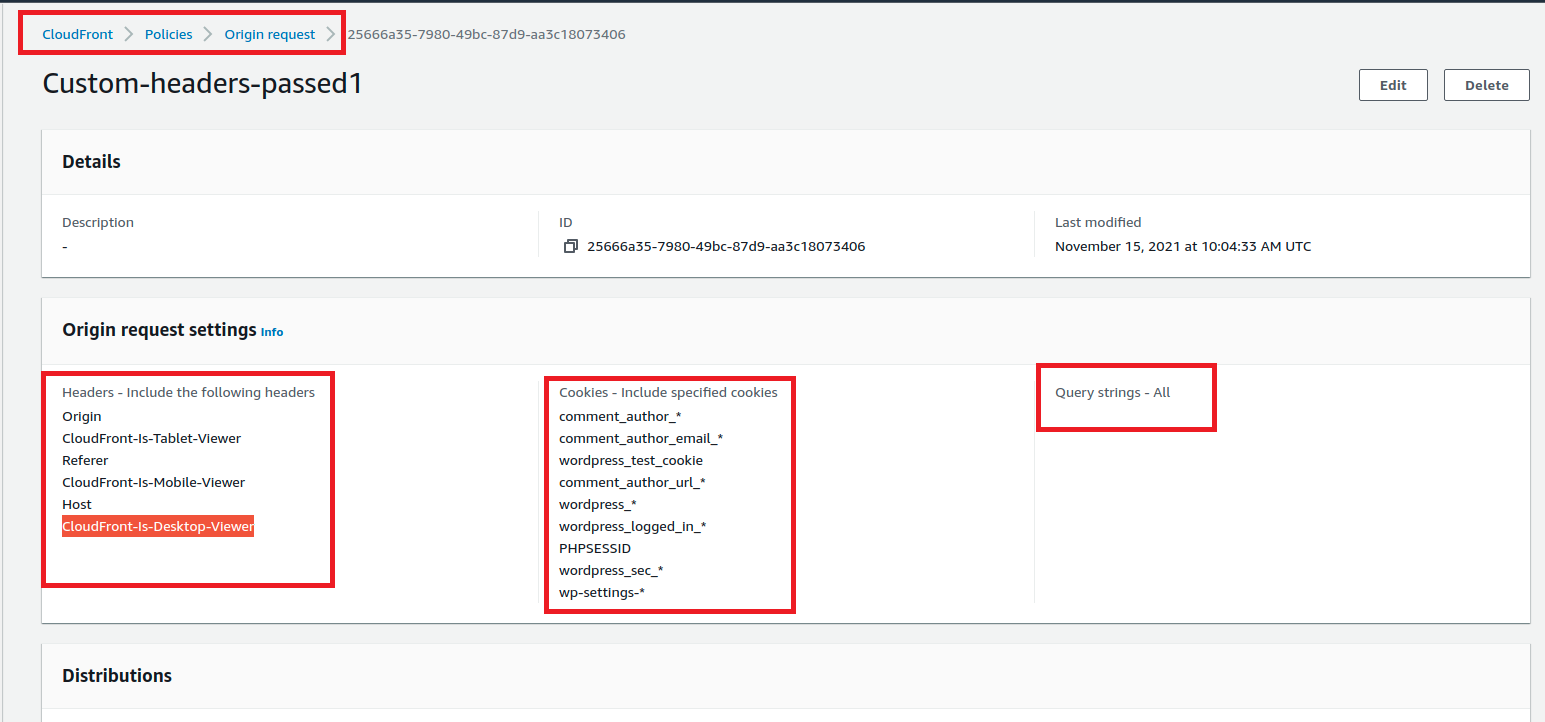
| Give a name like “Custom-headers-passed” whitelist the headers “Host,origin, Referer , CloudFront-Is-Desktop-Viewer, CloudFront-Is-Mobile-Viewer and CloudFront-Is-Tablet-Viewer” WordPress makes extensive use of cookies, and we need forward at least below cookiescomment_author_* comment_author_email_* comment_author_url_* wordpress_logged_in_* wordpress_test_cookie wp-settings-* PHPSESSID wordpress_* wordpress_sec_* There are lots of places where WordPress will use query strings in the URL, so we need to instruct CloudFront how to handle those as well. So Choose “All” |
|---|
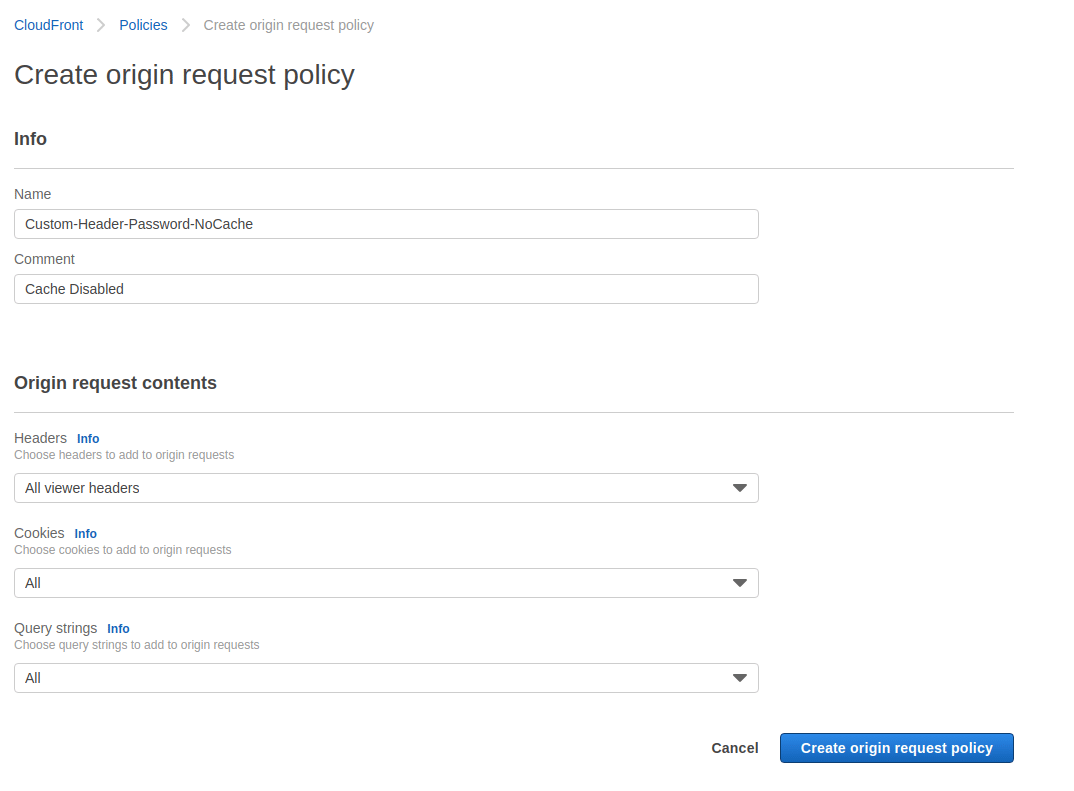
Now Again create Another Origin request Policy with name “Custom-Header-Passed-NoCache”. In that use below settings and hit create button.
| Headers – All viewer headers Cookies – All Query strings – All |
|---|
Okay, by creating above two origin request policy, using one policy we define selected Headers pass to or forward to origin from Cloudfront as per the origin request policy. We Choose only minimum Host headers that we need to pass. This policy will later used for caching the client request types according to the behaviour under our Cloudfront distribution.
Using the other origin policy our CloudFront distribution will not cache objects but will instead send all requests to your Origin for processing. This policy will be used for WordPress URL request types that we don’t wish to cache by Cloudfront.
Suppose we use any policy with Headers, Cookies and query string values as “None” then CloudFront could serve the wrong content in certain circumstances, such as when you host content for multiple websites on the same server. So make sure you don’t use any such Origin policy for your Cloudfront distribution.
So in short we will use these policy according to different type of Behaviour we create on our Cloudfront distribution. Below screenshots will show the settings of two origin request policy we created.
Okay, this completes the creation of Custom Origin policy section. Now lets move to the next section.
In this section we are issuing SSL certificate for our WordPress domain name using “AWS Certificate Manager”. The SSL issues through ACM is free of cost. Once we purchased it Normally it will be issued with in 15 Min.
During the creation of Cloudfront distribution we normally input our websites name in the Alternate Domain Names (CNAMEs) filed. In such cases for those domain names SSL is must thing other wise we will get error like below during the creation of Cloudfront distribution.
Error occurred
Bad request.
(InvalidChangeBatch 400: RRSet of type CNAME with DNS name example.com. is not permitted at apex in zone example.com.)
So lets see how this can be implemented. We already discussed the steps for issuing SSL/TLS certificate using “AWS Certificate Manager” as a separate blog article. Refer below link if you are looking to issue SSL certificate other wise move to next section. I am not mentioning the steps in this article for avoiding the duplication.
In this section we are creating the Cloudfront distribution for our WordPress website. By default CloudFront distribution caches all requests to the origin specified by Origin definition. Means behaves as full page cache and we also have the option to implement custom origin-pull patterns. So lets get started.
Log into the AWS management panel and go to the “CloudFront service” section.
Under Distribution click on “Create Distribution”

The create distribution window will open. In that the first section is origin.
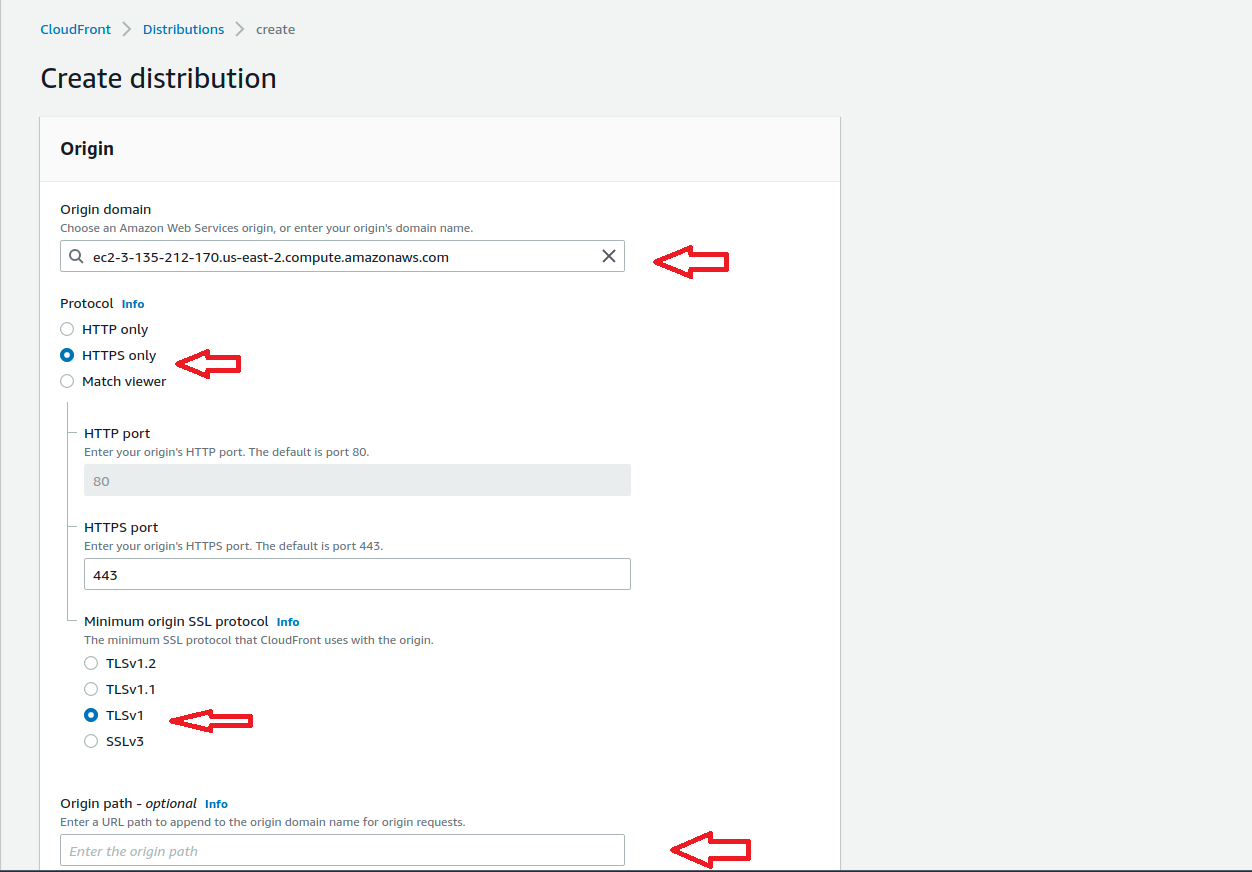
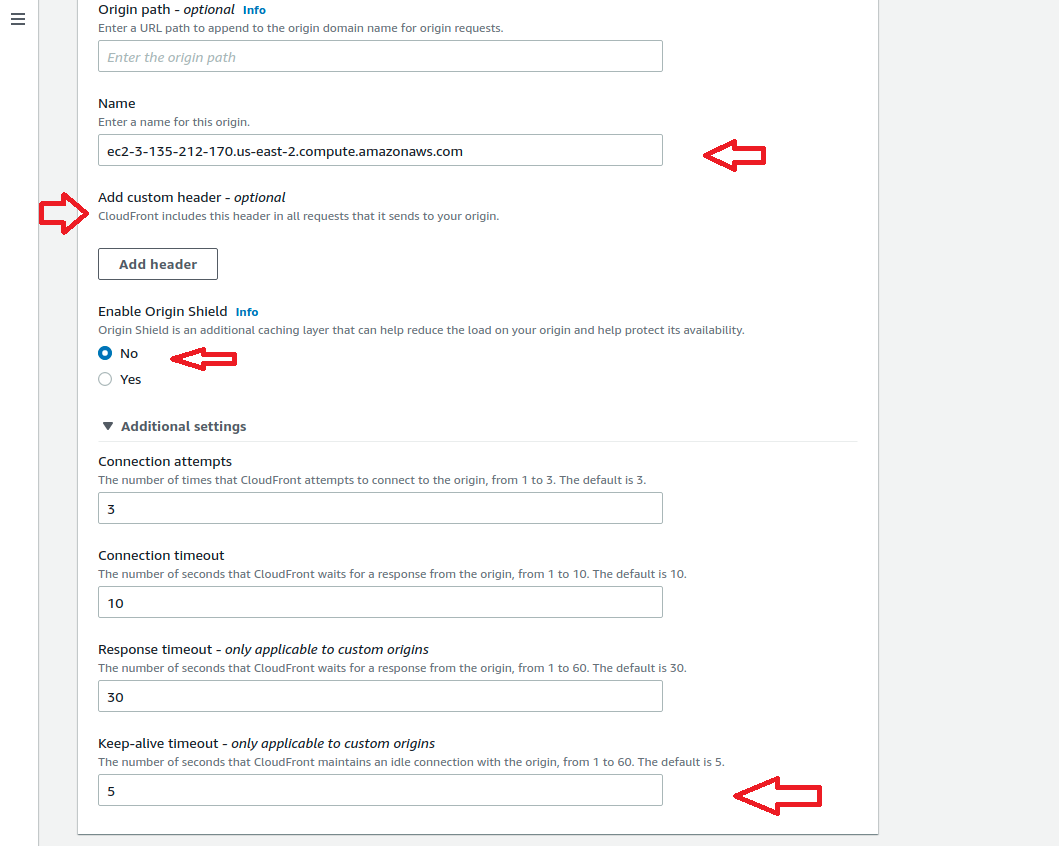
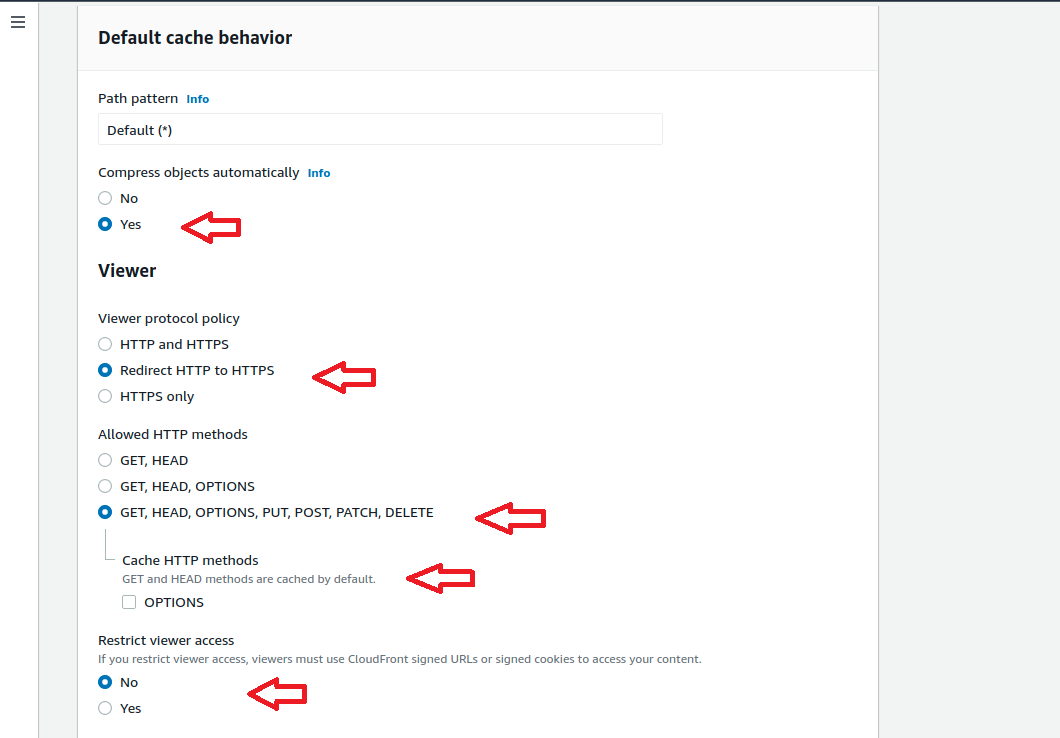
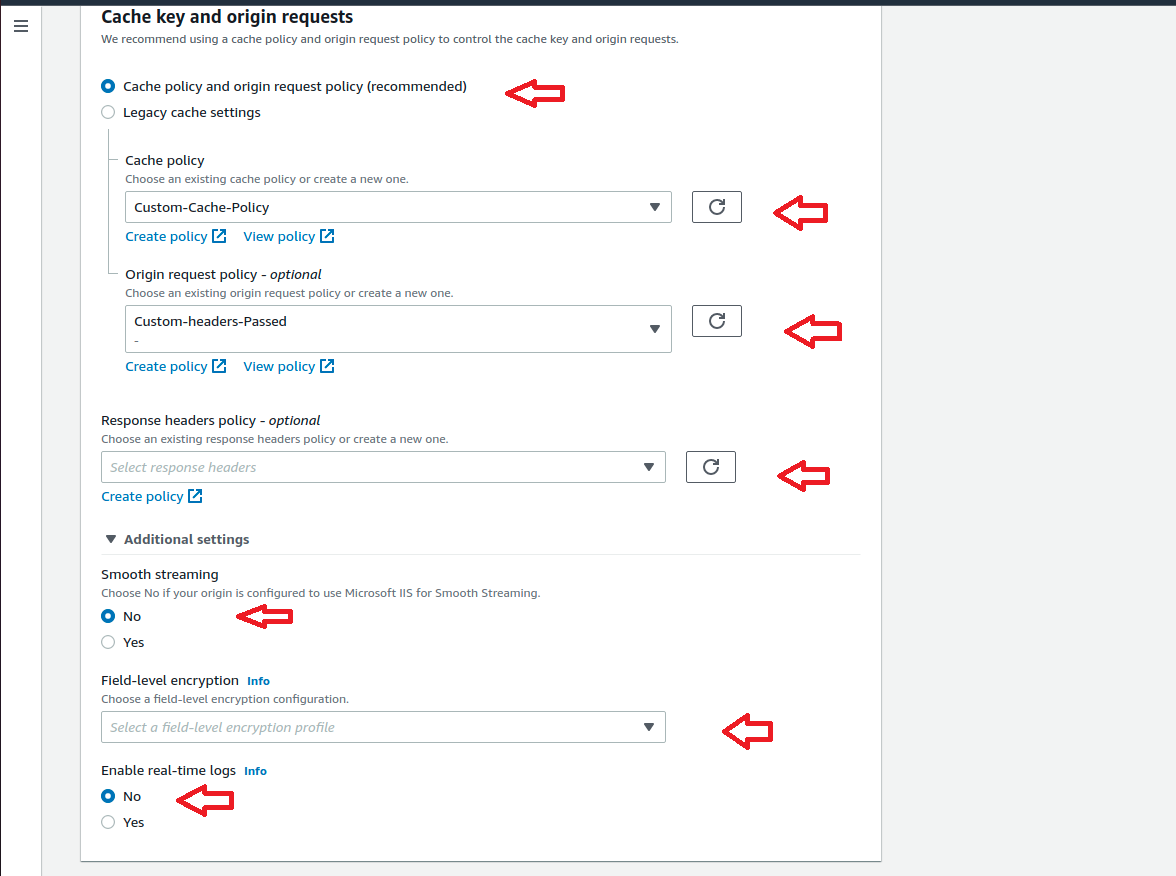
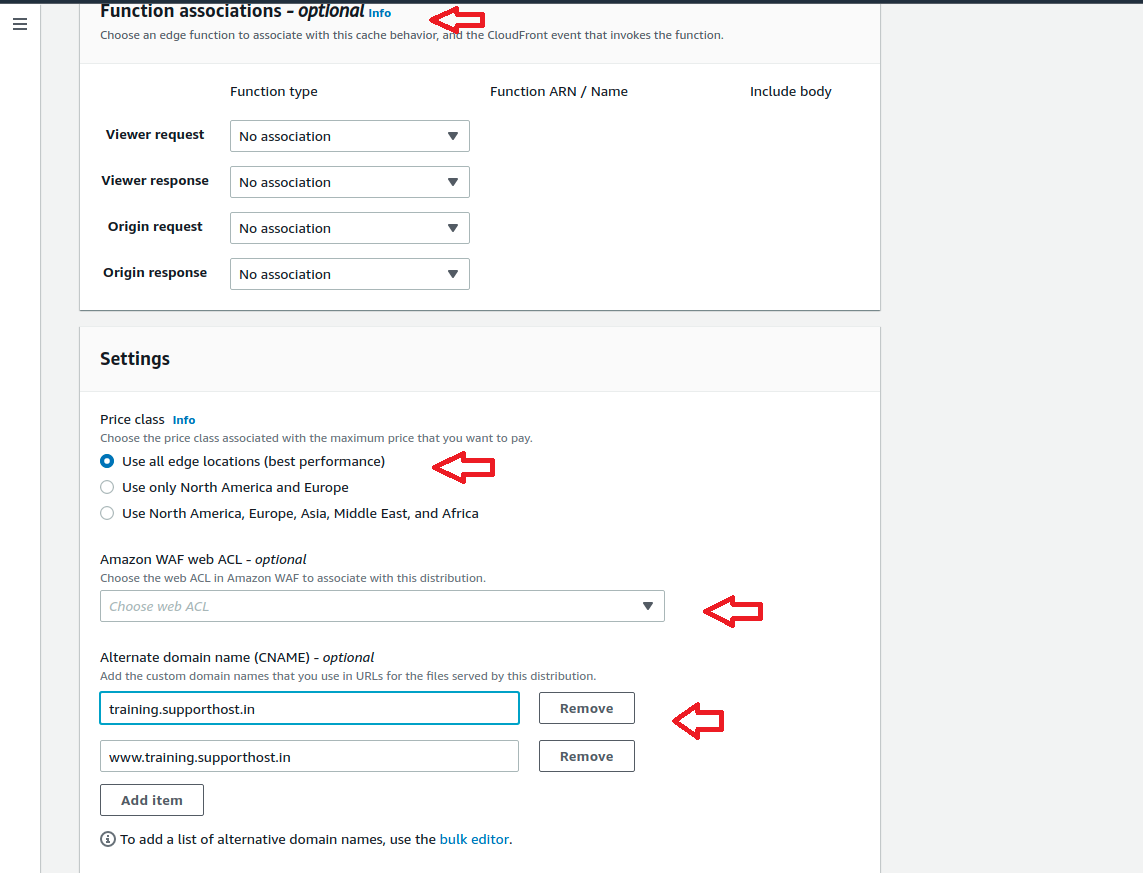
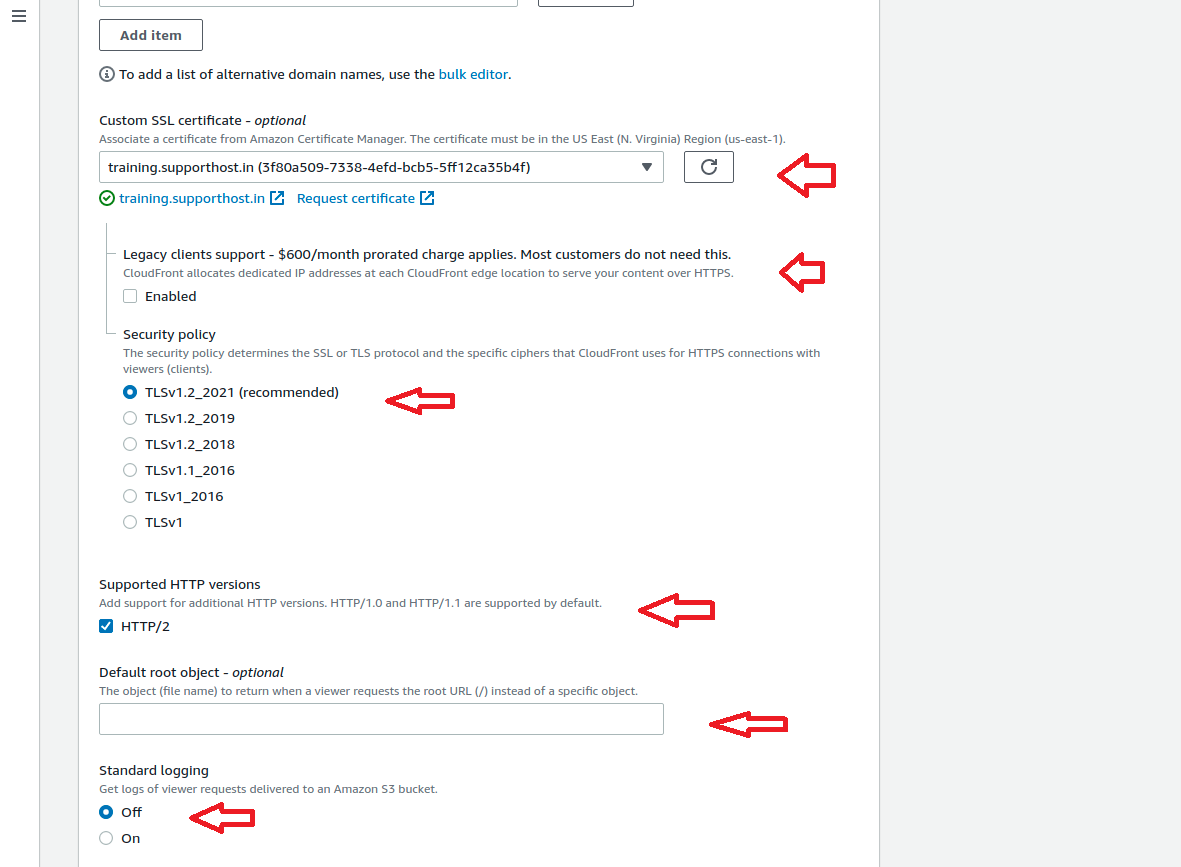
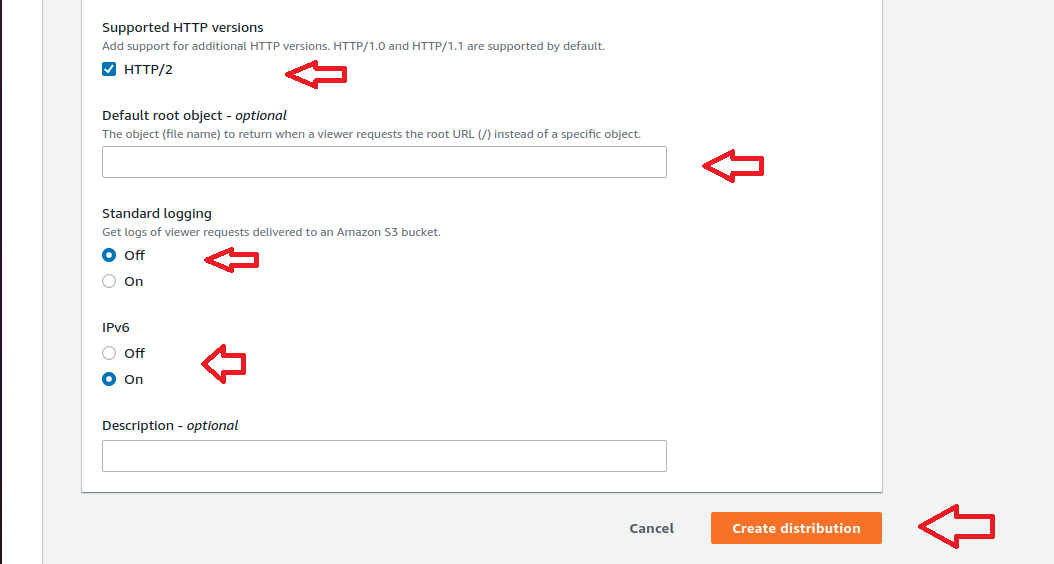
Finally verify the setting again by referring above screenshots and Click Create Distribution. Initially we can see the Cloudfront in progress status and after few minutes we can see the status as “Deployed” and ready to use. This completes the Creation of CloudFront Distribution. Now lets move to the Next section.
In this section we edit the default behaviour of our created distribution which is to cache all request types. But we also need not to cache some of the WordPress URL request pattern types which are give below. We don’t need our wp-admin area and other links mentioned above to be cached by Cloudfront because caching above URL patterns will cause issues to the proper working of a WordPress website. So lets see how these can be done.
| URL Pattern | Use Cases | Caching Status |
|---|---|---|
| /wp-login.php | The admin pages | No |
| /wp-admin/* | The admin pages | No |
| /wp-json/* | The root URL for the REST API | No |
| /contact/ | Our Web page contact form url.Replace this url with your own contact form url | No |
| /.well-known/* | This is a required route for Let’s Encrypt postbacks | No |
| /wp-cron.php | WordPress scheduled task functionality | No |
| /xmlrpc.php | The WordPress API | No |
| /wp-trackback.php | Blog post trackback functionality | No |
| /wp-signup.php | Used for visitor signups if your site supports it | No |
For that from AWS Panel itself , under Cloudfront services, click on CloudFront Distributions
click on ID corresponding to our cloudfront distribution created.

Click “Behaviour” tab >> Click create New behaviour and use below settings.

We need to create new behaviour for each of above listed WordPress URL from the “create behaviour” window. For each behaviour only Path pattern field changes according to the url request types but the rest of the settings will be same.
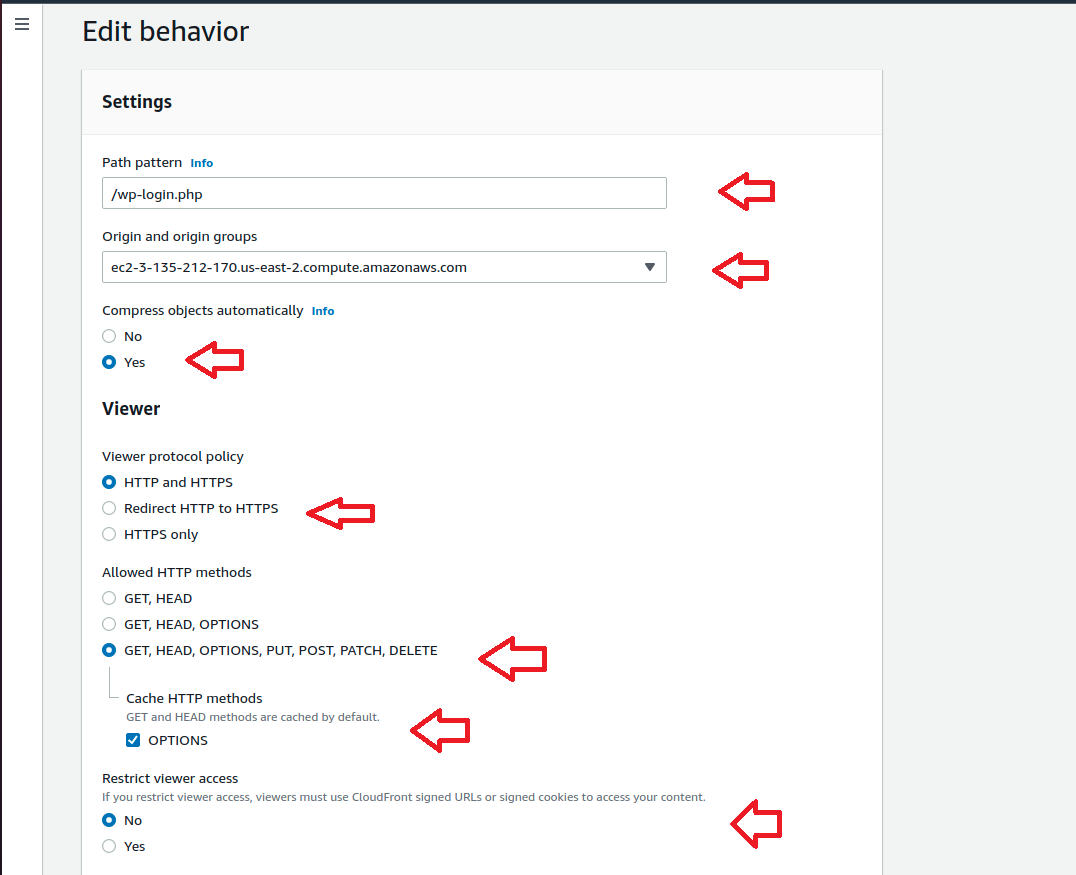
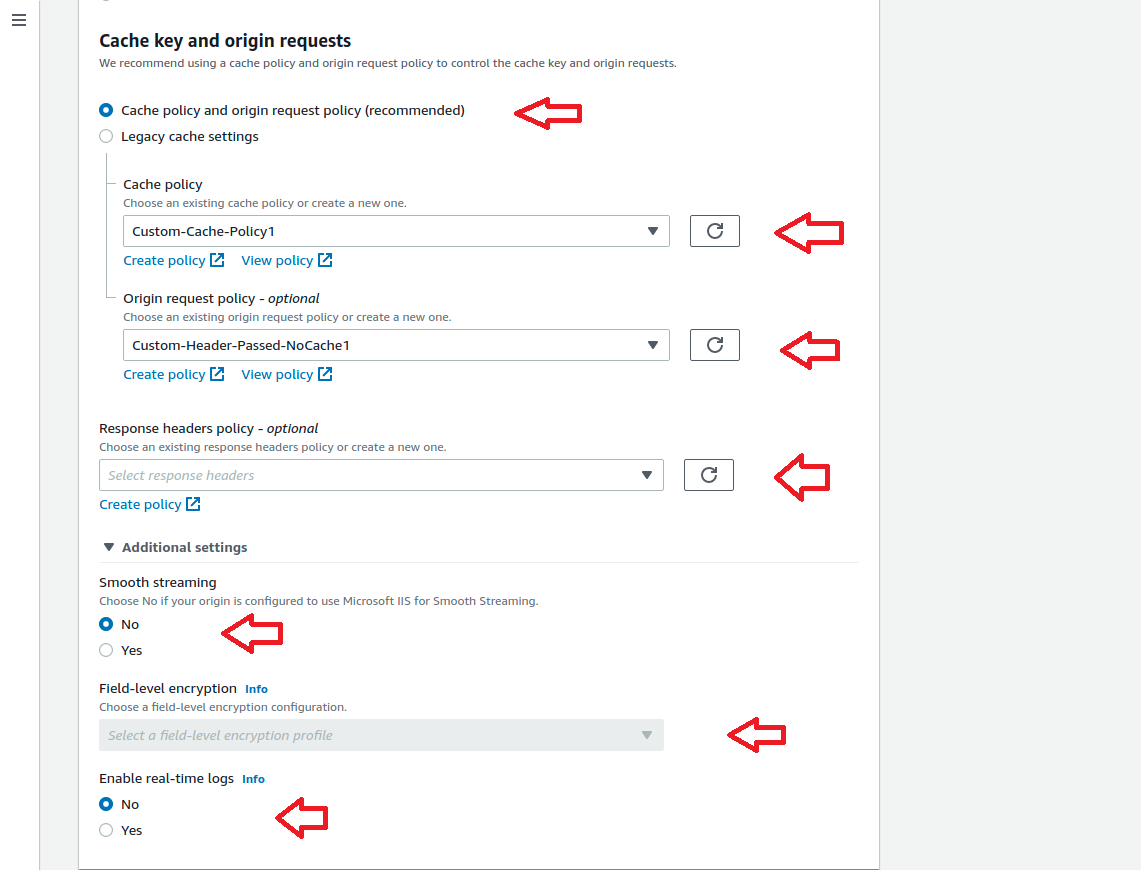
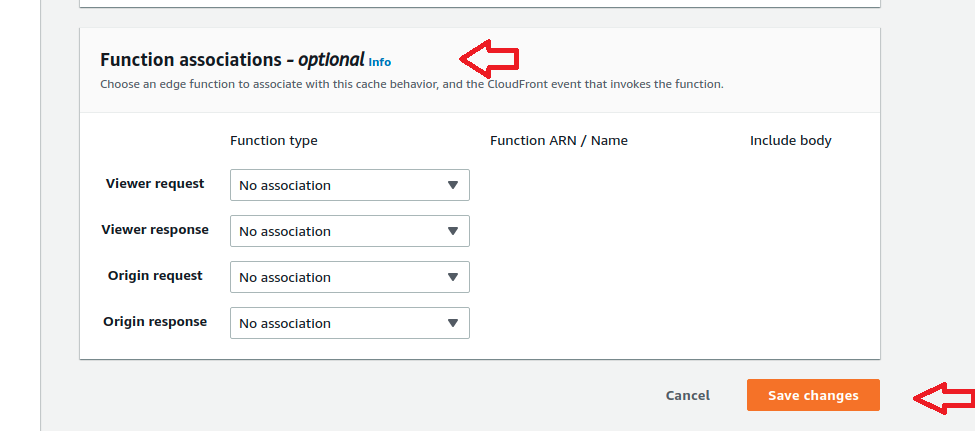
Repeat the above steps for each URL path pattern. Once completed, the behaviour tab will look like below.
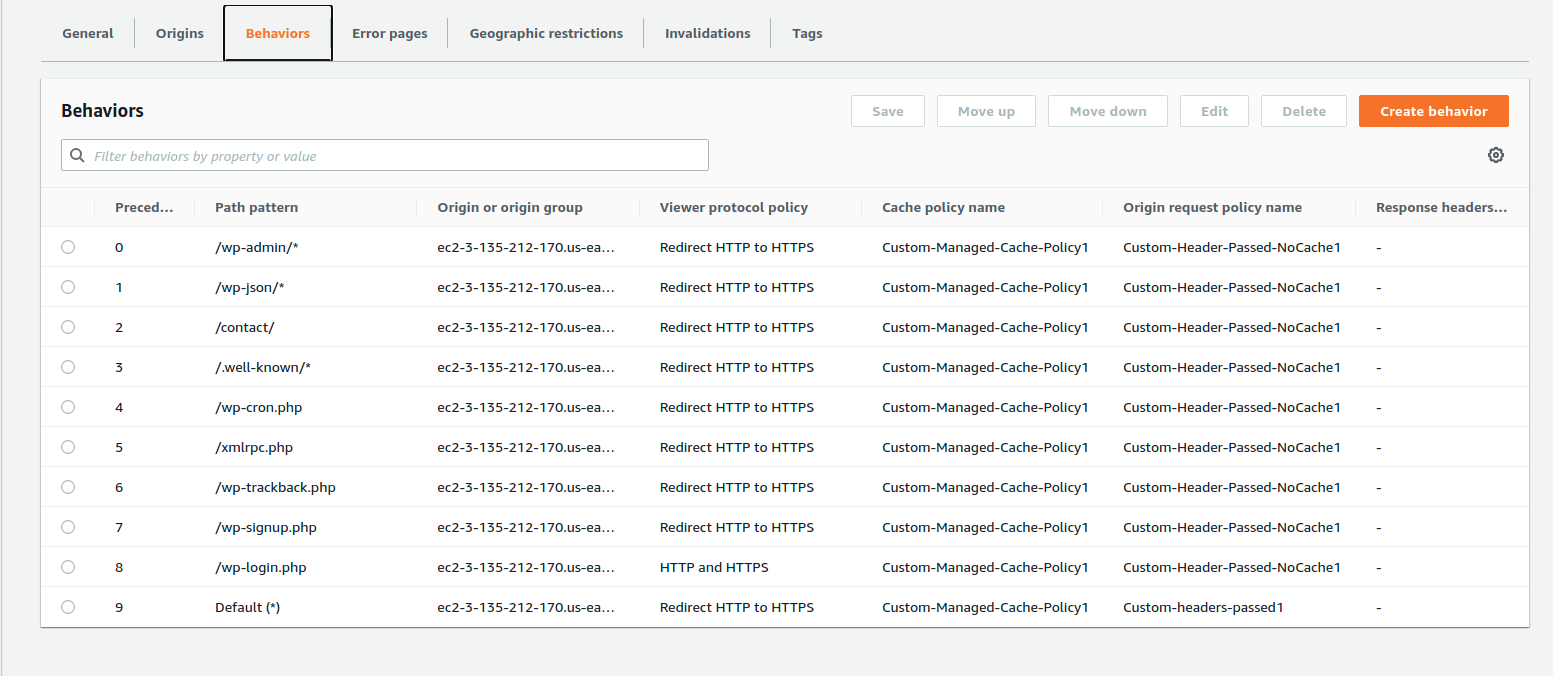
Now we excluded above WordPress related URL from cached by CloudFront. We don’t need our wp-admin area and other links mentioned above to be cached by CloudFront because caching above URL patterns will cause issues to the proper working of a WordPress website. This completes the editing the behaviour of CloundFront distribution we created. Now lets move to the next section.
In this section we are changing our WordPress website DNS A record. For that go the DNS manager section of your own website and create a CNAME pointing www.example.com or example.com at your CloudFront Distribution DNS endpoint. Also don’t forget to delete the existing DNS A records from making conflicts.
If you are using Route53 as your DNS zone manager. If try to change the record type as CNAME for existing DNS A record type and input the CloudFront Distribution DNS endpoint name. We will get below error.
Error occurred
Bad request.
(InvalidChangeBatch 400: RRSet of type CNAME with DNS name example.com. is not permitted at apex in zone example.com.)
In order to fix For that go back to AWS panel again
From the services section choose Route 53 service
click “Hosted zones” option from the left side
Now click our website name and the existing DNS records will show up
select our domain DNS A record and click edit from the right side options
Choose the Record Type as ” Route traffic to an IPV4 address and somw AWS resources”
and then enable the alias option
and then in the route traffic to option, from the drop down menu choose ” alias to cloudfront distribution ”
gave the CloudFront Distribution DNS endpoint name in the next drop down menu. We can also get the cloudfront distribution DNS endpoint name from the cloudfront services section too.
Refer below screenshot for a reference.
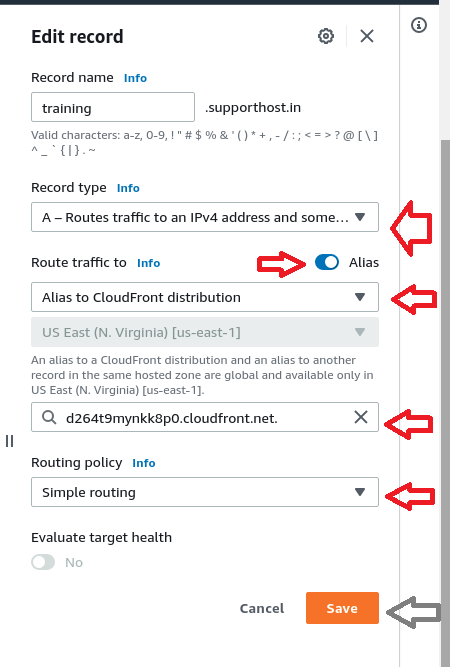
Wait for completing the DNS propagation and if we test the domain using curl, we can see “Server: CloudFront”. The Curl command output is given below for your reference.
 curl -v example.com
* Rebuilt URL to: example.com/
*   Trying 11.3.45.2...
* TCP_NODELAY set
* Connected to example.com (11.3.45.2) port 80 (#0)
> GET / HTTP/1.1
> Host: example.com
> User-Agent: curl/7.58.0
> Accept: */*
>
< HTTP/1.1 301 Moved Permanently
< Server: CloudFront
< Date: Fri, 31 Jul 2020 04:50:10 GMT
< Content-Type: text/html
< Content-Length: 183
< Connection: keep-alive
< Location: https://example.com/
< X-Cache: Redirect from cloudfront
< Via: 1.1 7d2d57745dfgfdgf.cloudfront.net (CloudFront)
< X-Amz-Cf-Pop: MAA50-C2
< X-Amz-Cf-Id: zsF3xHc3KIJ-asC-PkWl3I8uw==

<html>
<head><title>301 Moved Permanently</title></head>
<body bgcolor="white">
<center><h1>301 Moved Permanently</h1></center>
<hr><center>CloudFront</center>
</body>
</html>
* Connection #0 to host example.com left intact
* Connection #0 to host example.com left intact
This Completes the DNS changes for our WordPress Website. Now lets move to the Next section.
Now lets proceed with the Use of a Cache Plugin that support CloudFront. When we use WordPress plugin related to CloudFront for site acceleration, the plugin uses a subdomain, also known as an alternate domain name or CNAME, to send your website’s traffic through CloudFront.
Without this plugin, all the traffic of your website’s viewers goes to the server that hosts your WordPress website. So lets get started. Lets use a Plugin named W3TC.

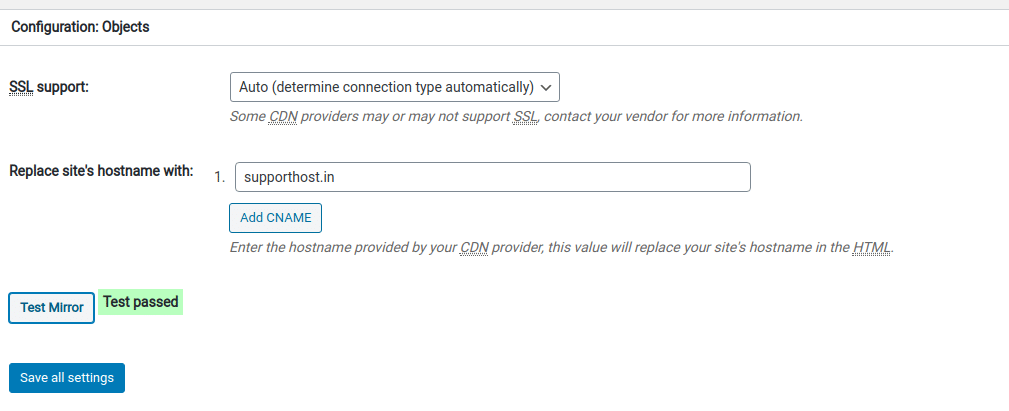
Okay, this completes setting up our WordPress Cache plugin W3TC for using our created CloudFront distribution.
In this article we discussed about how to Setup CloudFront for our WordPress Website. Enabling CloudFront for our Website will usually improve response time. I hope this article is informative. Leave your thoughts at below comment box.