标签: wordpress

  • 多个wordpress共享同一用户数据库

    多个wordpress共享同一用户数据库

    有朋友在问wordpress是不是可以实现多个wordpress共享同一用户数据库。

    思路

    1.两个wordpress站共享用户数据,其他(文章、主题、设置等)数据不共享。

    2.共享cookie,即登录A站后切换为B站后仍为登录状态。

    教程

    前提:A、B两站为同顶级域名(a.abc.com与b.abc.com)或同根目录(abc.com/a与abc.com/b)

    A为主站,B共享A的用户数据,新建B,安装时数据库选择和A同一数据库下,A的数据库表头为wp_,B的改为和A的不一样,如:wp2_,安装B站时管理员任意填写,反正用不到(B站的管理员账户从A站)。

    打开B站的wp-config.php文件,添加:

    define('CUSTOM_USER_TABLE', 'wp_users');
    define('CUSTOM_USER_META_TABLE', 'wp_usermeta');


    这时候,用A的用户数据去登录B,可以登录但无后台权限。

    然后在A的functions.php添加:

    add_action( 'user_register', 'dup_capabilities' );
    add_action('profile_update', 'dup_capabilities');
    function dup_capabilities( $user_id ){
    //在这里设置数据表前缀,所有站的数据库表前缀全部写上即可。
    $prefixs = array('wp_','wp2_');
    global $table_prefix;
    $cap_val = get_user_meta( $user_id, $table_prefix.'capabilities',true);
    if( !empty( $cap_val ) ) {
    foreach( $prefixs as $prefix ){
    if( $prefix != $table_prefix )
    update_user_meta( $user_id, $prefix.'capabilities', $cap_val );
    }
    }
    }
    

    然后回头管理员身份登录A站,后台用户编辑功能里把每个用户重新编辑一下,不修改任何信息即可。编辑过后,就可以用A站的账户登录B站了。

    所以如果要做类似数据共享的站,最好是在一开始主站用户数量很少的时候就开始操作,不然一个个用户编辑下去也很麻烦。

    A作为主站,操作用户数据或注册新用户就在A站上操作,然后同步给B。

    <span style="color: #ff0000;">(以下没测试,请自行测试:</span>
    
    <span style="color: #ff0000;">如果在B站上注册新用户是否能同步给A,可以在B的functions.php里也添加以上代码)</span>

    这时候A站B站不同cookie,无法免登陆自由切换,接下来实现同步cookie。

    打开A站的wp-config.php文件,复制身份认证密钥,共8行。

    把B站的身份认证密钥替换为A的,保证A、B一模一样。

    在A、B两站的wp-config.php文件里同时添加:

    define('COOKIEPATH', '/');
    define('COOKIE_DOMAIN', '这里填写A、B两站的顶级域名');
    define('SECRET_SALT', '这里任意自定义一串字符串或密码');
    define('ADMIN_COOKIE_PATH', '/');
    define('SITECOOKIEPATH', '/');
    define('COOKIEHASH', md5('这里任意自定义一串字符串或密码'));
  • WordPress 6.3+ 火车头/高铁采集器发布插件 免登录发布接口

    WordPress 6.3+ 火车头/高铁采集器发布插件 免登录发布接口

    最近发现博客突然不更新了,有点诧异,难道一直用的采集器接口有问题了。其实自动更新到WordPress 6.3已经有一段时间了,今天才有时间来看下是什么原因。

    直接接口测试,提示发布成功。。。。。 但是后台看不到,无语子。

    打开代码调试下看看,发现了一个Fatal Error,有个php8开始弃用的函数

    get_magic_quotes_gpc 

    直接把这个删除,自己采集其实判断这个没有太大用处,是防注入的。

    再跑下,还是不行,继续调试代码。

    居然看到一段代码是有Bug的,不知道是哪个新手实习生写的代码了。

    找到错误修改起来自然就简单了。

    代码放到附件了,有需要的下载吧。

  • WordPress无缝配合CloudFront实现CDN加速

    WordPress无缝配合CloudFront实现CDN加速

    Introduction

    AWS cloudfront or Amazon cloudfront is a content delivery network(CDN) service. It deliver data into end users up on request through secure, low latency, high speed network. The AWS CDN physical servers, are integrated to AWS global infrastructure and with other AWS services like Amazon EC2, Amazon S3, Load Balancing etc.

    Benefits

    • Amazon CloudFront is globally distributed with highly-resilient Amazon backbone network.
    • We don’t have to pay for any data transferred between AWS other services and with CloudFront.
    • Highly programmable using Lambda@Edge functions and can run our custom codes.
    • Amazon CloudFront supports API calls, WebSocket traffic. Also supports proxy methods like POST, PUT, OPTIONS, DELETE and PATCH.
    • CloudFront has the option of modifying the original Headers from client.

    Normal Work Flow of AWS CloudFront.

    • An End User access a website and request and image object to download through browser.
    • DNS service route the end user request to the nearest CloudFront edge location.
    • CloudFront edge location server checks its cache for the requested files and return the results to the end user.

    The pricing

    The Amazon CloudFront charges are mainly based on below areas. The details can be found from the AWS website and using AWS monthly calculator. There will be a slight change in price according to the Region.

    DATA TRANSFER OUT (INTERNET/ORIGIN)
    HTTP/HTTPS REQUESTS
    INVALIDATION REQUESTS
    FIELD LEVEL ENCRYPTION REQUESTS
    DEDICATED IP CUSTOM SSL CERTIFICATES ASSOCIATED WITH A CLOUDFRONT DISTRIBUTION

    Currently the aws cloudfront has 216 Points of Presence or edge locations available or called by the name amazon CDN locations. Each edge locations are inter connected and sync our data automatically. The updated list can be found from the Amazon website itself.

    Benefits of Using cloudfront In WordPress

    • WordPress holds 28% of the web market share but there is room for improvement. Here comes the picture of cloudfront in WordPress.
    • Cloundfront increase the performance of our website by reducing server load.
    • It reduces the cost of operating your WordPress infrastructure by reducing Resource Allocation.
    • Reduces the traffic towers to the origin server by serving cached results to the end users.
    • The DNS server will hit the CloudFront CDN first and serve a copy of the content to the end users from cache and from the closet aws cloudfront edge locations related to the end user Geo location. The Cloudfront will pull content from the behind application servers or any other integrated service as it becomes new or something changed.
    • We will have option for cloudfront gzip which can reduce the size of the data send to end users by 70 percent.
    • Have the option named cloudfront http2 which will also support http2 versions.

    Some CloudFront definitions.

    TerminologyDefinitions
    DistributionAn DNS endpoint name we can use to send traffic. Normally we point our domain name to the distribution via DNS
    OriginThis is where our applications hosted. An origin can be either an Amazon S3 bucket or an HTTP server.
    BehaviorA URL pattern and its associated caching behaviour.

    In our case we create multiple behaviors for the various WordPress URL requests and all that using single Origin and Distribution. Example Behavior are like WordPress admin pages should never be cached and other pages can be cached for a period of time.

    In the case of WordPress, we have the following files/folders to think about

    Folder Paths or FilesContent or Usage
    /wp-content/* and /wp-includes/*Most of the static assets and theme files will likely be here
    /wp-admin/* and /wp-login.php*The admin pages
    /wp-json/*The root URL for the REST API
    /contact/Replace this url with your own contact form url
    /wp-signup.phpUsed for visitor signups if your site supports it
    /wp-trackback.phpBlog post trackback functionality
    /xmlrpc.phpThe WordPress API
    /wp-cron.phpWordPress scheduled task functionality
    /.well-known/*This is a required route for Let’s Encrypt postbacks
    Everything elseHomepage, sub pages, blog posts, etc.

    So lets get started and see how we can setup Amazon CloudFront with WordPress.

    Section 1. Create Cache Policy

    Using this policy key settings we specify the values in viewer requests that CloudFront includes in the cache key. The values that we include in the cache key are automatically included in requests that CloudFront sends to the origin. For WordPress websites we need create cache policy like below.

    For that Log into the AWS management panel and go to the “CloudFront service” section.

    Under “Policy” option and under “Cache” tab click “Create cache policy” button

    A new window will open from there use below settings and hit create button.

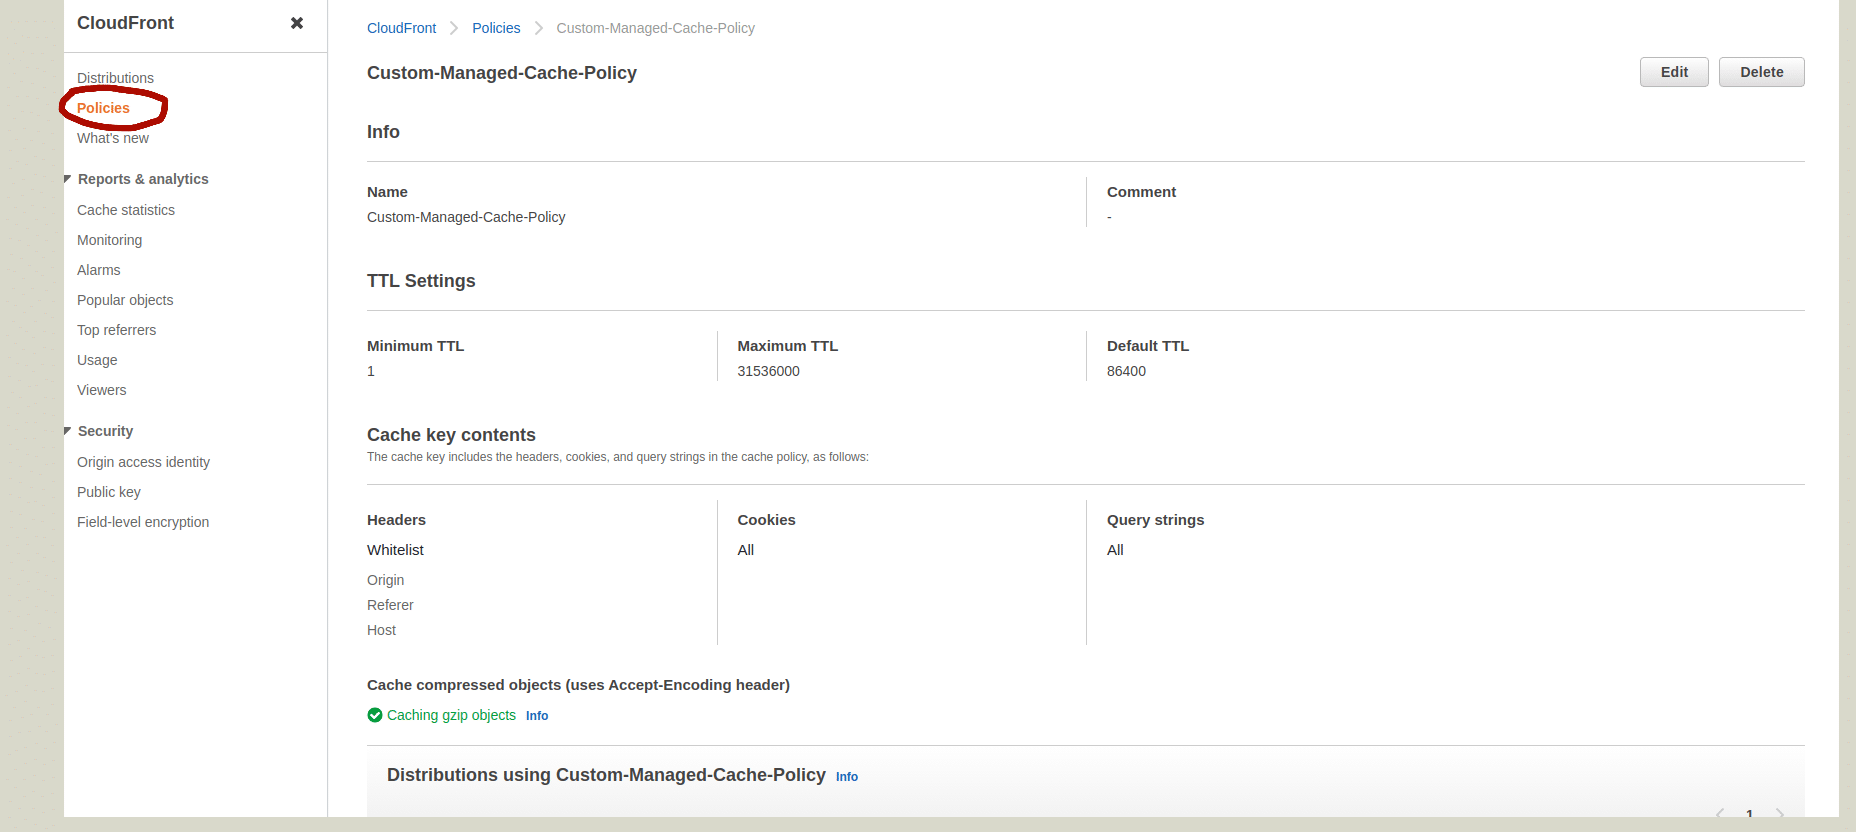
    Give a Name for Policy we create, Like “Custom-Managed-Cache-Policy”.
    Minimum TTL 1
    Maximum TTL 31536000
    Default TTL 86400
    Whitelist the headers “Host,origin and Referer”
    Allow “All” for Cookies and Query Strings.
    Compression support gzip only

    Refer above screenshot so you will get an idea about how the cache policy will look like. Now lets move to the next section.

    Section 2. Create Origin Request Policy

    In this section we are creating our own origin request policy to customise the information from the viewer request that you want CloudFront to include in the origin request for proper working of our WordPress websites. We needed this because Some information from the viewer request, such as URL query strings, HTTP headers, and cookies, is not included in the origin request by default. So lets get started.

    From the AWS management panel itself and go to the “CloudFront service” section.

    Under “Policy” option and under “Origin Request” tab click “Create origin request policy” button

    A new window will open from there use below settings and hit create button.

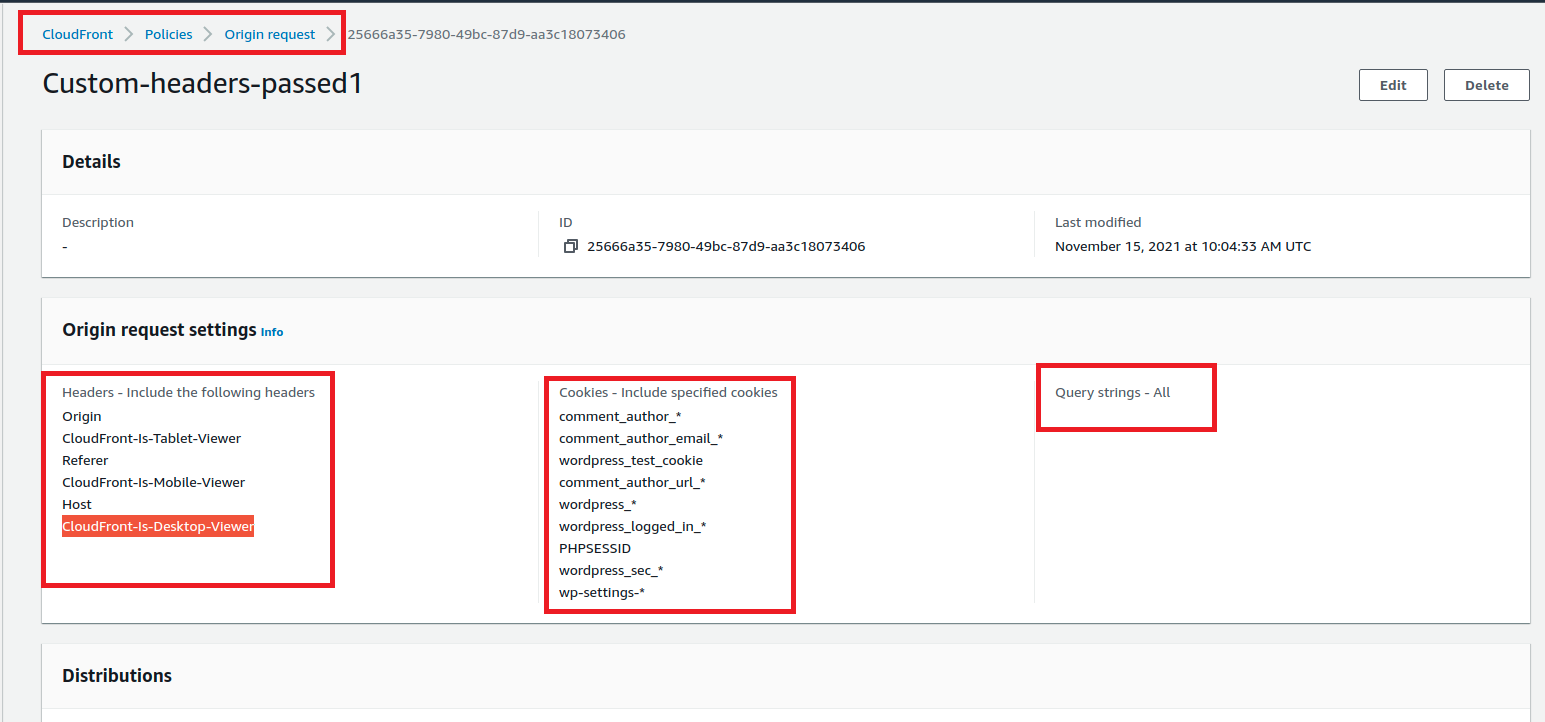
    Give a name like “Custom-headers-passed”
    whitelist the headers “Host,origin, Referer , CloudFront-Is-Desktop-Viewer, CloudFront-Is-Mobile-Viewer and CloudFront-Is-Tablet-Viewer”
    WordPress makes extensive use of cookies, and we need forward at least below cookiescomment_author_*
    comment_author_email_*
    comment_author_url_*
    wordpress_logged_in_*
    wordpress_test_cookie
    wp-settings-*
    PHPSESSID
    wordpress_*
    wordpress_sec_*
    There are lots of places where WordPress will use query strings in the URL, so we need to instruct CloudFront how to handle those as well. So Choose “All”

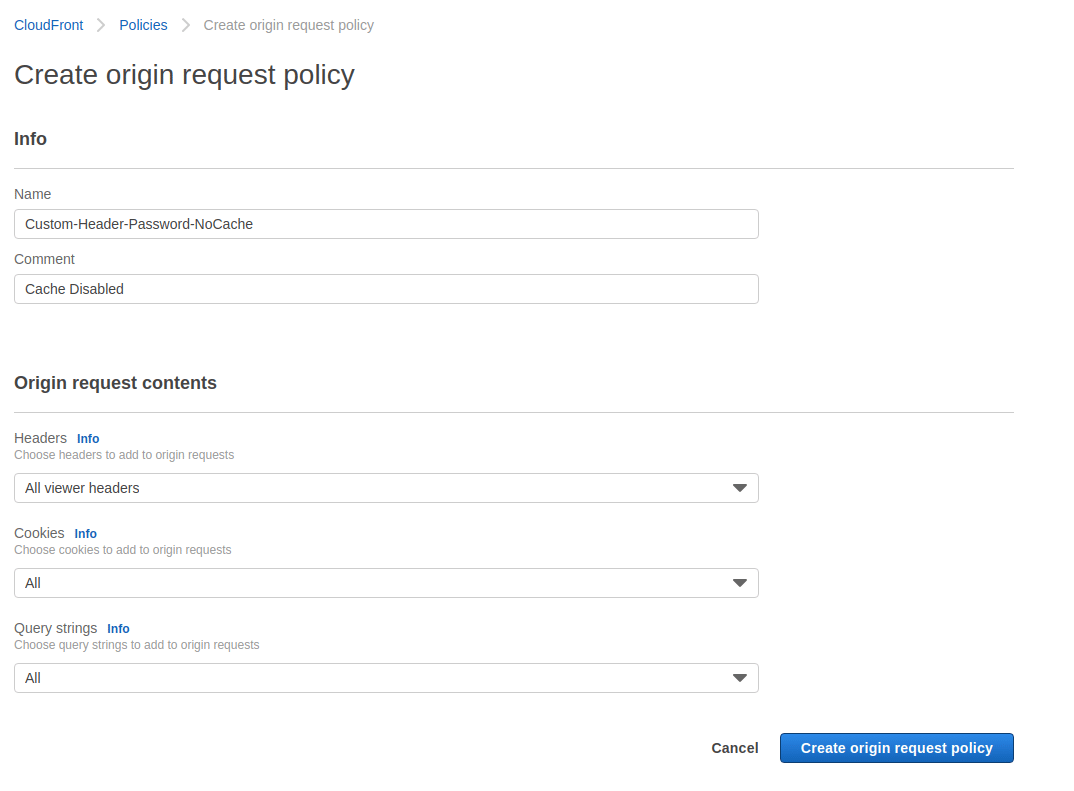
    Now Again create Another Origin request Policy with name “Custom-Header-Passed-NoCache”. In that use below settings and hit create button.

    Headers – All viewer headers
    Cookies – All
    Query strings – All

    Okay, by creating above two origin request policy, using one policy  we define selected Headers pass to or forward to origin from Cloudfront as per the origin request policy. We Choose only minimum Host headers that we need to pass. This policy will later used for caching the client request types according to the behaviour under our Cloudfront distribution.

    Using the other origin policy  our CloudFront  distribution will not cache objects but will instead send all requests to your Origin for processing. This policy will be used for WordPress URL request types that we don’t wish to cache by Cloudfront.

    Suppose we use any policy with Headers, Cookies and query string values as “None” then CloudFront could serve the wrong content in certain circumstances, such as when you host content for multiple websites on the same server. So make sure you don’t use any such Origin policy for your Cloudfront distribution.

    So in short we will use these policy according to different type of Behaviour we create on our Cloudfront distribution. Below screenshots will show the settings of two origin request  policy we created.

    Okay, this completes the creation of Custom Origin policy section. Now lets move to the next section.

    Section 3. Issue SSL Certificate

    In this section we are issuing SSL certificate for our WordPress domain name using “AWS Certificate Manager”. The SSL issues through ACM is free of cost. Once we purchased it Normally it will be issued with in 15 Min.

    During the creation of Cloudfront distribution we normally input our websites name in the Alternate Domain Names (CNAMEs) filed. In such cases for those domain names SSL is must thing other wise we will get error like below during the creation of Cloudfront distribution.

    Error occurred
    Bad request.
    (InvalidChangeBatch 400: RRSet of type CNAME with DNS name example.com. is not permitted at apex in zone example.com.)

    So lets see how this can be implemented. We already discussed the steps for issuing SSL/TLS certificate using “AWS Certificate Manager” as a separate blog article. Refer below link if you are looking to issue SSL certificate other wise move to next section. I am not mentioning the steps in this article for avoiding the duplication.

    Section 4. Create Distribution

    In this section we are creating the Cloudfront distribution for our WordPress website. By default CloudFront distribution caches all requests to the origin specified by Origin definition. Means behaves as full page cache and we also have the option to implement custom origin-pull patterns. So lets get started.

    Log into the AWS management panel and go to the “CloudFront service” section.

    Under Distribution click on “Create Distribution”

    The create distribution window will open. In that the first section is origin.

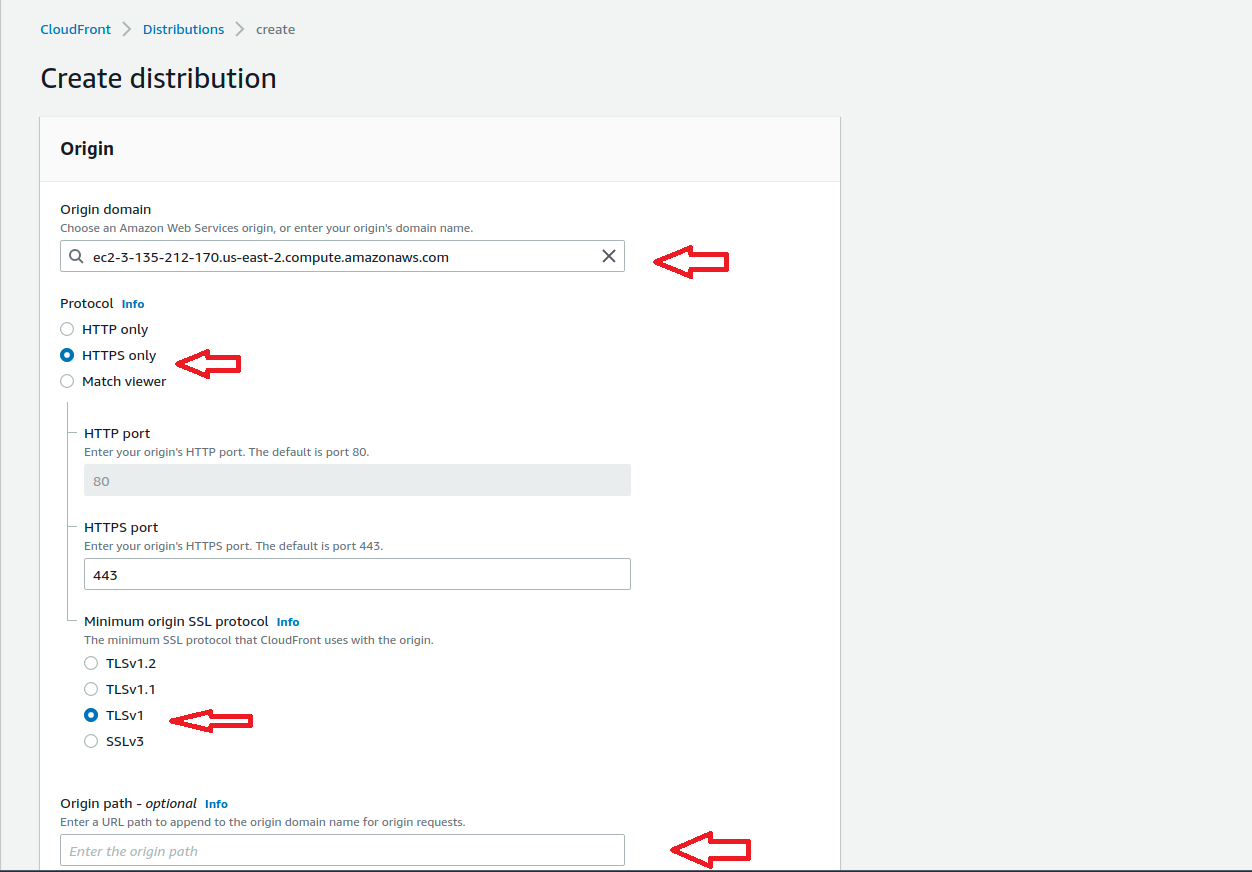
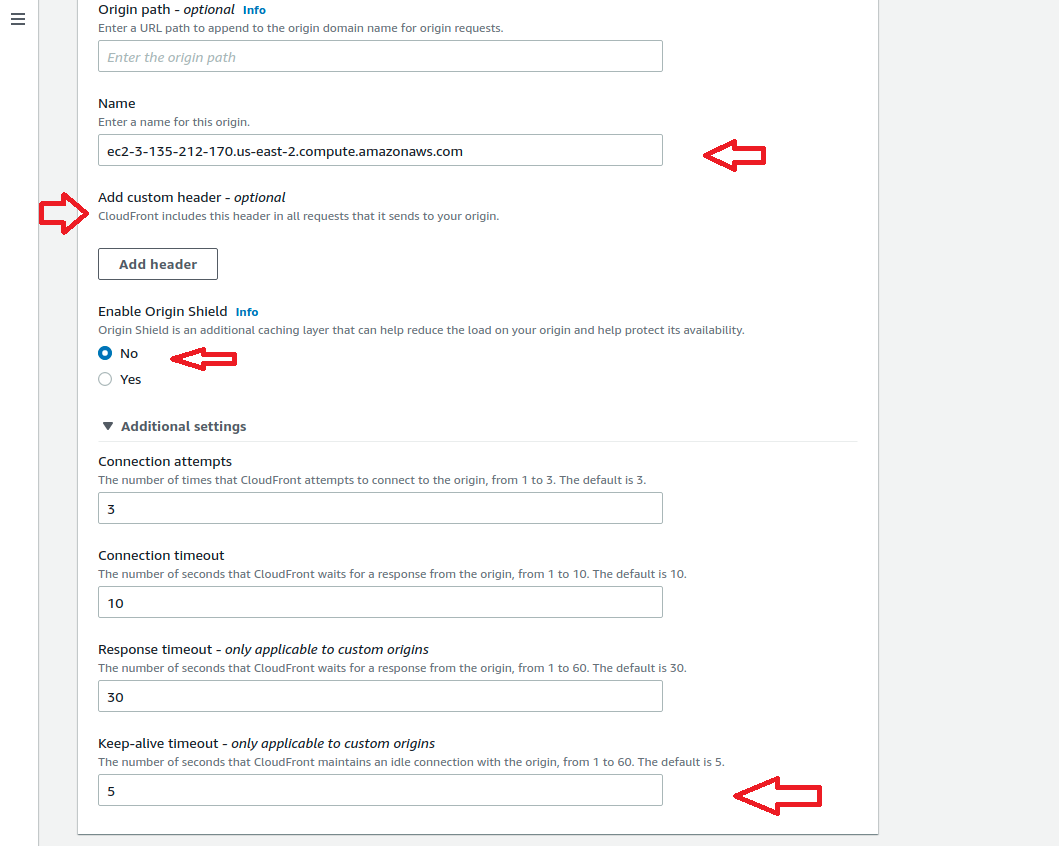
    • In the “Origin Domain Name” field use our Public DNS host-name of EC2 instance where our WordPress Website Hosted because the ec2 instance is our HTTP server.
    • Choose the “Origin Protocol Policy” as “HTTPS Only”. This is how CloudFront communicates with our Origin WordPress EC2 instance server.
    • Choose “Minimum Origin SSL Protocol” as “TLSv1” even though Amazon suggest to use the latest supported one by the server. But the problem with that, is some time the end user having older version of browser will have an issue with loading our website over HTTPS.
    • Leave the filed “Origin path” as blank. By using this filed we can modify the header send by the end user and can insert our desired value.
    • The “Origin name” field will be auto filled and it will be our EC2 instance Public DNS host-name. So Leave it as it is.
    • Leave the “Add custom header” option as blank. We don’t want to insert any customer header value in the origin request.
    • Choose Enable Origin Shield option as “No”. The Origin Shield is is an additional caching layer that can help reduce the load on your origin and help protect its availability but right now we are not choosing this option.
    • Change the value for ” Keep-alive timeouts” into “60” if you website is having low traffic other wise leave it with the default value “5”.
    • Leave other timeout related settings as it is. Basically this time out settings deals with how CloudFront will handle requests to our origin server.
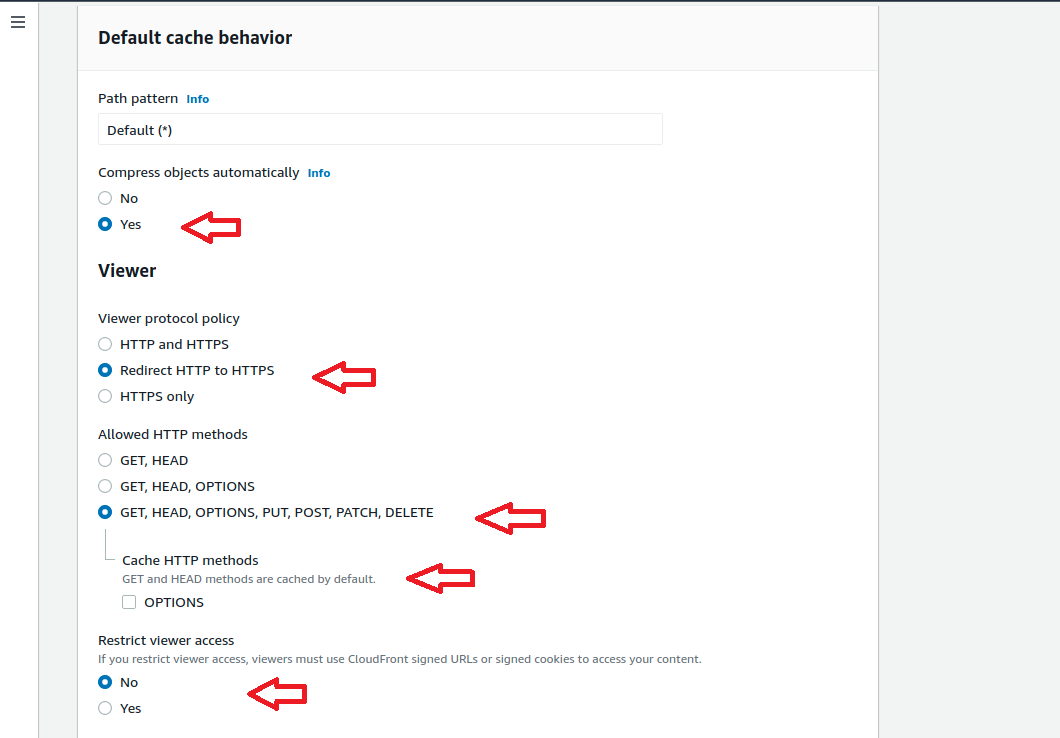
    • Choose the “Compress objects automatically” as yes. CloudFront will compress certain files when the requesting viewer
      or browser includes the header: “Accept-Encoding: gzip”. Delivering compressed objects will improve performance for your users.
    • Choose “Viewer Protocol Policy” as ” Redirect HTTP to HTTPS “. This controls how our end users connect to Cloudfront.
    • Choose ” Allowed HTTP Methods ” as ” GET, HEAD, OPTIONS, PUT, POST, PATCH, DELETE ” because, WordPress use POST methods.
    • Cached HTTP methods, leave it as it is.
    • Choose “Restrict Viewer Access(Use Signed URLs or Signed Cookies) as “No”
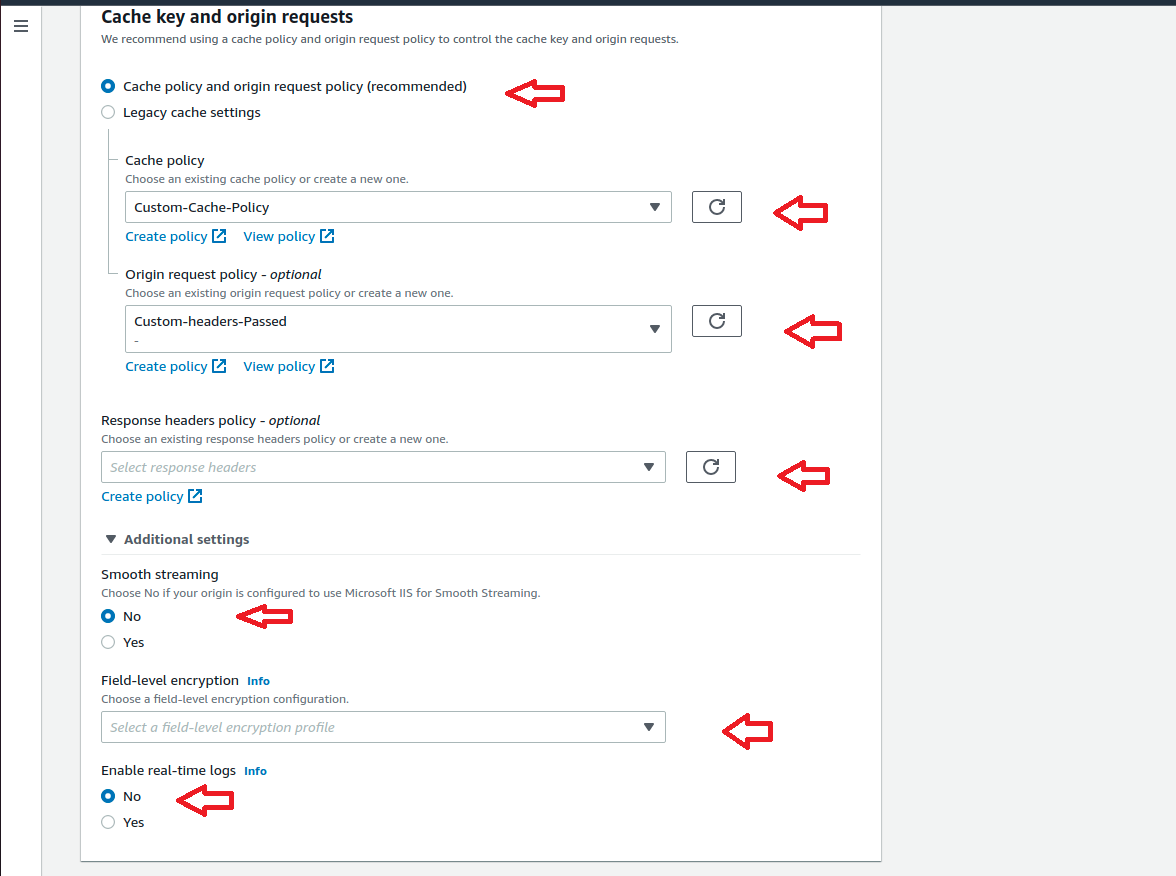
    • Choose “Cache policy and origin request policy” for Cache key and origin requests.
    • In “Cache Policy” choose our cache policy named “Custom-Cache-Policy” from the drop down menu available next to it.
    • In the “Origin Request Policy”  choose the origin policy as “Custom-headers-passed” from the drop down menu.
    • Leave the “Response Headers Policy” as blank.
    • Choose “Smooth Streaming” as No
    • Leave “Field Level Encryption” option  as blank.
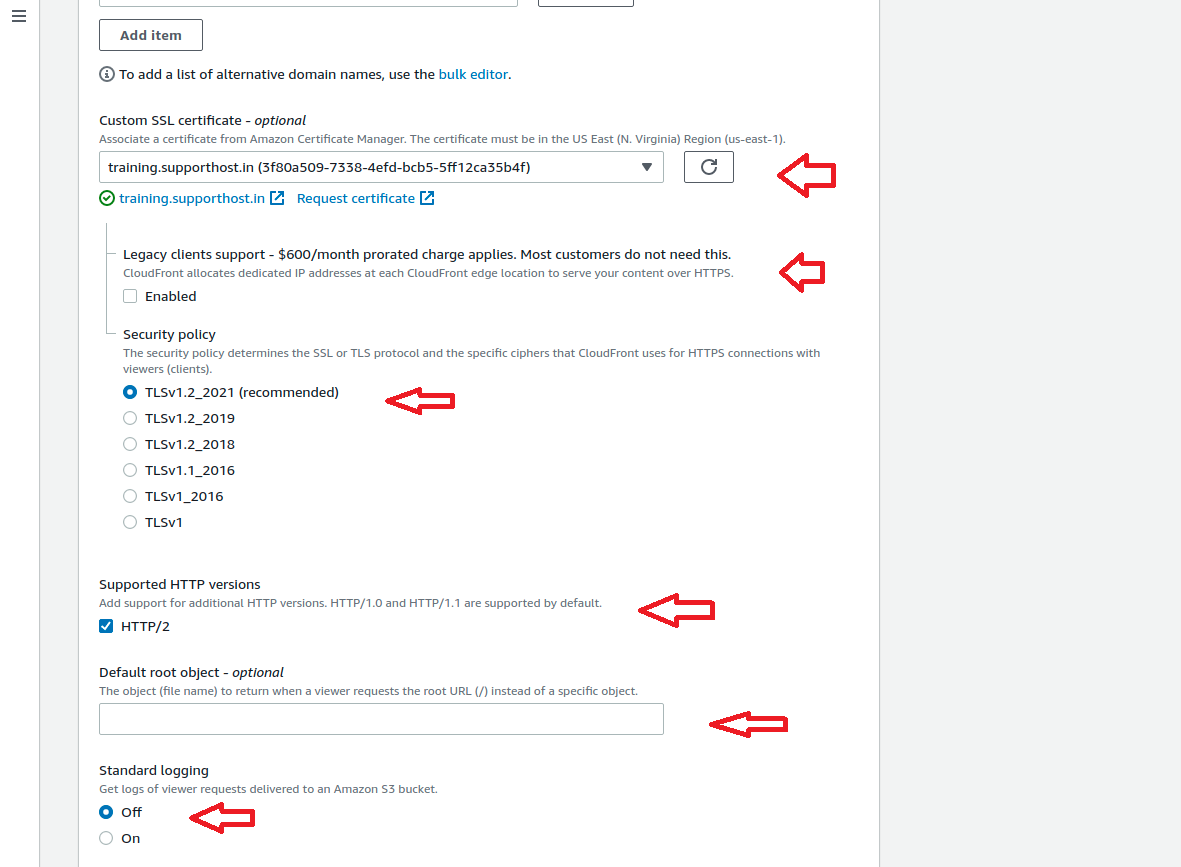
    • Choose “Enable real-time logs” option as No. This only need to enable when we need to debug our cloudfront requests.
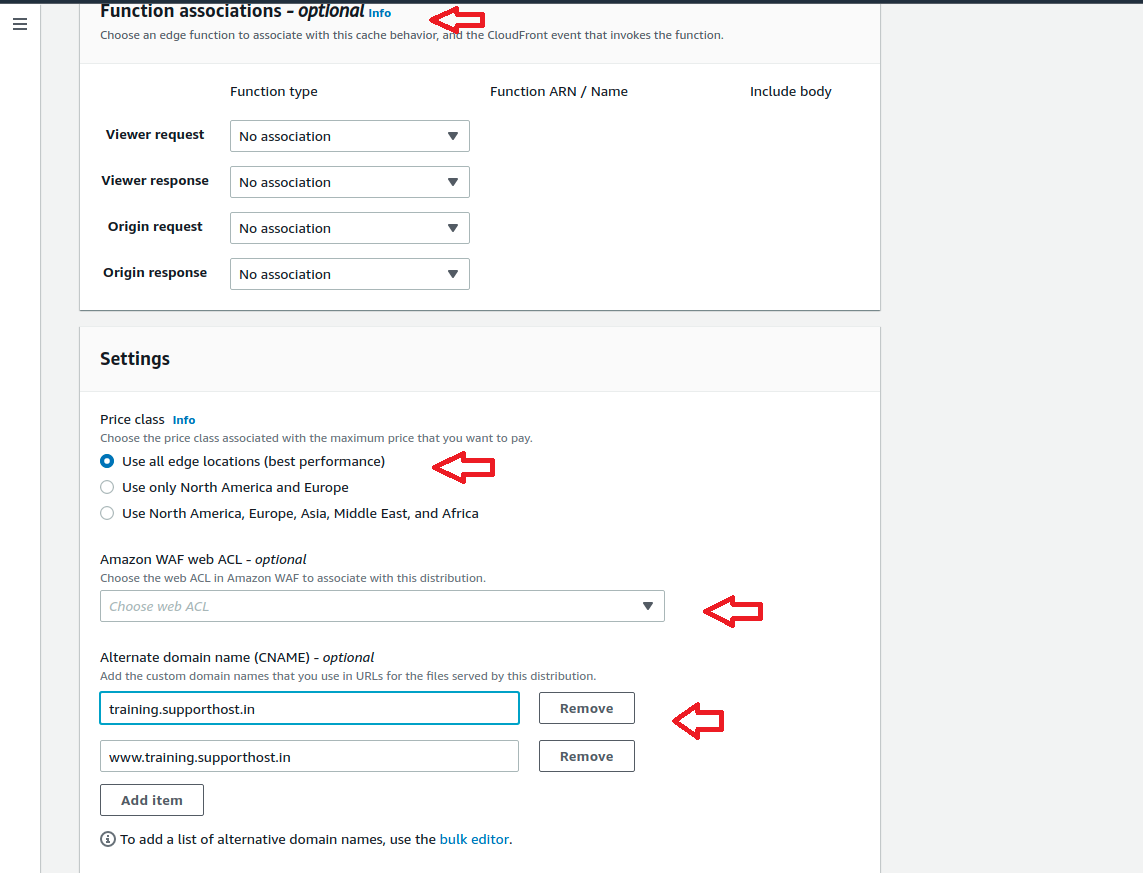
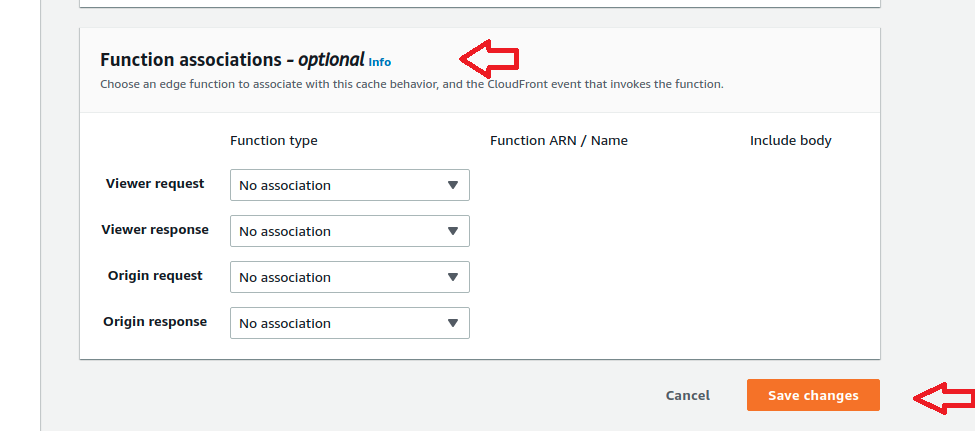
    • Leave the “Function associations ” option as blank.
    • In “Price Class” Choose ” Use All Edge Locations”
    • AWS WAF Web ACL as ” None “
    • Alternate Domain Names (CNAMEs)  field give our domain names, like example.com and www.example.com
    • Choose  our  website “SSL Certificate”  generated through AWS certificate manager  from drop down menu available for  ” Custom SSL certificate” option.
    • Leave the “Legacy Clients Support” option as it is. Don’t enable this option.
    • Security Policy as ” TLS1.2_2021″
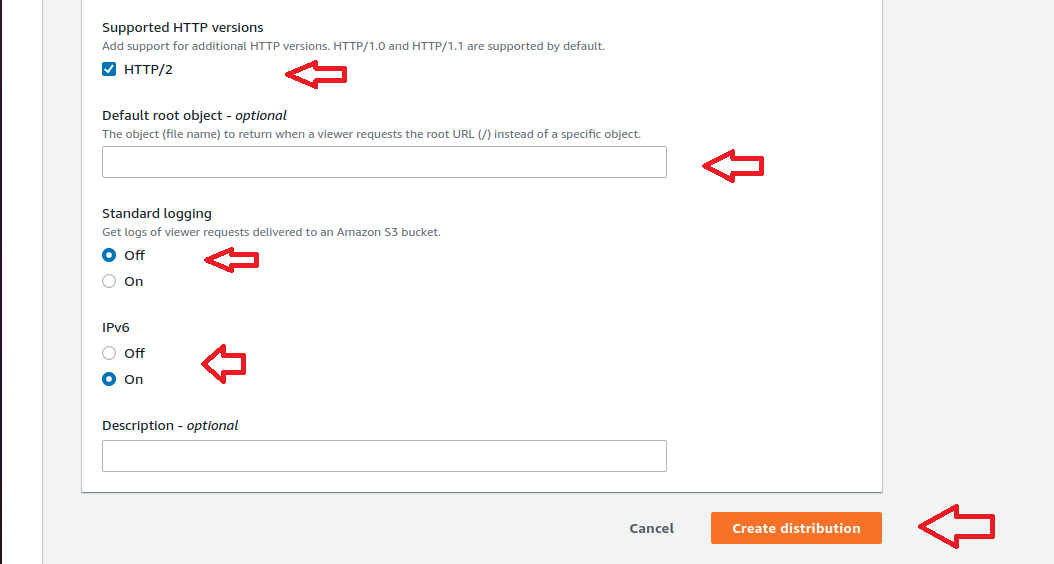
    • Choose Supported HTTP Versions as  “HTTP/2, HTTP/1.1, HTTP/1.0”
    • Default Root Object , leave as blank, only needed when our website is hosted in S3 bucked
    • Choose Logging  option as  “Off”
    • Choose Enable IPv6  option as  “yes”

    Finally verify the setting again by referring above screenshots and Click Create Distribution. Initially we can see the Cloudfront in progress status and after few minutes we can see the status as “Deployed” and ready to use. This completes the Creation of CloudFront Distribution. Now lets move to the Next section.

    Section 5. Edit Distributions Behaviour.

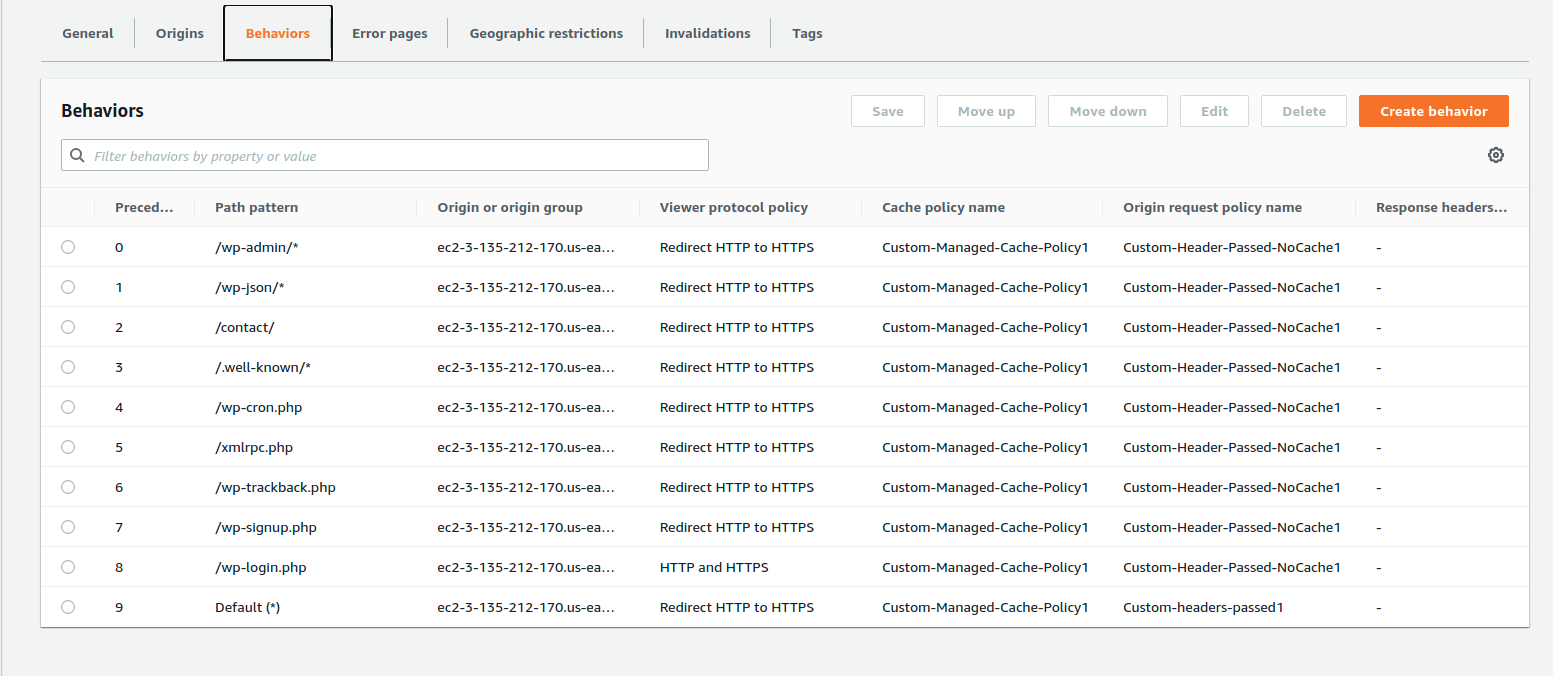
    In this section we edit the default behaviour of our created distribution which is to cache all request types. But we also need not to cache some of the WordPress URL request pattern types which are give below. We don’t need our wp-admin area and other links mentioned above to be cached by Cloudfront because caching above URL patterns will cause issues to the proper working of a WordPress website. So lets see how these can be done.

    URL PatternUse CasesCaching Status
    /wp-login.phpThe admin pagesNo
    /wp-admin/*The admin pagesNo
    /wp-json/*The root URL for the REST APINo
    /contact/Our Web page contact form url.Replace this url with your own contact form urlNo
    /.well-known/*This is a required route for Let’s Encrypt postbacksNo
    /wp-cron.phpWordPress scheduled task functionalityNo
    /xmlrpc.phpThe WordPress APINo
    /wp-trackback.phpBlog post trackback functionalityNo
    /wp-signup.phpUsed for visitor signups if your site supports itNo

    For that from AWS Panel itself , under Cloudfront services, click on CloudFront Distributions

    click  on ID corresponding to our cloudfront distribution created.

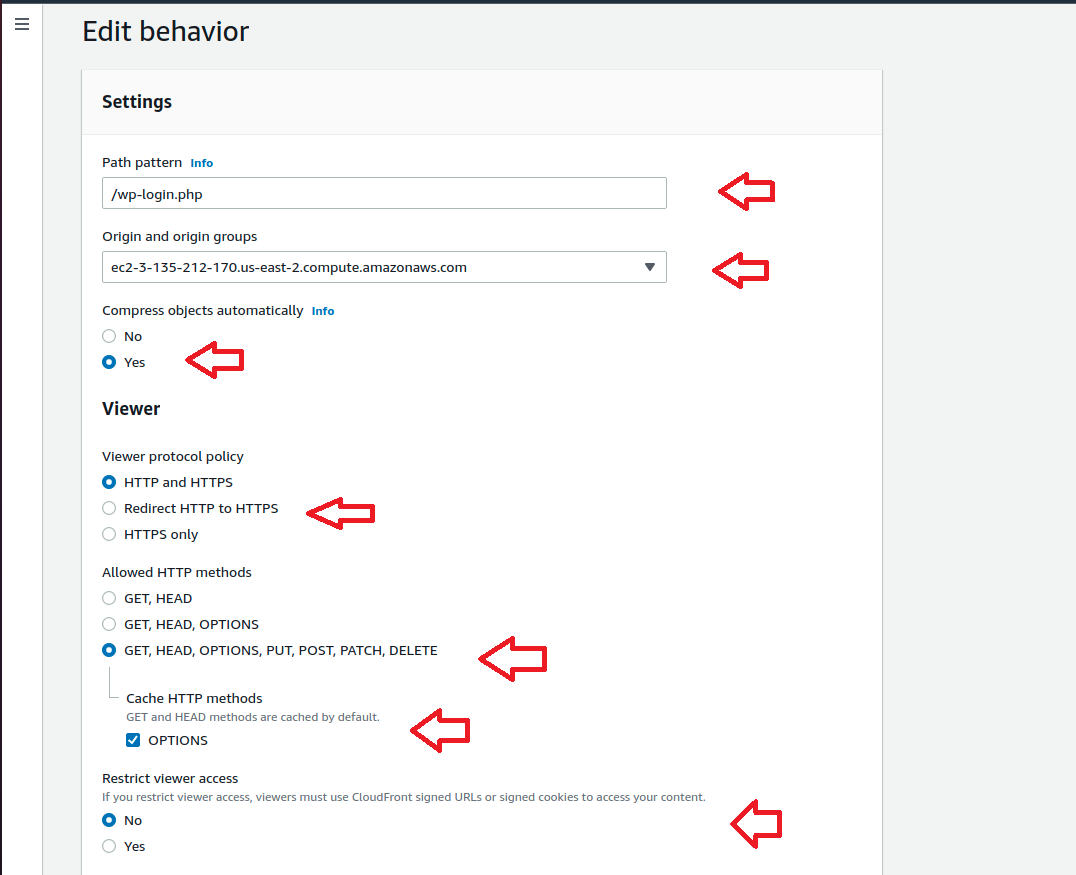
    Click “Behaviour” tab >> Click create New behaviour and use below settings.

    We need to create  new behaviour for each of above listed WordPress URL from the “create behaviour” window. For each behaviour only Path pattern field changes according to the url request types but the rest of the settings will be same.

    • In Path pattern field Give our url like /wp-login.php
    • In Origin or Origin Group   Choose our EC2 instance name available.
    • Choose ” Compress Objects Automatically” as “Yes”.
    • In Viewer Protocol Policy  choose “Redirect HTTP to HTTPS”
    • In Allowed HTTP Methods  choose “GET, HEAD, OPTIONS, PUT, POST, PATCH, DELETE”
    • Cached HTTP methods Choose “Options” too
    • Choose “Restrict Viewer Access(Use Signed URLs or Signed Cookies) as “No”
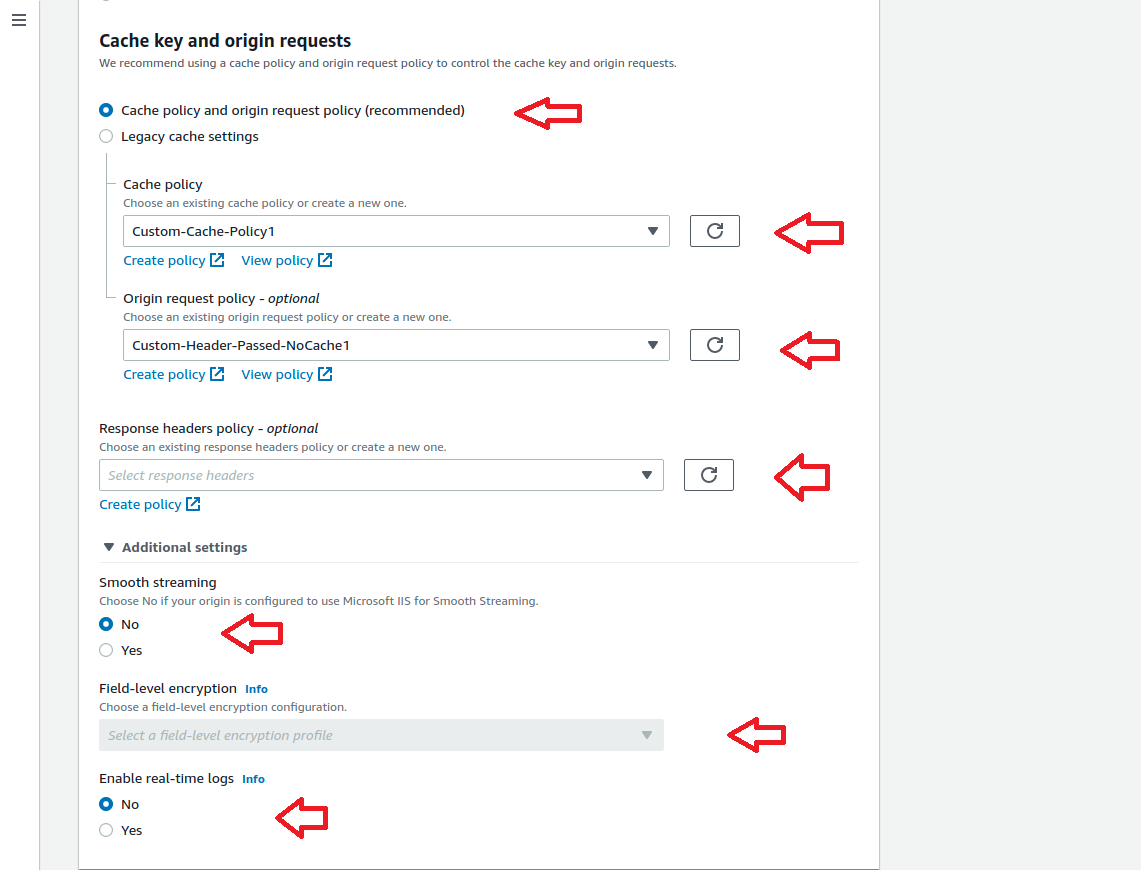
    • Choose “Cache key and Origin Request policy ” as  “Cache policy and origin request policy”
    • Choose Cache Policy as “Custom-managed-Cache-Policy”, this is the cache policy we created in earlier section.
    • Now for the “origin Request Policy”  choose  policy named “Custom-header-Passed-NoCache”. Using this policy we are instructing our CloudFront distribution to not cache when the url request type is /wp-login.php.
    • Leave “Response Header policy” option as blank.
    • Leave “Field-level Encryption Config” as blank.
    • Choose “Smooth Streaming”  as No
    • Choose “Enable real time logs ” as No
    • Leave function associations  option as blank and Save it.

    Repeat the above steps for each URL path pattern. Once completed, the behaviour tab will look like below.

    Now we excluded above WordPress related URL from cached by CloudFront. We don’t need our wp-admin area and other links mentioned above to be cached by CloudFront because caching above URL patterns will cause issues to the proper working of a WordPress website. This completes the editing the behaviour of CloundFront distribution we created. Now lets move to the next section.

    Section 6. Change DNS.

    In this section we are changing our WordPress website DNS A record. For that go the DNS manager section of your own website and create a CNAME pointing www.example.com or example.com at your CloudFront Distribution DNS endpoint. Also don’t forget to delete the existing DNS A records from making conflicts.

    If you are using Route53 as your DNS zone manager. If try to change the record type as CNAME for existing DNS A record type and input the CloudFront Distribution DNS endpoint name. We will get below error.

    Error occurred
    Bad request.
    (InvalidChangeBatch 400: RRSet of type CNAME with DNS name example.com. is not permitted at apex in zone example.com.)

    In order to fix For that go back to AWS panel again
    From the services section choose Route 53 service
    click “Hosted zones” option from the left side
    Now click our website name and the existing DNS records will show up
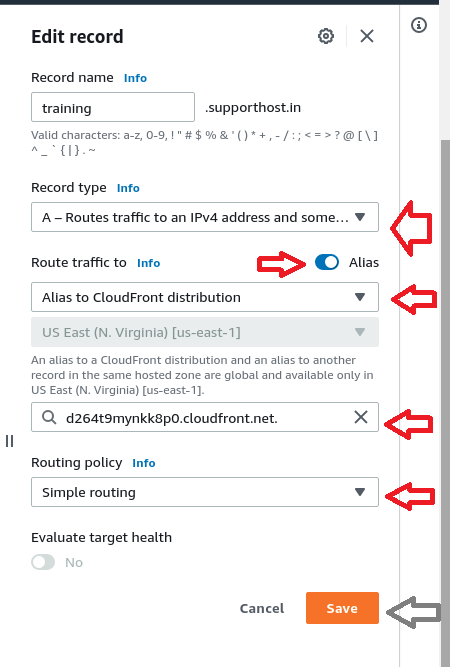
    select our domain DNS A record and click edit from the right side options

    Choose the Record Type as ” Route traffic to an IPV4 address and somw AWS resources”
    and then enable the alias option
    and then in the route traffic to option, from the drop down menu choose ” alias to cloudfront distribution ”
    gave the CloudFront Distribution DNS endpoint name in the next drop down menu. We can also get the cloudfront distribution DNS endpoint name from the cloudfront services section too.

    Refer below screenshot for a reference.

    Wait for completing the DNS propagation and if we test the domain using curl, we can see “Server: CloudFront”. The Curl command output is given below for your reference.

     curl -v example.com
    * Rebuilt URL to: example.com/
    *   Trying 11.3.45.2...
    * TCP_NODELAY set
    * Connected to example.com (11.3.45.2) port 80 (#0)
    > GET / HTTP/1.1
    > Host: example.com
    > User-Agent: curl/7.58.0
    > Accept: */*
    > 
    < HTTP/1.1 301 Moved Permanently
    < Server: CloudFront
    < Date: Fri, 31 Jul 2020 04:50:10 GMT
    < Content-Type: text/html
    < Content-Length: 183
    < Connection: keep-alive
    < Location: https://example.com/
    < X-Cache: Redirect from cloudfront
    < Via: 1.1 7d2d57745dfgfdgf.cloudfront.net (CloudFront)
    < X-Amz-Cf-Pop: MAA50-C2
    < X-Amz-Cf-Id: zsF3xHc3KIJ-asC-PkWl3I8uw==
    
    <html>
    <head><title>301 Moved Permanently</title></head>
    <body bgcolor="white">
    <center><h1>301 Moved Permanently</h1></center>
    <hr><center>CloudFront</center>
    </body>
    </html>
    * Connection #0 to host example.com left intact
    * Connection #0 to host example.com left intact

    This Completes the DNS changes for our WordPress Website. Now lets move to the Next section.

    Section 7. Use WordPress Cache Plugin

    Now lets proceed with the Use of a Cache Plugin that support CloudFront. When we use WordPress plugin related to CloudFront for site acceleration, the plugin uses a subdomain, also known as an alternate domain name or CNAME, to send your website’s traffic through CloudFront.

    Without this plugin, all the traffic of your website’s viewers goes to the server that hosts your WordPress website. So lets get started. Lets use a Plugin named W3TC.

    Setting Up W3TC

    • Log in to the WordPress administration panel.
    • Browse to the “Plugins” menu page and ensure that the “W3 Total Cache” plugin is installed. If not install it.
    • Activate the plugin by clicking the “Activate” link.
    • Browse to the “Performance -> General Settings” page.
    • In the “CDN” section, enable “CDN” and set the “CDN Type” field to “Generic Mirron”. Click the “Save Settings and Purge Caches” button.
    • Browse to the “Performance -> CDN” page.
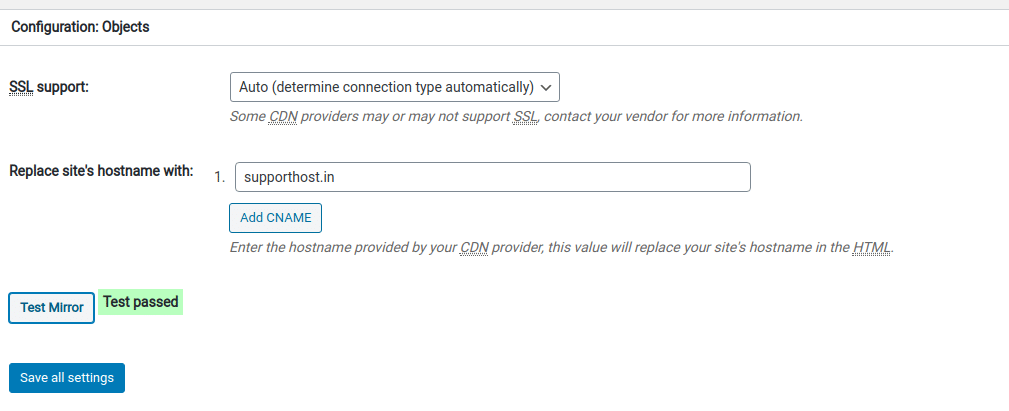
    • In the “Configuration: Objects” section
    • In the “Replace Sites Hostname” filed with your own domain name. Click On “Test Mirror” Button and Make sure we get Passed message. Save the settings.

    Okay, this completes setting up our WordPress Cache plugin W3TC for using our created CloudFront distribution.

    Conclusion.

    In this article we discussed about how to Setup CloudFront for our WordPress Website. Enabling CloudFront for our Website will usually improve response time. I hope this article is informative. Leave your thoughts at below comment box.

  • WordPress 6.x 外部入库接口php文件(可适用于火车头,高铁,ET等)

    建议配合这个发布模块使用

    [b2_insert_post id=”638″]


    <?php
    /*
    WordPress免登录发布接口,支持最新Wordpress6.x
    
    更新说明
    T3: 2023.7.03
    1、优化了验证标题重复
    2、优化了附件、图片、缩略图的上传和生成
    
    ■ 功能特性:
    
    分类(category):
    1、分类支持分类名和分类ID, 系统自动判断
    2、多分类处理(多个分类请用逗号隔开)
    3、自动创建分类,如果网站内没有这个分类,会自动创建分类。
    4、自动创建父分类, 适用于想要设置父分类并且网站中不存在. 使用方法: WEB发布模块/高级功能/内容发布参数/ -> 增加 post_parent_cate
    5、添加分类描述 使用方法: WEB发布模块/高级功能/内容发布参数/ -> 增加 category_description
    
    标签:
    1、多标签处理(多个标签请用逗号隔开)
    
    作者:
    1、多作者处理, 可设置多个作者随机发布文章, 发布参数中指定post_author
    2、自定义作者功能,如果提交的数据为用户名的话,会自动检测系统是否存在该用户,如果已存在则以该用户发布,不存在则自动新建用户(接口以针对中文用户名进行了处理)
    
    图片和缩略图:
    1、Web图片上传,无需FTP上传
    2、自动设置【标签:内容】的第一张图片为文章的特色图片.
    3、支持自定定义缩略图(特色图像) 使用方法: WEB发布模块/高级功能/文件上传设置/ 增加 缩略图所在的标签,表单名为: thumb递增数字
    3、标准的php.ini单次最大文件上传数为20个, 如果发布的内容附件超过20个,将会出错. 如果遇到此问题请更改php.ini的max_file_uploads 参数 . 或者更换上传方式为FTP
    
    时间和预约发布:
    1、正确的时间格式为2017-10-01 23:45:55或者2017-10-01 23:45
    2、自动处理服务器时间与博客时间的时区差异
    3、随机时间安排与预约发布功能: 可以设定发布时间以及启用预约发布功能. 启用预约发布后,如果POST过来的数据包涵时间,则以时间为准立即发布,反之则以接口文件配置时间发布。
    
    评论:
    1、发布评论,支持评论时间、评论作者、评论内容, 需要在火车头->Web发布模块/内容发布参数/ ->新增 comment、commentdate、commentauthor三个参数,分别对应评论内容、评论时间、评论作者. 三个参数缺一不可
    
    其它:
    1、标题重复判断, 打开参数配置中的$checkTitle,即可判断标题是否重复,对于重复结果不予发布.
    2、发布文章后自动ping,需要再后台设置->撰写->更新服务 填入ping地址
    3、'pending review' 更新文章状态pending(审核) 为 publish(所有人可见)
    
    自定义字段
    1、使用方法: WEB发布模块/高级功能/内容发布参数/ -> 增加 post_meta['字段名']
    
    自定义文章类型(post_type)
    1、使用方法: WEB发布模块/高级功能/内容发布参数/ -> 增加 post_type
    
    自定义文章形式(post_format)
    1、使用此功能需要修改配置参数 $postformat=true;并在火车头->Web发布模块/内容发布参数/->新增发布参数post_format, 标签内容必须为: 图像: post-format-image 视频: post-format-video
    
    自定义分类(taxonomy):
    1、使用方法: WEB发布模块/高级功能/内容发布参数/ -> 增加 post_taxonomy, 使用taxonomy之后, 文章只能发布在taxonomy所属的分类下, 分类名称或者ID请填写在分类category
    
    自定义分类--多个分类--(taxonomy):
    1、使用方法: WEB发布模块/高级功能/内容发布参数/ -> 增加 post_taxonomy_list[taxonomy_name], 使用后可以将文章归属到多个自定义分类下, 多个term必须使用|||隔开
    
    自定义分类信息(add_term_meta)
    1、使用方法: WEB发布模块/高级功能/内容发布参数/ -> 增加 post_cate_meta['meta_key'], 标签内容可以为文本或者数组,数组必须参照格式: key$$value|||key$$value|||key$$value
    
    模块参数列表:
    post_title 必选 标题
    post_content 必选 内容
    tag 可选 标签
    post_category 可选 分类
    post_date 可选 时间
    post_excerpt 可选 摘要
    post_author 可选 作者
    category_description 可选 分类信息
    post_cate_meta[name] 可选 自定义分类信息
    post_meta[name] 可选 自定义字段
    post_type 可选 文章类型 默认为'post'
    post_taxonomy 可选 自定义分类方式
    post_format 可选 文章形式
    
    */
    
    //-------------------配置参数开始,根据需要修改-------------------------
    $post_author_default = 1; //默认作者的id,默认为admin(这里是作者ID号码,并非作者名)
    $post_status = 'future'; //立即发布 pending 审核 draft 草稿箱
    $time_interval = '1'; //发布时间间隔,单位为秒 。可设置随机数值表达式,如12345 * rand(0,17),设置为负数可将发布时间设置为当前时间减去这里设置的时间
    $post_next = 'now'; //now:发布时间=当前时间+间隔时间值 //next: 发布时间=最后一篇时间+间隔时间值
    $post_ping = false; //发布后是否执行ping
    $translate_slug = false; //是否将中文标题转换为MD5值,如需开启请设置为true或MD5值长度,建议设置为大于10,小于33的数字。
    $secretWord = false; //接口密码,如果需要密码,则设为$secretWord='你的密码';
    $checkTitle = false; //检测标题是否重复
    $postformat = true; //开启文章形式
    //-------------------配置参数结束,以下请勿修改-------------------------
    
    //开始
    if(isset($_GET['action'])){
    $hm_action=$_GET['action'];
    }else{
    die("操作被禁止>");
    }
    
    $post = $_POST;
    
    include_once "./wp-config.php";
    if($post_ping) require_once("./wp-includes/comment.php");
    
    if($hm_action== "list"){
    hm_print_catogary_list();
    }elseif($hm_action== "update"){
    hm_publish_pending_post();
    }elseif($hm_action == "save"){
    //检查通讯密码
    if (isset($secretWord)&&($secretWord!=false)) {
    if (!isset($_GET['secret']) || $_GET['secret'] != $secretWord) {
    die('接口密码错误,请修改配置文件或者修改发布参数,保持两者统一。');
    }
    }
    
    extract($post);
    //判断标题是否为空
    if ($post_title=='[标题]'||$post_title=='') {die('标题为空');}
    //检查标题是否重复
    if($checkTitle){
    $post_title = trim(hm_strip_slashes($post_title));
    $sql = "SELECT `ID` FROM $wpdb->posts WHERE `post_title` = '$post_title'";
    $t_row = $wpdb->query($sql);
    if($t_row) {die('标题重复,发布成功');};
    }
    //判断标题是否为空
    if ($post_content=='[内容]'||$post_content=='') {die('内容为空');}
    //检查自定义文章类型
    if (empty($post_type) || strpos($post_type, '[') || strpos($post_type, ']')) {$post_type='post';}
    //检查自定义分类目录
    if (empty($post_taxonomy) || strpos($post_taxonomy, '[') || strpos($post_taxonomy, ']')) {$post_taxonomy='category';}
    //检查分类描述是否未设置
    if (empty($category_description) || strpos($category_description, '[') || strpos($category_description, ']')) {$category_description='';}
    //检查自定义字段
    if(array_key_exists('post_meta', $post)){$post_meta = $post['post_meta'];}
    //检查自定义分类信息
    if(array_key_exists('post_cate_meta', $post)){$post_cate_meta = $post['post_cate_meta'];}
    //检查发布时间
    if (!isset($post_date) ||strlen($post_date)<8) $post_date=false;
    //检查作者
    if (empty($post_author)) {
    $post_author=$post_author_default;
    } else {
    $post_author=hm_add_author($post_author);
    }
    
    $post_content = fileHandle('fujian',$post_content);
    fileHandle('thumb');
    
    hm_do_save_post(array('post_title'=>$post_title,
    'post_content'=>$post_content,
    'post_category'=>$post_category,
    'post_excerpt'=>$post_excerpt,
    'post_type'=>$post_type,
    'post_taxonomy'=>$post_taxonomy,
    'tags_input'=>$tag,
    'post_date'=>$post_date,
    'post_author'=>$post_author,
    'fujianid'=>$fujianid));
    echo '发布成功';
    }else{
    echo '非法操作['.$hm_action.']';
    }
    
    //附件处理
    //$filename 附件名称
    //$content 标签内容,为空返回首张图片ID
    function fileHandle($filesnames, $content = null)
    {
    global $thumbid;
    if (!empty($_FILES[$filesnames.'0']['name'])) {
    require_once('./wp-load.php');
    require_once('./wp-admin/includes/file.php');
    require_once('./wp-admin/includes/image.php');
    $i = 0;
    while (isset($_FILES[$filesnames.$i])) {
    $fujian[$i] = $_FILES[$filesnames.$i];
    $filename = $fujian[$i]['name'];
    $fileExt=array_pop(explode(".", $filename));
    //附件保存格式【时间】
    $upFileTime=date("YmdHis");
    //更改上传文件的文件名为时间+随机数+后缀
    $fujian[$i]['name'] = $upFileTime."-".uniqid().".".$fileExt;
    $uploaded_file = wp_handle_upload($fujian[$i], array('test_form' => false));
    $content = str_replace("\'".$filename."\'", "\"".$uploaded_file[url]."\"", $content);
    $content = str_replace($filename, $uploaded_file[url], $content);
    if (isset($uploaded_file['error'])) {
    echo "文件上传失败";
    wp_die($uploaded_file['error']);
    }
    $file = $uploaded_file['file'];
    $new_file = iconv('GBK', 'UTF-8', $file);
    $url = iconv('GBK', 'UTF-8', $uploaded_file['url']);
    $type = $uploaded_file['type'];
    $attachment = array(
    'guid' => $url,
    'post_mime_type' => $type,
    'post_title' => $filename,
    'post_content' => '',
    'post_status' => 'inherit'
    );
    $attach_id = wp_insert_attachment($attachment, $new_file);
    if (strpos($fujian[$i]['type'], 'image') !== false) {
    if(empty($thumbid) || $filesnames == 'thumb') $thumbid = $attach_id;
    $attach_data = wp_generate_attachment_metadata($attach_id, $file);
    $attach_data['file'] = iconv('GBK', 'UTF-8', $attach_data['file']);
    foreach ($attach_data['sizes'] as $key => $sizes) {
    $sizes['file'] = iconv('GBK', 'UTF-8', $sizes['file']);
    $attach_data['sizes'][$key]['file'] = $sizes['file'];
    }
    wp_update_attachment_metadata($attach_id, $attach_data);
    }
    $i++;
    }
    }
    return $content;
    }
    
    function hm_tranlate($text)
    {
    global $translate_slug;
    $pattern = '/[^\x00-\x80]/';
    if (preg_match($pattern,$text)) {
    $htmlret = substr(md5($text),0,$translate_slug);
    } else {
    $htmlret = $text;
    }
    return $htmlret;
    }
    
    function hm_print_catogary_list()
    {
    $cats = get_categories("hierarchical=0&hide_empty=0");
    foreach ((array) $cats as $cat) {
    echo '<<<'.$cat->cat_ID.'--'.$cat->cat_name.'>>>';
    }
    }
    
    function hm_get_post_time($post_next="normal")
    {
    global $time_interval;
    global $wpdb;
    
    $time_difference = absint(get_option('gmt_offset')) * 3600;
    $tm_now = time()+$time_difference;
    
    if ($post_next=='now') {
    $tm=time()+$time_difference;
    } else { //if ($post_next=='next')
    $tm = time()+$time_difference;
    $posts = $wpdb->get_results( "SELECT post_date FROM $wpdb->posts ORDER BY post_date DESC limit 0,1" );
    foreach ( $posts as $post ) {
    $tm=strtotime($post->post_date);
    }
    }
    return $tm+$time_interval;
    }
    
    function hm_publish_pending_post()
    {
    global $wpdb;
    $tm_now = time()+absint(get_option('gmt_offset')) * 3600;
    $now_date=date("Y-m-d H:i:s",$tm_now);
    $wpdb->get_results( "UPDATE $wpdb->posts set `post_status`='publish' WHERE `post_status`='pending' and `post_date`<'$now_date'" );
    }
    
    function hm_add_category($post_category, $post_taxonomy = 'category')
    {
    if (!function_exists('wp_insert_category')) {include_once "./wp-admin/includes/taxonomy.php";}
    global $wpdb,$post_cate_meta,$post_parent_cate,$category_description;
    $post_category_new=array();
    $post_category_list= array_unique(explode(",", $post_category));
    foreach ($post_category_list as $category) {
    $cat_ID =$category;
    if (!isInteger($cat_ID) || $cat_ID < 1) {
    $category = $wpdb->escape($category);
    $term = get_term_by('name',$category,$post_taxonomy,'ARRAY_A');
    $cat_ID = $term['term_id'];
    if($cat_ID == 0){
    //检查父分类是否存在和创建父分类->start
    if(!empty($post_parent_cate) && $post_parent_cate != '[父分类]')
    {
    $parent = intval($post_parent_cate);
    if($parent == 0){
    $post_parent_cate = $wpdb->escape($post_parent_cate);
    $term = get_term_by('name',$post_parent_cate,$post_taxonomy,'ARRAY_A');
    $cat_ID = $term['term_id'];
    if($parent == 0){
    $parent = wp_insert_category(array('cat_name'=>$post_parent_cate, 'taxonomy'=>$post_taxonomy));
    }
    }
    $cat_ID = wp_insert_category(array('cat_name'=>$category, 'category_description'=>$category_description, 'category_parent'=>$parent, 'taxonomy'=>$post_taxonomy));
    
    }else{
    $cat_ID = wp_insert_category(array('cat_name'=>$category, 'category_description'=>$category_description, 'taxonomy'=>$post_taxonomy));
    }
    //检查父分类是否存在和创建父分类->end
    //定义分类信息->start
    if (!empty($post_cate_meta)) {
    foreach(array_unique(array_filter($post_cate_meta)) as $key => $value) {
    $value = strtoarray($value);
    add_term_meta($cat_ID, $key, $value);
    }
    }
    //定义分类信息->end
    }
    }
    array_push($post_category_new, $cat_ID);
    }
    return $post_category_new;
    }
    
    function add_category($post_category, $post_taxonomy = 'category')
    {
    if (!function_exists('wp_insert_category')) {include_once "./wp-admin/includes/taxonomy.php";}
    global $wpdb;
    $post_category_new=array();
    $post_category_list= array_unique(explode(",", $post_category));
    foreach ($post_category_list as $category) {
    $cat_ID =$category;
    if (!isInteger($cat_ID) || $cat_ID < 1) {
    $category = $wpdb->escape($category);
    $term = get_term_by('name',$category,$post_taxonomy,'ARRAY_A');
    $cat_ID = $term['term_id'];
    if($cat_ID == 0){
    $cat_ID = wp_insert_category(array('cat_name'=>$category, 'taxonomy'=>$post_taxonomy));
    }
    }
    array_push($post_category_new, $cat_ID);
    }
    return $post_category_new;
    }
    
    function isInteger($value){
    return is_numeric($value) && is_int($value+0);
    }
    
    function hm_add_author($post_author)
    {
    global $wpdb,$post_author_default;
    $User_ID =intval($post_author);
    if ($User_ID == 0) {
    $pattern = '/[^\x00-\x80]/';
    if (preg_match($pattern,$post_author)) {
    $LoginName = substr(md5($post_author),0,10);
    } else {
    $LoginName = $post_author;
    }
    $User_ID = $wpdb->get_col("SELECT ID FROM $wpdb->users WHERE user_login = '$LoginName' ORDER BY ID");
    $User_ID = $User_ID[0];
    if (empty($User_ID)) {
    $website = 'http://'.$_SERVER['HTTP_HOST'];
    $userdata = array(
    'user_login' => "$LoginName",
    'first_name' => $post_author,
    'user_nicename' => $post_author,
    'display_name' => $post_author,
    'nickname' => $post_author,
    'user_url' => $website,
    'role' => 'contributor',
    'user_pass' => NULL);
    $User_ID = wp_insert_user( $userdata );
    }
    $post_author = $User_ID;
    } else {
    $post_author = $post_author_default;
    }
    return $post_author;
    }
    
    function hm_strip_slashes($str)
    {
    if (get_magic_quotes_gpc()) {
    return stripslashes($str);
    } else {
    return $str;
    }
    }
    function checkDatetime($str){
    $date = strtotime($str);
    if($date > 31500000){
    return true;
    }else{
    return false;
    }
    }
    
    function formatdate($date){
    $d = date('Y-m-d');
    if(strpos($date, 'today') !== false){
    return str_replace('today at', $d, $date);
    }
    
    if(strpos($date, 'Today') !== false){
    return str_replace('Today at', $d, $date);
    }
    
    $dd = date('Y-m-d', time()-84600);
    if(strpos($date, 'yesterday') !== false){
    return str_replace('yesterday at', $d, $date);
    }
    
    if(strpos($date, 'Yesterday') !== false){
    return str_replace('yesterday at', $d, $date);
    }
    }
    
    //字符串转换为数组
    //字符串的格式必须为 //$str = 'eo_description$$seo_description|||seo_keywords$$seo_keywords|||seo_title$$seo_title';
    
    function strtoarray($str){
    if(strpos($str, '|||') !== false){
    $str = explode('|||', $str);
    if(strpos($str[0],'$$') !== false){
    foreach($str as $k => $v){
    $v = explode('$$', $v);
    $r[$v[0]] = $v[1];
    }
    $str = $r;
    }
    }
    return $str;
    }
    
    function hm_do_save_post($post_detail)
    {
    global $post,$post_author,$post_ping,$post_status,$translate_slug,$post_next,$post_meta,$comment,$commentdate,$commentauthor,$wpdb,$postformat,$post_format,$post_taxonomy_list,$thumbid;
    extract($post_detail);
    $post_title=trim(hm_strip_slashes($post_title));
    $post_name=$post_title;
    if ($translate_slug) $post_name=hm_tranlate($post_name);
    $post_name=sanitize_title( $post_name);
    if ( strlen($post_name) < 2 ) $post_name="";
    $post_content=hm_strip_slashes($post_content);
    $tags_input=str_replace("|||",",",$tags_input);
    if (isset($post_date) && $post_date && checkDatetime($post_date)) {
    $tm=strtotime($post_date);
    $time_difference = absint(get_option('gmt_offset')) * 3600;
    $post_date=date("Y-m-d H:i:s",$tm);
    $post_date_gmt = gmdate('Y-m-d H:i:s', $tm-$time_difference);
    } else {
    $tm=hm_get_post_time($post_next);
    $time_difference = absint(get_option('gmt_offset')) * 3600;
    $post_date=date("Y-m-d H:i:s",$tm);
    $post_date_gmt = gmdate('Y-m-d H:i:s', $tm-$time_difference);
    if ($post_status=='next') $post_status='publish';
    }
    $post_category=hm_add_category($post_category, $post_taxonomy);
    $post_data = compact('post_author', 'post_date', 'post_date_gmt', 'post_content', 'post_type', 'post_title', 'post_category', 'post_status', 'post_excerpt', 'post_name','tags_input');
    $post_data = add_magic_quotes($post_data);
    $postID = wp_insert_post($post_data);
    //设定缩略图
    set_post_thumbnail( $postID, $thumbid );
    
    //自定义分类方式(taxonomy)
    if($post_taxonomy != 'category' && !empty($post_taxonomy)){
    wp_set_object_terms($postID, $post_category, $post_taxonomy);
    }
    
    //多个自定义分类方式(taxonomy)
    if(!empty($post_taxonomy_list)){
    foreach($post_taxonomy_list as $k => $v){
    $v = strtoarray($v);
    if(is_array($v)){
    foreach($v as $kk => $vv){
    $vv = add_category($vv, $k);
    wp_set_object_terms($postID, $vv, $k);
    }
    }else{
    $v = add_category($v,$k);
    wp_set_object_terms($postID, $v, $k);
    }
    }
    }
    
    //归档文章形式->start
    if(!empty($post_format) && $postformat == true){
    if($post_format == 'post-format-image' || $post_format == 'post-format-video'){
    wp_set_post_terms($postID, $post_format, 'post_format');
    }
    }
    //归档文章形式->end
    
    //发布自定义栏目
    if (!empty($post_meta)) {
    foreach($post_meta as $key => $value) {
    $ret = add_post_meta($postID,$key,$value,true);
    if(!$ret){
    delete_post_meta($postID, $key);
    add_post_meta($postID,$key,$value,true);
    }
    }
    }
    
    //发布评论->start
    if(!empty($comment)){
    //格式化评论内容
    $comment = str_replace(array("\r\n", "\r", "\n"), "", $comment);
    $arraycomment = explode('|||', $comment);
    //格式化评论时间
    $commentdate = str_replace(array("\r\n", "\r", "\n"), "", $commentdate);
    $arraycommentdate = explode('|||', $commentdate);
    //格式化评论作者
    $commentauthor = str_replace(' ','',$commentauthor);
    $commentauthor = str_replace(array("\r\n", "\r", "\n"), "", $commentauthor);
    $arraycommentauthor = explode('|||', $commentauthor);
    //评论计数
    $comment_count = count($arraycomment) -1 ;
    //更新文章评论数
    $wpdb->get_results("UPDATE $wpdb->posts set `comment_count` = $comment_count WHERE `ID` = $postID");
    //写入评论
    foreach($arraycommentauthor as $k => $v){
    //判断评论时间
    if($v != ''){
    $format="Y-m-d H:i:s";
    $d = formatdate($arraycommentdate[$k]);
    $d = strtotime($d);
    if($d != ''){
    $date = date($format,$d);
    $gmtdate = gmdate($format, $d);
    }else{
    $date = date($format);
    $gmtdate = gmdate($format);
    }
    //写入数据库
    $res = $wpdb->get_results("INSERT INTO $wpdb->comments (`comment_post_ID`,`comment_author`,`comment_date`,`comment_date_gmt`,`comment_content`,`user_id`) VALUES ($postID,'$v','$date','$gmtdate','$arraycomment[$k]',1)");
    }
    }
    }
    //发布评论->end
    
    // 自定PING,需要再网站后台设置->撰写->更新服务器 下面填写PING地址
    if ($post_ping) generic_ping();
    }
    ?>


  • 最新火车头(高铁采集器)wordpress 6.X 免登陆发布模块

    最新火车头(高铁采集器)wordpress 6.X 免登陆发布模块

    本版本在wordpress6.3下不能正常发布,请使用下方最新支持wordpress6.3的版本

    [b2_insert_post id=”5465″]

    源码说明

    WordPress 6.x 5.x 4.x 都可以用本插件发布!!! 本站实测无错,请不必怀疑。

    更新说明

    1.  适用于火车头采集器7.6-9.6(同高铁采集器)
    2.  优化了验证标题重复
    3.  优化了附件、图片、缩略图的上传和生成
    4.  增加了对多个分类方式的发布参数(post_taxonomy_list),使用方法请参考功能特性
    5.  修复BUG: 分类名称如果含有数字会导致分类错误
    6.  旧版发布接口重新设计,新版本号为T1,以后不再对旧版升级维护.旧版本支持3.X-4.8.2
    7.  修复BUG:当规则中没有发布模块中某个参数时会导致发布数据异常(会显示db:标签名)
    8.  优化strtoarray函数

    功能特性

    1.分类(category):

    • 分类支持分类名和分类ID, 系统自动判断
    • 多分类处理(多个分类请用逗号隔开)
    • 自动创建分类,如果网站内没有这个分类,会自动创建分类。
    • 自动创建父分类, 适用于想要设置父分类并且网站中不存在. 使用方法: WEB发布模块/高级功能/内容发布参数/ -> 增加 post_parent_cate
    • 添加分类描述 使用方法: WEB发布模块/高级功能/内容发布参数/ -> 增加 category_description

    2.标签:

    • 多标签处理(多个标签请用逗号隔开)

    3.作者:

    • 多作者处理, 可设置多个作者随机发布文章, 发布参数中指定post_author
    • 自定义作者功能,如果提交的数据为用户名的话,会自动检测系统是否存在该用户,如果已存在则以该用户发布,不存在则自动新建用户(接口以针对中文用户名进行了处理)

    4.图片和缩略图:

    • Web图片上传,根据主题或网站后台设置自动生成缩略图,并自动设置第一张图片为文章的特色图片. 使用方法: WEB发布模块/高级功能/文件上传设置/->增加 图片所在的标签,表单名为: fujian递增数字
    • 自定定义缩略图(特色图像) 使用方法: WEB发布模块/高级功能/文件上传设置/ 增加 缩略图所在的标签,表单名为: thumb递增数字
    • 标准的php.ini单次最大文件上传数为20个, 如果发布的内容附件超过20个,将会出错. 如果遇到此问题请更改php.ini的max_file_uploads/2018/03 参数 . 或者更换上传方式为FTP

    5.时间和预约发布:

    • 正确的时间格式为2017-10-01 23:45:55或者2017-10-01 23:45
    • 自动处理服务器时间与博客时间的时区差异
    • 随机时间安排与预约发布功能: 可以设定发布时间以及启用预约发布功能. 启用预约发布后,如果POST过来的数据包涵时间,则以时间为准立即发布,反之则以接口文件配置时间发布。

    6.评论:

    • 发布评论,支持评论时间、评论作者、评论内容, 需要在火车头->Web发布模块/内容发布参数/ ->新增 comment、commentdate、commentauthor三个参数,分别对应评论内容、评论时间、评论作者. 三个参数缺一不可

    7.其它:

    • 标题重复判断, 打开参数配置中的$checkTitle,即可判断标题是否重复,对于重复结果不予发布
    • 发布文章后自动ping,需要再后台设置->撰写->更新服务 填入ping地址
    • ‘pending review’ 更新文章状态pending(审核) 为 publish(所有人可见)

    使用说明

    将locoy.php放到wordpress站点根目录
    编辑任务/选择”第三步: 发布内容设置”页面下的”Web发布配置管理”

  • 7B2主题破解版4.3.8(4.4.1)安装的一些注意事项

    7B2主题破解版4.3.8(4.4.1)安装的一些注意事项

    B2 Pro是一款非常不错的wordpress主题,一直也被作者认为是不可能破解的。然而现在开心版还是来了。

    开心版链接如下,为防止泛滥,象征性收10积分,请大家谅解。

    [b2_insert_post id=”422″]

    以下是7B2主题破解版4.3.8(4.4.1)安装的一些注意事项:

    [content_hide]

    首先主题是完整可用的,请不要对程序怀疑而放弃。

    安装的环境一定要注意,因为可以后台报错了但是前台没有显示。建议打开后台的php的错误日志,这样能及时找到问题。

    环境就是正常的安装就可以,新手使用bt或者amh都是不错的选择。

    有几个常遇见的问题分享下:

    1,无法登陆,文章页面的右侧小工具都没有加载。这是因为缺少了php的扩展所至。安装一下bcmath这个扩展就可以了。

    2,jwt_auth一定不要装,因为本身模板已经包含了,如果再装一个jwt_auth,会出现冲突导致无法登陆。

    3,环境最高只支持到php7.4,请不要使用更高的版本。

    4,loader.so和ioncube是有冲突的,所以二者只能选一。

    [/content_hide]

    如果以上都注意一下,应该就可以正常运行了。

    本站就是基于破解版运行的。有bug大家可以评论区告诉我。